
Installation and Operation


REV 2 - 1406051400
L-C2-387
13
INSTALLATION (cont.)
WALL MOUNT BRACKET
The wall mount bracket must be installed into the spacer
to assist in supporting the vent hood.
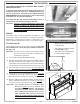
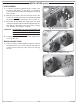
To install wall mount bracket to Fire Magic Spacer:
Fire Magic spacers are designed with pre-drilled holes and
include screws for ease of bracket installation.
1. Center the bracket (from left-to-right) over the channel
located on the front center of the Fire Magic Spacer.
2. Using a medium Phillips screwdriver and the large 1/4-
20 screws supplied with the spacer, secure the bracket
in place. The spacer has pre-drilled holes. See Fig. 13-1.
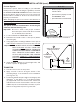
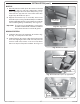
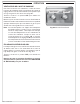
To install wall mount bracket to custom spacer:
The bracket should be centered from left to right on the
spacer. The horizontal position of the bracket center must be
7.125" down from the top of the vent hood/spacer. Alignment
notches are provided on the top, bottom, center, and sides
of the bracket to aid in proper location and leveling.
1. Locate the "left-to-right" center of the spacer and pencil
a vertical line. Then pencil a horizontal line 7.125" down
from the top of the spacer (see Fig. 13-2, A-B).
2. Place the bracket over the two lines. Use the alignment
notches in the top, bottom, center, and sides of the
bracket to properly locate and assist in leveling (see
Fig. 13-2, C).
3. Using appropriate mounting hardware for the spacer
construction; secure the bracket onto the spacer (see
Fig. 13-2, D).
Important: THE BRACKET MUST BE SECURED INTO
THE SPACER STUDS TO ENSURE PROPER
SUPPORT. A MINIMUM OF 4 SCREWS WITH
FENDER WASHERS MUST BE EVENLY
DISTRIBUTED AND FASTENED INTO TWO
STUDS. ADDITIONAL SCREWS WILL BE
REQUIRED ACROSS THE BRACKET INTO
THE SPACER WALL, FOR COMPLETE
SUPPORT.
To ensure a properly installed bracket, fi rst hand-
tighten all screws. Reposition the bracket as
needed, then fully tighten.
Fig. 13-2 Install wall bracket to custom spacer
Fig. 13-1 Install wall bracket to F.M. Spacer
A
C
D
7.125"
mark
center
B
align
Fire Magic
Spacer
Custom
Spacer