
Installation and Operation


REV 2 - 1406051400
L-C2-387
23
SERVICING AND CLEANING (cont.)
REPLACING HALOGEN BULBS
Important: ONLY REPLACE WITH 120V / 50 WATT
HALOGEN BULB(S).
Important: Wear gloves during this procedure for safety
and to maintain bulb life.
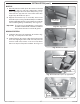
1. Ensure the power cord has been disconnected.
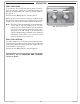
2. With one hand directly below the light assembly, gently
pry the glass lens out using a thin fl at-head screwdriver.
Slowly twist the screwdriver handle until the lens is
removed.
Note: Replacement should only be done on a light
assembly that is completely cool.
3. Clean the lens with a standard household window
cleaner, dry completely, and set aside.
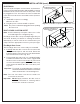
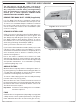
4. Gently remove the bulb from its socket.
5. Install a new 120V / 50 watt halogen bulb into the
socket, being sure that both pins are properly inserted.
Important: Bulb is halogen. DO NOT TOUCH with bare
hands. Oils from hands drastically reduce
bulb life.
6. Place the lens back into the fi xture and snap it into place.
Note: The curved cutout of the lens should align over the
bulb when replacing the lens.
7. Repeat as needed.
8. Reconnect the power cord and test.
Fig. 23-2 Replace bulb
Fig. 23-1 Light orientation
Glass lens
Bulb
Socket