
Owner's Manual


47
If you have trouble with the unit, please use this list to identify the problem. By trying one or more of the solutions
to the possible cause, you should be able to solve the problem. If this list does not cover your present problem, or
if you have other technical difficulties with the unit, please contact your local dealer.
* Important: Propane tanks are equipped with a safety shutdown
device that may cause low or no gas/flame at the
burners if operating and lighting instructions are
not followed exactly. If you suspect the propane
tank safety shutoff is in effect: 1) Shut off all grill
valves. 2) Shut off tank valve. 3) Open and close a
main burner valve. 4) Open tank valve. 5) Follow the
LIGHTING INSTRUCTIONS. Lighting instructions are
located in your owner’s manual and printed on the
unit’s metal drip tray. If the problem persists, continue
troubleshooting, or contact your local dealer or R. H.
Peterson for assistance.
PROBLEM POSSIBLE CAUSE CORRECTION
Accessories do
not operate
1. Power source not hooked to power supply
2. Master switch is off
1. Hook external power to unit.
2. Turn master switch on.
Ignition system
failure
1. Power source not hooked to power supply
2. Improper air shutter adjustment
3. Ignition wire disconnected
4. Low gas pressure
5. Front carry-over port
6. Blown fuse in power supply box
7. Igniter malfunction
8. Igniter switch malfunction on valve
1. Hook external power to unit.
2. Adjust air shutters.
3. Plug wires back into ignition switches.
4. Have the gas co. check pressure at unit.
5. Clean burner ports.
6. Replace the fuse. Reference the POWER SUPPLY
FUSE REPLACEMENT section.
7. Contact dealer for replacement.
8. Contact dealer for replacement.
Insufficient heat /
low flame
1. Burner ports clogged
2. Improper air shutter adjustment
3. Using propane orifice for natural gas
4. Low gas pressure/flame (propane)
5. Low gas pressure/flame (natural)
6. L.P. regulator hose cracked due to age
1. Clean burner ports. Burner maintenance kit available,
see Table 1.
2. Adjust air shutters.
3. Check/change orifices.
4. Shut off all valves, including propane tank, and follow
lighting instructions exactly. (See important note*
below.)
5. Have a qualified professional service technician check
for proper gas supply, setup, and pressure.
6. Replace L.P. regulator hose.
Uneven heating
1. Burner ports partially blocked by debris
2. Small spiders or insects in burner
3. Improper air shutter adjustment
1. Remove burners and clean out ports.
2. Inspect burners and orifices for spider webs or other
debris that may block flow.
3. Adjust air shutter.
Thermometer not
operating properly
1. Thermometer malfunction
1. Reset thermometer by turning master switch off then
back on.
Interior oven lights
& knob lights not
operating
1. Thermometer light switch not functioning
2. Interior or knob light(s) burned out
3. Light micro switch activation pin positioned
incorrectly
4. Light micro switch activation pin malfunction
1. Reset thermometer by turning master switch off then
back on.
2. Contact dealer for replacement.
3. Adjust control panel. See CONTROL PANEL REMOVAL
section.
4. Contact dealer for replacement.
Burner goes out on
LOW
1. Valve "Low" setting needs adjustment
1. Light burner on HIGH, immediately turn to LOW
setting. Remove knob from valve and using a small flat
screwdriver, slowly turn the adjustment screw in the
stem, a little at a time (30° to 45°), in either direction,
until the flame is approximately
1
/
4
" in height from
burner ports.
Rotisserie noisy
1. Rotisserie out of balance 1. Adjust rotisserie counterbalance.
Rotisserie doesn’t
turn but lights work
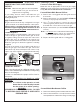
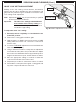
1. Elec. socket circuit breaker is tripped 1. Reset circuit breaker (See Fig. 47-1).
To reset the cart electrical outlets
press in hard on the reset (upper)
button until you hear an audible
click.
Note: The main power feed to the
cart must be on for the reset
switch to function. Open the
grill oven lid and turn on the
lights to verify that the unit
has electrical power before
resetting the breaker.
TROUBLESHOOTING