
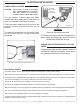
Installation Instructions


14
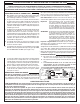
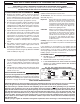
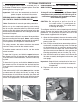
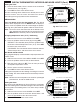
IDENTIFICATION OF GRILL CONTROLS
Fig. 14-1
Left
main burner
control
knob
Right
main burner
control knob
Digital thermometer
Center main burner
control knob
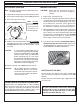
Fig. 14-2
Left
main
burner
control
knob
Right
main burner
control knob
Backburner
control knob
Digital
thermometer
E1060i control locations
E660i and E790i control locations
Center right main
burner
control knob
Center left main
burner
control knob
Smoker drawer
burner control
knob
Smoker drawer
burner control
knob
Right backburner
control knob
Left
backburner
control
knob
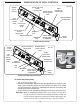
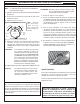
To remove the control panel:
•
Turn off the gas shutoff valve.
• Pull off the control knobs. Slowly lift away the lighted bezels to clear the valve
stems, and carefully disconnect the wires found on the back of the bezels
(use your fi ngernail.) Remove the woodchip box. Unscrew and remove the
control panel screws and washers.
• Lift the control panel up and outward, allowing it to rest on the internal chain(s).
Important: When re-installing the control panel,
set it back over the front lip of
the grill so that the lid-closed-sensor plunger protrudes through the
hole on the upper right of the control panel. Prior to opening the gas
shutoff valve, be sure the control knobs are in the OFF position.
Woodchip
box
Drip
trays
Control
panel
screw(s)
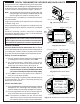
Woodchip
box
Drip
tray
Fig. 14-3
Bezel
installed
Bezel
removed
Carefully
disconnect
Master
switch
Power hood
control switch
(if equipped)
Master
switch
Power hood
control switch
(if equipped)
Control
panel
screw(s)