
Installation Instructions


19
DIGITAL THERMOMETER / INTERIOR AND KNOB LIGHTS
Your grill comes with a digital thermometer for temperature
monitoring and timed cooking. Pressing any button will turn
on the thermometer. The thermometer will automatically shut
off after 5 minutes if no temperature change is detected.
Note: The thermometer also controls the interior lights, and
knob backlights. Thermometer shutdown will not shut
off these lights; they must be manually shut off.
The thermometer is located on the control panel between
the control knobs.
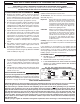
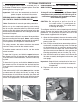
Plug in the meat probe on the right side of the control panel
as shown in Fig. 19-1.
For best performance and temperature readings center the
zone separators properly between each burner (see PARTS
LIST).
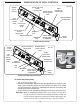
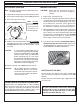
Read the following sections completely regarding
thermometer operation. Refer to Fig. 19-2 for thermometer
orientation and button locations.
Prior to initial use; calibrate the thermometer (following
page). Whenever the master switch is turned off or the
power supply is disconnected, allow 30 seconds for the
thermometer to initialize the next time it is powered on.
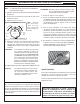
DEFAULT SCREEN
Press any button to turn the thermometer On. The default
screen will be displayed. All temperatures for the cooking zones
(see Grilling Tips section) and the meat probe will be shown
(Fig. 19-3). See below for options under the default screen.
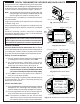
Setting a Location Temperature
1. Press the up/down arrow to switch to the desired location
(a cooking zone or the meat probe). Press SET.
2. The selected location’s temperature screen will be
displayed. Use the arrows to set the desired temp. The
actual temp. will also be shown. (See Fig. 19-4.)
Note: PRESSING the arrows will adjust the desired
temp. by increments of one. HOLDING them down
(for several seconds) will adjust the temp. rapidly.
3. Press SET to return to the default screen. Repeat as
necessary for all other locations.
The alarm will sound (if set to do so) when a location reaches
its set temperature. The alarm is silenced by pressing any
button on the thermometer.
Interior and Knob Lights
1. Press the light button to turn both the interior lights and knob
backlights On. The interior lights will temporarily shut off
when the hood is closed (except for Magic View models).
2. Press the light button once to turn the interior lights off,
and a second time to turn the knob backlights off.
Note: Thermometer shutdown will not shut off these
lights; they must be manually shut off by turning the
thermometer back on and pressing the light button.
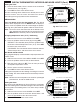
MENU
SET
Fig. 19-2 Orientation
Arrows for adjusting digits
SET button
for selecting
& confi rming
Display screen
Timer button
Light button
Menu
button
080
MENU
SET
05:00
350
075078
350
078
350
170
PROBE
TEMP
ZONE 3ZONE 2ZONE 1
SET ACT
°F
ACT
SET
Fig. 19-3 Default screen detail
Time set via TimerMeat probe temp. info
Cooking zones temp. info
MENU
SET
ZONE 1
ACTUAL: 078
SET TEMP: 350
Fig. 19-4 Location temp. screen (zone 1 shown)
Current location
Set this temp. as desired
Use arrows to set
Fig. 19-1 Meat probe detail
MEAT
PROBE
Meat probe handle
Meat probe plug