
Installation Instructions


20
DIGITAL THERMOMETER / INTERIOR AND KNOB LIGHTS (Cont.)
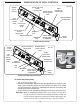
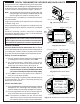
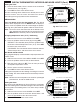
Setting the Timer
1. Press the timer button. Use the arrows to set the desired
amount of time (see Fig. 20-1.)
2. Press SET to return to the default screen.
The time remaining will be shown on the default screen. Once
the time reaches zero; the alarm will sound. The alarm is
silenced by pressing any button on the thermometer.
MENU SCREEN
Press any button to turn the thermometer On. The default
screen will be displayed. Press the MENU button to display its
screen. Press the up/down arrow to scroll through the options.
(See Fig. 20-2.) See below for options under the menu screen.
Note: The menu screen will return back to the default screen
after approximately 30 seconds of no activity. Press the
MENU button to manually return to the default screen.
Changing temperature units (°C/°F) / Calibrating
1. Under the menu screen select SETUP. Press SET.
2. Press the up/down arrow to select (by pressing SET):
• SETUP F C. This will allow you to press the up/down arrow
to select the desired temperature unit (°C/°F). Press SET
to return to the menu screen.
• CALIBRATE. This will calibrate the thermometer with the
ambient temperature, and return to the menu screen.
Grill Guide and Meat Probe
The grill guide displays recommended ready temperatures for
various meats.
1. Under the menu screen select GRILL GUIDE. Press SET.
2. Press the up/down arrow to view the desired meat.
3. Note the temp. and press SET. This will take you to the
meat probe temperature screen.
4. Use the arrows to set the noted temp.
5. Press SET to return to the default screen.
Putting the meat probe into the cooking meat will give an actual
temp. reading. The alarm sounds when the actual temp. reaches
the set temp.
Note: Do not leave the meat probe in the meat for a prolonged
period of time, or with the hood closed.
Setting the Alarm
The alarm can be individually set (On or Off) for the meat probe
and each cooking zone. The default setting has the alarm Off for
the meat probe and cooking zones. The alarm always sounds
for the Timer.
1. Under the menu screen select ALARM. Press SET.
2. Use the up/down arrow to select the desired alarm, and
press the light button to turn the alarm On/Off.
3. Press SET to return to the menu screen.
MENU
SET
SETUP
GRILL GUIDE
ALARM
BACKLIGHT
Fig. 20-2 Menu screen
MENU
SET
MED
RARE
WELL
DONE
170
170
180
160
N/A
160
150
N/A
150
140
N/A
140
BEEF
PORK
LAMB
PROBE
TEMP
MEDRARE
Fig. 20-3 Grill Guide screen
Use arrows to view desired meat
MENU
SET
OFF
OFF
OFF
ON
ZONE 1
ZONE 2
ZONE 3
PROBE
Fig. 20-4 Alarm screen
Use arrows to select desired alarm
Press light button to turn On/Off
MENU
SET
05:00
TIMER
Fig. 20-1 Timer screen
Set time as desired
Use arrows to set
Timer button