
Installation Instructions


21
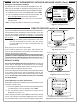
MENU
SET
OFF
OFF
ON
BACKLIGHT
RED
GREEN
BLUE
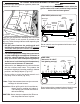
Fig. 21-1 Backlight screen
Use arrows to select desired color
Press light button to turn On/Off
Setting the Thermometer Backlight
The default color for the thermometer backlight is blue. The
color may be changed as desired by turning the three base
colors On/Off. Various combinations will result in different colors.
1. Under the menu screen select BACKLIGHT. Press SET.
2. Use the up/down arrow to select the desired color, and
press the light button to turn the color On/Off.
3. Press SET to return to the menu screen. The new color
will now show.
Note: Turning all colors Off will result in no backlight.
DIGITAL THERMOMETER / INTERIOR AND KNOB LIGHTS (Cont.)
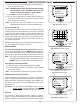
Press power button to turn On/Off
Arrows for
adjusting
digits
SET button
for selecting
& confi rming
Display screen
Press
left for
Menu
Fig. 21-2 Orientation
MEAT PROBE
ACTUAL: 078
SET TEMP: 350
Fig. 21-4 Temp. screen (meat probe shown)
Current location
Set this temp. as desired (meat probe only)
Use arrows
to set
The receiver will display data transmitted from the thermometer,
and sound when the thermometer alarm sounds. It can also
set the meat probe temperature, and take a meat probe
temperature reading (when the meat probe is connected to
the receiver).
Note: Although the cooking zone temperatures and alarm
may be set through the receiver, they will always
be over-ridden by the data transmitted from the
thermometer.
Refer to Fig. 21-2 for receiver orientation.
As the receiver displays the same data, and functions the
same as the thermometer; this section will reference some
previous thermometer information.
Read this section completely, then sync the receiver with
the thermometer (following page), prior to receiver use.
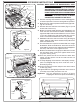
DEFAULT SCREEN
Press the power button to turn the receiver On. The default
screen will be displayed. All temperatures for the cooking
zones and the meat probe will be shown (see Fig. 21-3). See
below for options under the default screen.
The receiver display will automatically shut off after 30 seconds
of no activity. Two minutes after thermometer shut off; the
receiver will go into a deep sleep, which will minimize battery
usage. To manually shut off the receiver; press and hold
the power button.
Viewing/Setting a Location Temperature
All location temperatures (cooking zones/meat probe) can be
viewed in a detail screen.
1. Press the up/down arrow to switch to the desired location
(a cooking zone or the meat probe). Press SET.
2. The selected location’s temperature screen will be
displayed (see Fig. 21-4.)
If done viewing a location, press SET to return to the default
screen. OR; with the meat probe plugged in to the receiver,
you may follow steps 3-5 to set the meat probe temperature.
REMOTE RECEIVER (optional)
080
05:00
350
075078
350
078
350
170
PROBE
TEMP
ZONE 3ZONE 2ZONE 1
SET ACT
°F
ACT
SET
Time set via thermometer timerMeat probe temp. info
Cooking zones temp. info
Fig. 21-3 Default screen detail