
Installation Instructions


22
REMOTE RECEIVER (cont.)
3. Use the arrows to set the desired temp (see ‘Temp Screen’
fi gure on previous page).
Note: PRESSING the arrows will adjust the desired temp.
by increments of one. HOLDING them down (for
several seconds) will adjust the temp. rapidly.
4. Press SET to return to the default screen.
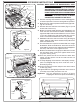
5. Put the meat probe into the cooking meat to obtain an
actual temp. reading. The alarm sounds when the actual
temp. reaches the set temp.
Note: Do not leave the meat probe in the meat for a
prolonged period of time, or with the hood closed.
Alarm Sounding Info
The alarm on the receiver will sound (if set to do so) when any
location reaches its set temperature. The alarm is silenced
by pressing the power button. The thermometer alarm will
continue to sound (if set to do so) and must be silenced by
pressing any button on it. Alternatively; if the thermometer is
silenced fi rst, it will stop sending a signal to the receiver, and
the receiver will silence.
Should the alarm go off on the thermometer while the receiver
is in sleep mode; it will wake the receiver.
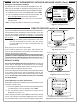
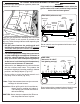
MENU SCREEN
Press the power button to turn the receiver On. The default
screen will be displayed. Press the MENU button to display its
screen. Press the up/down arrow to scroll through the options.
(See Fig. 22-1.) See below for options under the menu screen.
Note: The menu screen will return back to the default screen
after approximately 30 seconds of no activity. Press the
MENU button to manually return to the default screen.
Sync Receiver with Thermometer
1. Under the menu screen select SETUP. Press SET.
2. Use the up/down arrow to select SYNC, and press SET
to sync the receiver.
Note: The thermometer must be on to sync the receiver.
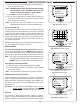
Additional Menu Screen Functions
Please reference the Thermometer section on the previous
pages regarding Changing Temperature units / Grill Guide /
Setting the Alarm / Setting the Backlight. These options are
available in the receiver and are controlled the same as the
thermometer.
Exception: For the Alarm and Backlight screens; use the
power button to toggle between ON/OFF (as
opposed to the light button). See Fig. 22-3 & 4.
Batteries
The receiver is powered by two AAA (alkaline or better)
batteries. Using the backlight feature will drain the batteries
quicker. If batteries are removed; the receiver will stay synced.
SETUP
GRILL GUIDE
ALARM
BACKLIGHT
Fig. 22-1 Menu screen
MED
RARE
WELL
DONE
170
170
180
160
N/A
160
150
N/A
150
140
N/A
140
BEEF
PORK
LAMB
PROBE
TEMP
MEDRARE
Fig. 22-2 Grill Guide screen
OFF
OFF
OFF
ON
ZONE 1
ZONE 2
ZONE 3
PROBE
Fig. 22-3 Alarm screen
Press power button to turn On/Off
OFF
OFF
ON
BACKLIGHT
RED
GREEN
BLUE
Fig. 22-4 Backlight screen
Use arrows to
select desired
color
Press power button to turn On/Off
Use arrows to
select desired
alarm
Use arrows to
view desired
meat