
Installation Instructions


23
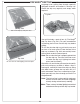
ROTISSERIE INSTRUCTIONS
Drip tray
liner
Fig. 23-3
Backburner
(unlit)
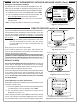
CAUTION: WHEN USING THE BACKBURNER; KEEP
THE OVEN LID CLOSED TO PREVENT HEAT
LOSS, PROVIDE PROPER CONVECTION,
AND PROVIDE PROPER VENTING. THIS WILL
ENSURE EVEN COOKING TEMPERATURES.
DO NOT KEEP YOUR OVEN LID OPEN DURING
ROTISSING, AS THIS MAY CAUSE PERSONAL
INJURY, OR IN SOME CASES, IN WINDY
CONDITIONS, DAMAGE TO THE GRILL.
1. Remove warming rack, backburner cover, cooking grids,
and zone separators. Leave the fl avor grids on if possible.
2. Slide rotisserie motor fully onto motor bracket (right side,
Fig. 23-1 and 23-2).
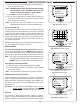
3. Remove rotisserie rod from rear bracket (Fig. 23-1) and
attach knob if necessary.
4. Slide the left meat holder onto the rod (and tighten), the
meat onto the rod and into the holder, followed by the
right meat holder onto the rod and into the meat as shown
in Fig. 23-3. Tighten the right meat holder. Be sure the
meat is centered and balanced as well as possible.
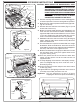
7. Hold both ends of the rod so it settles freely (do not grip
tightly). Allow the rod to rotate until the heavy side of the
meat rests downward.
8. The counterbalance may then be attached to even weight
distribution. Slide counterbalance onto rod next to the
meat holder. Loosen the arm and point it upward opposite
the heavy side of the meat. Tighten the arm.
9. Slide the counterbalance weight up or down the arm until
the rod rotates most evenly then tighten thumb screw
(Fig. 23-4 and Fig. 23-5).
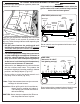
10. Insert the pointed end of the rod into the motor drive
socket and the groove next to the knob into the left
support bracket.
11. To keep drippings off the burners and simplify cleanup,
place Fire Magic
®
drip tray liners under the meat, if
desired (Fig. 23-3).
12. Plug-in the rotisserie motor and press the rocker switch
to start (Fig. 23-2).
13. Light backburner per lighting instructions in this manual
(or on drip tray handle) and close oven lid.
Important: Turn the backburner to low or off when
stopping the rotisserie to prevent overcooking.
Fig. 23-5
Backburner
(lit)
Left support bracket
Fig. 23-4
Thumb
screw
loosen/
tighten
slide
Weight
Arm
Backburner cover
Warming rack
Rotisserie rod
rear bracket
Rotisserie
rod
and
knob
Rotisserie
motor
Meat
holders
Counter-
balance
Rotisserie
motor
bracket
A
B
2
1
Rotisserie
rod bracket
Fig. 23-1
Rotisserie motor
slots (4)
Heavy-duty
Rotisserie motor
Rod drive socket
Fig. 23-2
1
2
Rocker
switch
Drip tray
liner
Fig. 23-3
Backburner
(unlit)
Backburner cover
Warming rack
Rotisserie rod
rear bracket
Rotisserie
rod
and
knob
Rotisserie
motor
Meat
holders
Counter-
balance
Rotisserie
motor
bracket
A
B
1
Rotisserie
rod bracket
Fig. 23-1
3