
Installation Instructions


25
The infrared (IR) searing burner (optional) cooks with
a powerful radiant heat.
Light the infrared burner following the LIGHTING
INSTRUCTIONS in this manual or printed on the
drip tray. Follow these guidelines when operating the
Infrared burner:
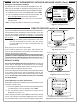
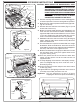
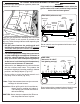
• DO NOT place food on the cooking grid until
the IR burner glows orange (Fig. 25-3). Drippings
are heated and evaporate instead of sticking to and
impairing burner function.
• For cleaning purposes; always leave your burner
on (after cooking) for an additional 5 minutes, to
allow for a burnoff period. This is important to
keep your burner clean and operating properly.
As the burner is self cleaning (at full temperature);
avoid the use of cleaners or abrasives.
• When not in use, always cover the infrared burner
with the stainless-steel cover. This protects the
burner from drippings (from other cooking), airborne
particles, and foreign objects (Fig. 25-2).
• Do not strike or scratch the burner ceramic as it
may chip, crack, or break (Fig. 25-2).
Note: Digital thermometer does not give accurate
readings for infrared burners.
Important: When grilling with the infrared burner,
always place a cooking grid above it.
The cooking grid must be removed for
rotisserie cooking.
CAUTION: Never attempt to operate the IR burner
with the protective cover in place.
WARNING
Only handle the infrared burner cover when the
grill is cold or with a well-insulated long-handled
tool or heat resistant gloves.
Burner ceramic must be protected with cover when
burner is not in use.
Drips and particles evaporate before hitting infrared
burner when cooking at the maximum setting.
O
F
F
HI
LIGHT
LOW
Fig. 25-3
SIDE VIEW
(burner on HI LIGHT
and glowing orange)
Flash
tube
Ignitor
electrode
Fig. 25-1
Cut-out for
Flash tube
Cover
Ignitor
electrode
Flash tube
OFF
HI
LIGHT
L
O
W
Fig. 25-2
Flash
tube
Cover
SIDE VIEW (with cover on)
Ignitor
electrode
Food
particles
or debris
Drippings
and other
liquids
Airborne
dust or
grease
NO foreign
objects
OPTIONAL INFRARED BURNER OPERATION