
Installation Instructions


26
The art of grilling involves learning the nuances of your
grill and knowing how various cuts of meat and other
foods cook on it under different settings and conditions.
Each grill will be unique due to its configuration
and how it is positioned or installed. This section
contains information about how Fire Magic grills were
engineered, which will help you in learning how your
grill responds to the way you use it.
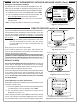
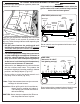
COOKING ZONES
Your grill is divided into three cooking zones, each
corresponding to a burner. Burners are numbered
starting at one (1) on the left, going to three (3) on the
right (see Fig. 26-1). The cooking zones are monitored
by the digital thermometer.
Note: E1060 models contain an additional cooking
zone, on the far left of the grill. This zone is not
monitored by the digital thermometer.
Each cooking zone temperature is designed to be
controlled individually by the burner control knob.
Specifi c zones are better suited to specifi c types of
cooking because of features such as being adjacent
to a fi re wall or away from the smoker drawer.
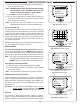
GRILL HEAT DISTRIBUTION - MAIN BURNERS
The heat level at each part of the grill has been
engineered for specifi c purposes. Knowing the heat
distribution for each burner will allow you the best
possible food positioning when grilling.
CAUTION: Even the coolest part of the grill is too
hot to be touched during operation of
the grill.
The front of the grill is designed, for safety reasons,
to be the coolest part of the grill. If you look directly
down on the grill top, while it is off and cool, you can
see this portion of the grill, where the front end of each
burner stops and the slope of the inner grill fi re wall
begins. This area also loses heat most rapidly when
the oven lid is opened (see Fig. 26-2).
From the front of the grill moving toward the back,
the heat rises gradually until just above the burner’s
front edge, where it rises rapidly to a fairly even
temperature refl ected by the digital thermometer.
The heat continues to rise gradually until it reaches a
maximum directly above the place where the two lobes
of each burner connect (see Fig. 26-2). From there to
the back of the grill, heat diminishes moderately. This
supports the desired temperature for the warming
rack and prevents heat from becoming excessive at
the back fi re wall of the grill.
GRILL HEAT DISTRIBUTION - IR BURNER
Infrared burners are designed for even, searing
heat across their whole surface. Because the heat
is radiant, it tends to heat the food you are cooking
directly without heating the air around it as much as
a conventional burner.
SMOKER DRAWER USE
When using a single cooking zone with the smoker
drawer, use zone 1. It will minimize burner heat on the
fl avor drawer and maximize a circulating convection
current that will draw the smoke fl avor into the food.
WIND CONSIDERATIONS
Wind direction can have an effect on the grill,
especially with the oven open. For maximum stability
and convenience, position the grill so that the oven
opens toward any prevailing wind (Fig. 26-1).
1
32
Fig. 26-1
Orient grill so prevailing wind
blows in this direction
Fig. 26-2
Medium heat
Medium heat
High heat
Low heat
GRILLING TIPS