
Installation Instructions


30
Fire Magic
®
Echelon grills are all engineered with the
conveniences of electrical power for illuminating and
igniting the grill.
To replace any Echelon oven light, follow the
instructions below.
Important: ONLY REPLACE WITH 12V / 10 WATT
HALOGEN BULB(S).
WARNING
To protect from potentially sharp sheet metal and
glass, wear gloves and safety glasses during this
procedure.
1. Turn all burner control knobs to the OFF position
and shut off the gas supply to the grill at the source
(tank valve for propane units or gas line shut-off
valve for natural gas units.)
2. Disconnect supply of external electrical power to
the grill.
CAUTION: Wait for the grill, oven, lens, light bulb,
and fi xture to cool before proceeding to
the next step.
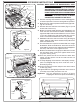
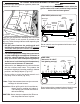
3. Open the oven lid.
Important: Place one hand directly below the glass
lens and prepare to catch it when it is
detached.
4. Carefully insert a standard fl at head screwdriver
or thin plastic spatula between the glass lens and
the stainless steel on which the light is mounted
and gently pry the glass lens out in such a way
that the stainless steel is not scratched (twisting
the screwdriver handle, for instance). Catch the
lens and set it safely aside.
Note: You may wish to take this opportunity to clean
the lens with a standard household window
cleaner and then dry it completely.
5. Wearing a pair of gloves, reach into the fi xture,
gently grab the bulb, and pull it straight out of the
fi xture so that the two pins at the base of the bulb
come all the way out.
Important: Bulb is halogen. DO NOT TOUCH with
bare hands. Oils from hands drastically
reduce bulb life.
Note: It may be helpful to rock the bulb gently
backward and forward while pulling it out.
6. Inspect the old bulb for broken glass or fi lament.
Note: It may be benefi cial to test a suspect bulb
in one of the other light fi xtures known to be
working and turn the power back on to be
certain the bulb is actually not working.
7. Insert the new 12V / 10 watt halogen bulb into the
socket so that both pins slide all the way into the
two holes in the bottom of the socket.
8. Place the lens back into the fi xture opening with
the curved cut-out on the bottom and snap it back
into place.
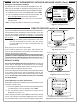
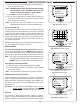
Fig. 30-1
Lens
Fig. 30-3
Bulb
Prongs
Socket
Holes
Fig. 30-2
Fixture
Socket
Curved
cut-out
top of
lens
Bulb
REPLACING HALOGEN BULBS