
Instructions / Assembly


Contact us for assistance: (866) 985-7877 | www.wtliving.com 9
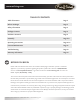
ASSEMBLY
13
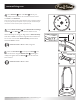
Install Reector. NOTE: MAKE SURE TO REMOVE THE BLUE
REFLECTOR TAPE ON REFLECTOR PIECES PRIOR
TO ASSEMBLY! Assembly Tip: If necessary for proper alignment of
reector sections, loosen each screw prior to further assembly and
retighten after sections are aligned. Slide two
together. Insert one Small Screw front underneath and loosely
screw on Cap Nut from top. Repeat with the other
Panels . Slide onto assembled
Panels. Insert one Small Screw and screw on Cap Nut loosely.
Repeat with two more Small Screws and Cap Nuts to complete
reector assembly. Fully tighten all screws and cap nuts.
Hardware Used: 9x Small Screw | 9x Cap Nut
14
While supporting heater, tilt the Head Assembly and slide
3 Large Flat Washers over the . Place
the reector assembly onto the and slide 3 Large Flat
Washers over the and onto the .
Secure with 3 Wing Nuts . Once you have tightened the Wing
Nuts, return the heater to an upright position.
Hardware Used: 6x Large Flat Washer
3x Wing Nut
15
Slide Cylinder Cover up and rest the Cylinder Cover on the
Post Support . Connect the Gas Hose and Regulator
to the LP cylinder. (The LP cylinder is sold separately. Use a standard
9.07 kg / 20 lb propane cylinder only.) Screw Regulator on to the Gas
Hose. Do not cross thread. Hand tighten securely then tighten with the
Wrench . Attach the Regulator to the valve on the LP cylinder and
hand tighten securely. Place LP tank onto base of heater. Secure the
LP gas tank by tightening the Large Bolts on the Brackets on the
Base . Lower the Cylinder Cover.
NOTE: Use this heater only with a propane vapor withdrawal
supply system. See chapter 5 of the standard for storage and
handling of liqueed petroleum gas, ANSI/NFPA 58. Your local
library or re department should have this book.
13
13
13
13
14
14
15
15