
Instructions / Assembly


7
NOTE: It is best to use TWO PEOPLE for assembly of this appliance.
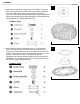
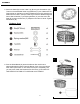
1. Locate 4 – Legs (E). Screw 2 – Studs (L) into the holes on each side
of the leg. Make sure all legs have the foot end facing down, then
align holes in 2 - Side Panels 1 (F1) and 1 - Side Panel 2 (F2) with
ends of the Studs (L) sticking out of each leg. Attach the Panel to the
Leg using Washer/Spring Washer/Nut (N,O,P). Tighten loosely
with Wrench (Q).
(DO NOT OVERTIGHTEN as you will need to adjust panels to ensure
proper alignment.)
Once all other Panels are loosely attached to the Legs, align the
Door (H) with the Studs (L) sticking out of the Legs and attach the
Door (H) using Washer/Spring Washer/Nut (N,O,P) with Wrench (Q).
Once all Panels are attached to the Legs (E), tighten nuts with
Wrench (Q).
Hardware Used
2. Once Side Panels/Door/Legs have been secured, turn the
assembly upside down and rest it on the tops of the Legs. Then
attach Gas Tank Support 1 (G1) to 2 - Side Panels 1 (F1) by
aligning holes in Gas Tank Support 1 (G-1) with holes in
2 – Side Panels 1 (F1). Insert Bolt (M) through Washer (N) and
then through holes. Slide another Washer (N) and
Spring Washer (O) over Bolt (M) and secure with Nut (P).
Tighten with Wrench (Q).
Hardware Used
ASSEMBLY
1
2