
Instructions / Assembly


8
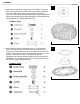
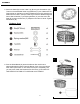
3. Attach Gas Tank Support 2 (G2) to Gas Tank Support 1 (G1) and
Door (H). Align the holes in ends of Gas Tank Support 2 (G2) with
the holes in Gas Tank Support 1 (G1) and hole on bottom of
Door (H). Insert Bolt (M) through Washer (N) and then through holes.
Slide another Washer (N) and Spring Washer (O) over Bolt (M) and
secure with Nut (P). Tighten with Wrench (Q).
Hardware Used
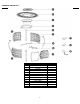
4. Place Table Top (B) so underside is facing up. Then place the
Burner (C) onto the Table Top. Make sure the Control Knob on
the Burner (C) faces toward one of the long sides of the Table Top
as the Control Knob will need to be aligned with the Door (H). Then
screw 4 – Studs (S) into holes on the Table Top (B) with
Screwdriver (W). Place the Burner Bracket (D) over the Studs (S).
Slide Washer (T) and Spring Washer (U) over Stud (S) and secure
with Nut (V). Tighten with Wrench (Q).
Hardware Used
ASSEMBLY
3
4