
Instructions / Assembly


9
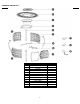
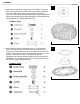
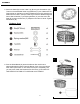
5. Screw the Studs (R) into the Table Top (B) using the Screwdriver (W).
Then turn the assembled Table Top (B)/Burner (C) over. Make sure the
Control Knob on the Burner is facing towards the Door (H) and align the
Studs with the holes in the tops of the Legs. Insert the Studs through the
holes. Slide a Washer (T) and Spring Washer (U) over the end of the
Stud (R) and secure with Nut (V). Repeat on the other 3 Studs. Tighten
with Wrench (Q).
Hardware Used
6. Pour the Glass Beads (K) around the Burner. Be careful not to
obstruct pilot light housing. Place the Burner Cover (A) on the Burner
when the fire pit is NOT in use. When the fire pit is completely cool,
you may cover it with the Protective Fire Pit Cover (I). DO NOT PUT
THE PROTECTIVE FIRE PIT COVER ON A HOT FIREPIT.
ASSEMBLY
5
6