
User manual


3
CONTENTS
Instructions for the User
Important Safety Information
2
Operation
4
Before use 4
Setting the temperature 4
The freezer compartment 4
Freezing fresh food 4
Frozen food storage 5
Thawing 5
Making ice cubes 5
Fresh food refrigeration 5
Normal operating sounds 5
Movable shelves 6
Positioning the door shelves 6
Hints and Tips
7
Maintenance and Cleaning
8
Internal cleaning 8
External cleaning 8
When the appliance is not in use 8
Changing the light bulb 8
Defrosting 8
Something Not Working
10
Service and Spare Parts
11
Customer Care
11
Guarantee Conditions
12
Instructions for the
Installer
Technical Specification
13
Installation
14
Positioning 14
Electrical Connection
15
Door Reversal
16
18
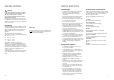
Place guide (Ha) on the inside part of the furniture
door, up and down as shown in the figure and mark
the position of external holes. After having drilled
holes, fix the guide with the screws supplied.
2
1
m
m
2
1
m
m
ca. 50 mm
90°
90°
ca. 50 mm
Fix cover (Hc) on guide (Ha) until it clips into place
PR33
Hc
Ha
PR167
Ha
Hb
8mm
Open the appliance door and the furniture door at
90°. Insert the small square (Hb) into guide (Ha).
Put together the appliance door and the furniture
door and mark the holes as indicated in the figure. .
PR168
Hb
Place the small square on the guide again and fix it
with the screws supplied.
Should the lining up of the furniture door be
necessary, use the clearance of slots.
At the end of operations, it is necessary to check if
the door of the furniture closes properly.
Ha
8mm
K
Remove the brackets and mark a distance of 8 mm
from the outer edge of the door where the nail must
be fitted (K).