Tested and Listed by 4915 Illuminations OMNI-Test Laboratories, Inc. Beaverton, Oregon Report # 028-F-88-2 Listed to UL 65, CSA 22.2 #12, and CSA 22.2 # 250 Electric Fireplace™ Owner’s Manual Installer: After installation give this manual to the homeowner and explain operation of this fireplace. © Copyright 2009, T.I. $10.00 100-01207_000 4081229 www.travisproducts.com 4800 Harbour Pointe Blvd.
Introduction Overview This manual details the installation requirements for the 4915 Illuminations fireplace. Listing Details This appliance was listed by OMNI Test Labs to UL 65, CSA 22.2 #12, and CSA 22.2 # 250 - report # 028-F-88-2. The listing label is affixed to the appliance. A copy is shown to the right. IAS (ICBO) Approval This appliance was listed by OMNI Test Labs – IAS (ICBO) # TL-130.
Table of Contents Introduction 3 Operation Overview ............................................................................. 2 Listing Details ...................................................................... 2 Facing ................................................................................ 16 Maintenance Safety Precautions Safety Precautions .............................................................. 4 Maintenance ..................................................................
Safety Precautions • USE ONLY WITH TRAVIS INDUSTRIES 250-01435 LUMINAIRE (BULB) • SUITABLE FOR DAMP LOCATIONS. NOT SUITABLE FOR WET LOCATIONS. • FIREPLACE MUST BE MOUNTED IN A LEVEL POSITION WITH SOCKETS FACING UPWARDS. THIS LUMINAIRE MUST BE MOUNTED OR SUPPORTED INDEPENDENTLY OF AN OUTLET BOX. FOR USE IN NON-FIRE-RATED INSTALLATIONS ONLY. • MIN. 105˚ C SUPPLY CONDUCTORS. PUSH CONDUCTORS INTO JUNCTION BOX. • SUITABLE FOR OPERATION IN AMBIENT NOT EXCEEDING 60˚ C.
Features and Specifications 5 Installation Options • Residential or Mobile Home • Flush or Recessed Face • One-Sided or See-Through Electrical Specifications VOLTS 120 VOLTS AC AMPS 0.
Installation (for qualified installers only) Packing List • • • Wall Switch with Plate Bulb Pack 2 Bags of Crushed Glass • • Junction Box (with receptacle, romex clamp and cover) Optional Remote (receiver and transmitter) Additional Items Required • • • Glass Frame (SKU 95000964) NOTE: Two glass frames are required for double-sided installations. Candle Set (Natural 95000961, Stone 95000962, or Frosted 95000963) Electrical Equipment (min.
Installation 7 (for qualified installers only) Framing Dimensions – One-Sided Configuration • The following framing dimensions are for one-sided installations. The framing (or insulation) may contact the sides and back of the fireplace. NOTE: The depth of the enclosure may be altered to accommodate facing depth. The 8” dimension below is based upon ½” drywall in a fully recessed installation.
Installation (for qualified installers only) Framing Dimensions – Two Sided Configuration • The following framing dimensions are for two-sided installations. The framing (or insulation) may contact the sides and back of the fireplace. NOTE: The depth of the enclosure may be altered to accommodate facing depth. The 7-1/4” dimension below is based upon ½” drywall on each side.
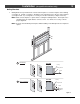
Installation 9 (for qualified installers only) Nailing Brackets • Nailing brackets are provided on the exterior of the fireplace to secure the fireplace to the framing (see Figure 4). If using ½” facing (i.e.: drywall), use the standoff closest to the face of the fireplace (see Figure 4 item “a”). If using 7/8” to 1” facing, use the other standoff (see Figure 4 item “b”). NOTE: Make sure the fireplace is square before securing the nailing brackets.
Installation (for qualified installers only) Electrical Connection • The electrical line to the grounded receptacle inside the fireplace must be installed by a qualified installer and must meet all local codes. • Make sure the circuit breaker is shut off prior to working on any electrical lines.
Installation 11 (for qualified installers only) Facing Examples • This appliance is designed to allow for drywall (or other combustible facing) to contact the sides and top of the fireplace. The facing examples below are included to aid the design and installation of this fireplace. Facing – Flush Single-Sided Front FRONT Facing – Flush Single-Sided Back BACK FRONT BACK Face NOTE: Additional Face framing is added after installation to support drywall.
Installation (for qualified installers only) Facing Examples (continued) Facing – 2-Sided, Flush on Both Sides Facing – 2-Sided, Flush & Wood-Trim FRONT FRONT BACK BACK Wood Trim Face Face NOTE: Additional framing is added after Face Face installation to support drywall.
Installation 13 (for qualified installers only) Steps for Finalizing the Installation Listed below are the steps needed to finalize the installation of the fireplace. Take care when finalizing the fireplace to not allow dust or other debris to enter the firebox. We recommend finalizing the installation after all construction work has been completed. Mirror Preparation .WARNING: Clean the mirror only with soap and water.
Installation (for qualified installers only) Light Bulb Installation Carefully remove the 11 light bulbs from the packaging and install into the sockets following the directions below. .WARNING: 1 2 3 Do not over-tighten the bulbs when screwing them in. The base of the bulb is fragile and may break if over-tightened. Do not grasp the bulb by the tip. THE BULBS ARE NOT COVERED BY THE WARRANTY. Carefully remove the bulb from the packaging. Do not hold the bulb by the tip.
Installation 15 (for qualified installers only) Glass Frame Removal and Installation .WARNING: Do not strike or slam the glass. 1. Remove and discard the four side glass brackets on the glass frame (see Figure 6, item “a”). Attach the mounting brackets included with this kit to the back of the glass frame, using the nuts removed earlier - make sure the brackets are installed with the notch on the lower side of the bracket (see Figure 6, item “b”). Figure 6 2.
Operation and Maintenance Operation Use the included wall switch or remote to turn the fireplace on and off. Maintenance WARNING: Clean the mirror only with soap and water. Windex® or other glass cleaners will damage or cloud the acrylic surface of the mirror. The glass frame may be dusted and cleaned with soap and water. Do not scrub the painted surfaces of the glass frame – the metallic paint may blur or show slight scuffing.
5 Year Limited Warranty 17 Register your TRAVIS INDUSTRIES, INC. Limited 5 Year Warranty online at traviswarranty.com, or complete the enclosed Warranty card and mail it within ten (10) days of the appliance purchase date to: TRAVIS INDUSTRIES, INC., 4800 Harbour Pointe Blvd. SW, Mukilteo, WA 98275. TRAVIS INDUSTRIES, INC. warrants this electric appliance (appliance is defined as the equipment manufactured by Travis Industries, Inc.
Index Index Additional Items Required ................................................... 6 Crushed Glass Installation .................................................. 14 Cylinder Installation ............................................................. 14 Dimensions ......................................................................... 6 Electrical Connection .......................................................... 10 Electrical Specifications ..................................................