Tested and Listed by 564 SS IPI Fireplace • • Operation Maintenance WARNING: OMNI-Test Laboratories, Inc. Beaverton, Oregon Report # 028-F-80b-5 ANSI Z21.88a-2003 If the information in these instructions is not followed exactly, a fire or explosion may result causing property damage, personal injury or loss of life. - Do not store or use gasoline or other flammable vapors and liquids in the vicinity of this or any other appliance. WHAT TO DO IF YOU SMELL GAS • Do not try to light any appliance.
Introduction Introduction We welcome you as a new owner of a 564 SS gas fireplace. This manual details operation and maintenance of this fireplace. Please familiarize yourself with the Owner's Manual before operating your heater and save the manual for future reference. Important Information No other 564 SS gas fireplace has the same serial number as yours. The serial number is on the listing label that is chained to the gas control valve. This serial number may be needed in case you require service.
Introduction 3 Table of Contents Introduction and Important Information Maintenance Introduction ......................................................................... 2 Important Information .......................................................... 2 Installation Warnings ........................................................... 2 Features .............................................................................. 3 Heating Specifications .......................................................
Safety Precautions IF YOU SMELL GAS: * Do not light any appliance * Extinguish any open flame * Do not touch any electrical switch or plug or unplug anything * Open windows and vacate building * Call gas supplier from neighbor's house, if not reached, call fire department This unit must be installed by a qualified installer to prevent the possibility of an explosion. Your dealer will know the requirements in your area and can inform you of those people considered qualified.
Safety Precautions Light the heater using the built-in igniter. Do not use matches or any other external device to light your heater. Do not place clothing or other flammable items on or near the heater. Because this heater can be controlled by a thermostat there is a possibility of the heater turning on and igniting any items placed on or near it. Allow the heater to cool before carrying out any maintenance or cleaning. The viewing glass should be opened only for conducting service.
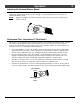
Operation Before You Begin • Read this entire manual before you use your new fireplace (especially the section "Safety Precautions" on pages 4 & 5). Failure to follow the instructions may result in property damage, bodily injury, or even death. Location of Controls Swing the concelament cover Lift up and swing the lower grill up and slide it back to expose An instruction card for operating the controls.
Operation 7 Starting the Fireplace for the First Time • Burn the heater at a high setting with the blower off for an extended period (up to 48 hours). This will cure the painted surfaces. Fumes from the paint curing and oil burning off the steel will occur. This is normal. We recommend opening a window to vent the room. • Condensation may appear on the glass each time you start the fireplace - this is normal. • Blue Flames will occur on the fireplace when it first comes on.
Operation Adjusting the Flame Height This fireplace has an adjustable flame to tailor the look and heat output to your specific needs. It is adjusted by turning the flame adjust knob. FLAME ADJUST HIGH LOW Accent Light This fireplace has a built-in accent light that may be turned on and off and dimmed to your preference. Turn the knob to achieve the desired light output.
Operation 9 Adjusting the Optional Blower Speed The blower helps transfer heat from the heater into the room. It will not turn on until the heater is up to temperature (approximately 15 minutes after starting). See the illustration below for instructions on adjusting the blower speed. NOTE: With the rear burner off (comfort control), the heater may not become hot enough for the blower to turn on.
Operation Normal Operating Sounds The appliance may creak with change of temperature -- THIS IS NORMAL. Blower Snap Disk This part can produce a clicking sound as it turns the blower on and off. Blowers This heater has optional blowers to push heated air into the room. You will hear the sound of air movement that increases as the speed is increased. Gas Control Valve As the gas control valve is turned on and off you will hear a dull clicking sound. This is the valve opening up and shutting down.
Maintenance 11 Maintaining Your Fireplace's Appearance Fingerprints or other marks left on the optional plated surface may become etched in place if they are not wiped clean prior to turning the fireplace on. Clean the plated surface with denatured alcohol and a soft cloth (with the fireplace cool). Other cleaners may leave a film that may become etched into the surface.
Maintenance Accent Light Replacement Two accent lights are included in your fireplace to provide additional lighting. These bulbs will burn out over time. To replace, follow the directions below: • Shut off gas to the fireplace and let it cool for 15 minutes. • Remove the glass (see page 15) and logs (see page 17). • Replace the halogen bulbs with the following bulbs: (NOTE: .
Maintenance 13 Grill Installation and Removal Follow the directions below to install. Upper Grill Installation (FPX and Avalon) Hold the grill at an angle and insert the lower slot over the lower bushing on the fireplace (both sides) Swing the grill upwards to engage the upper slot. You will need to lift the grill slightly to get it over the bushing. Once in place the grill is held in place by gravity.
Maintenance Face Installation and Removal Some fireplaces have a face that fits over the glass frame. The face can be removed following the directions below. Phillips Screwdriver Four screws hold the face in place. The screws are accessed through the grills on the face.
Maintenance 15 Glass Frame Removal and Installation Warning: The appliance must be completely cool before removing the glass. Warning: Do not strike or slam the glass. a Based upon the face being used, either: (a) swing the access door down and remove the top grill, (b) remove the face (unscrew or lift off - see the instructions included with the face for details). Open the four latches holding the glass frame in place (start with the bottom) - follow the directions shown to the right.
Maintenance Glass Frame Removal and Installation (continued) The latch can come loose from the latch assembly. This occurs only when it is rotated. Follow the directions below to re-install the latch if it comes loose. Hold the latch at an angle and insert it into the slot on the glass frame anchor. Latch NOTE: this slot may be at a different angle than illustrated. Top of Firebox Glass Frame Anchor Note how the washer on the latch fits behind the flange on the glass frame anchor.
Maintenance 17 Log Set Installation Log Set Overview When installed, the logs should appear as shown below.
Maintenance Rear Log Installation The rear log has a flat notch on both sides that center it on the grate. Place the rear log on the grate and slide it all the way back until the log contacts the endbrackets on the grate.
Maintenance 19 Right Log Installation The left log has a groove that fits over the grate. Note how the left side of the log rests on the burner but does not cover any burner holes.
Maintenance Left Log Installation The left log has a groove that fits over the grate. Note how the right side of the log rests on the burner but does not cover any burner holes.
Maintenance 21 Left Twig Installation This hole fits over the pin on the rear log. The left twig should be positioned so the front edge contacts the grate as shown above.
Maintenance Right Twig Installation The right twig has two holes for the pins on the rear and right log. When in place the right twig will appear as shown above.
Maintenance 23 Ember Installation A bag of embers is provided to further enhance the firebox. Place the embers on the firebox floor and on the burner. Do not place embers over any of the burner holes or air channels.
Maintenance Glass Cleaning The glass may be cleaned with a nonabrasive cleaner. To clean the inside of the glass, simply remove the glass frame, place it on a non-scratching surface, and clean the inside surface. If the outside surface of the glass frame requires cleaning, follow the directions below to remove the outer glass frame and screen. WARNING: do not operate the fireplace without the glass frame in place. Six sets of tabs hold the glass (and glass gasket) in place.
Maintenance 25 Troubleshooting Table Problem: Main Burners Will Not Start Receiver Beeps Thermostat Does Possible Cause: Don't Call for Service Until You: The ON/OFF switch is turned to "OFF" Turn the ON/OFF switch to "ON" The remote control is not working correctly See the remote control instructions The thermostat is disconnected or set too low See "Thermostat Operation" No Propane in Tank Check Tank Level The power backup batteries are dead Replace the batteries (see page 11) The ON/OFF sw
Maintenance Wiring Diagram Spark Rod Pilot Sensor Pilot Ground CN4 Comfort Control Valve PILOT SENSOR DIGITAL FIREPLACE CN0 BURNER CONTROL SPARK ROD VALVE CN3 CN2 DIAGNOSTIC COMMAND POWER CN1 GROUND POWER SUPPLY IPI / CPI Blue Red Black Red Red Red ON / OFF Black Blue Red Green Orange Yellow / Green VALVE AC ADAPTER Green White Black Blue White CONTINUOUS PILOT GREENSMART PILOT Caution: COMFORT CONTROL AA BATTERY TRAY MAIN BURNER Label all wires prior to disconn
Limited 7 Year Warranty 27 Register your TRAVIS INDUSTRIES, INC. Limited 7 Year Warranty online at traviswarranty.com, or complete the enclosed Warranty card and mail it within ten (10) days of the appliance purchase date to: TRAVIS INDUSTRIES, INC., 4800 Harbour Pointe Blvd. SW, Mukilteo, WA 98275. TRAVIS INDUSTRIES, INC. warrants this gas appliance (appliance is defined as the equipment manufactured by Travis Industries, Inc.
Optional Equipment Accessories The accessories listed below are available at your Travis dealer. To locate a dealer, visit: www.travisproducts.com GreenSmart™ Remote / Thermostat This accessory allows for remote control of your fireplace (burner, flame height, accent light).. It has a built-in thermostat if you wish for automatic temperature control. °F Blower The optional blowers help transfer heat to your home.
Optional Equipment © Travis Industries 4081205 29 100-01211_000
Index Index Accent Light Replacement .................................................. 12 Accent Light ........................................................................ 8 Adjusting the Flame Height ................................................. 8 Adjusting the Optional Blower Speed .................................. 9 Battery Replacement .......................................................... 11 Before You Begin ................................................................