
User Manual


Firetide Instant Mesh Networks 5 January 2008
Chapter 2. Outdoor Installation
Introduction
Installation of the Firetide HotClient outdoor device should only be done by qualied and expe-
rienced personnel. Outdoor installation involves many safety hazards, including electrocution,
lightning strikes, and falls. Please be careful.
Unpacking and Setup - Outdoor
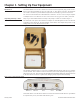
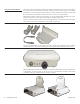
The Firetide HotClient device is packed as shown in Figure 4. Note that an Ethernet cable is NOT
included. You should obtain a weatherproof 4-pair cat-5 cable long enough to reach from the
HotClient unit to the indoor location where you will connect with a PC, Ethernet switch, or other
equipment.
The cable must be a 4-pair cable; smaller cables will not seal in the waterproof connector. The
cable can be pre-terminated; the waterproof connector will pass an RJ-45 plug.
Figure 4. Series 2200 Outdoor Unit - Package Contents
Assembling the Ethernet Cable
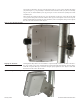
Test the unit before mounting it on the pole or mast. Begin by making the cable.
Remove the weatherproof Ethernet connector cover - the black plug - from the unit.1.
Dismantle it. You will have a housing, a housing insert, a cap, and a gasket.2.
Place the cap over one end of your Ethernet cable.3.
Place the housing insert over the cable.4.
Thread the cable through the housing.5.
Plug the cable into the RJ-45 port visible inside the HotClient.6.
Thread the housing back into the HotClient. Make sure the gasket is still in place.7.
Tighten the cap so that it compresses the housing insert to the housing.8.
Now you can connect the Ethernet cable to the power feed unit, via the OUT port on the power
feed unit. Use a second Ethernet cable to connect the IN port to your PC. Verify operation of the
HotClient before proceeding.