
Replacement Part List


Page 20
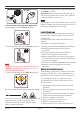
If the generator fails to start after a total of six
attempts, the start button on the remote control
must be pushed again to begin another cycle of
six start attempts.
8. Allow generator to run at no load for few
minutes upon each initial start-up to permit
engine and generator to stablize.
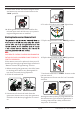
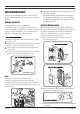
Connecting Electrical Loads
1.Let engine stabilize and warm up for a few
minutes after starting.
2.Ensure circuit breaker on control panel is in
on position.
3.Plug in and turn on the desired 120 or 240 Volt
AC, single phase, 60Hz electrical loads. It is
better to attach the item with largest load first.
This unit has been pretested and adjusted to
handle its full capacity. Before starting the
generator, disconnect all load. Apply load only
after generator is running. Voltage is regulated
via the engine speed adjusted at the factory for
correct output. Readjusting will void warranty.
CAUTION
When applying a load, do not exceed the maximum
wattage rating of the generator when using one or
more receptacles. Also, do not exceed the amperage
rating of any one receptacle.
Do not apply heavy electrical load during break-in
period (the first five hours of operations).
If the engine fails to start within 3 to 5 seconds,
the engine will attempt to start five additional
times. If the generator failed to start, the remote
start indicator light will flash.
English Customer Service: 1-844-FIRMAN1
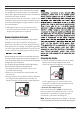
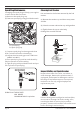
Stopping the Engine
1. Turn off and remove entire electrical loads.
Never start or stop the generator with
electrical devices plugged in or turned on.
Let the generator run at no-load for two
minutes to stabilize internal temperatures
of the engine and generator.
2. Remote Start Operation
Push and release the "STOP" button on the
remote control. The generator will run for an
additional 15 seconds as it goes through a
cool down cycle before shutting off.
Note: Skip this step and go to step 3, if you are
not using Remote Start to shutdown the engine.