Store and Share your Digital Creations SeriTek /1VE2+2 ™ 2-Port External, 2-Port Internal Serial ATA PCI-X Host Adapter User Manual for Power Macintosh
FirmTek, LLC www.firmtek.com Copyright Copyright © 1998-2005 FirmTek, LLC. All rights reserved. No part of this manual may be reproduced, translated by any means, photocopied, or transmitted in any form without the prior written permission of FirmTek. Trademarks FirmTek, UltraTek, AV-Tek, SeriTek names and logotypes are trademarks of FirmTek, LLC. Apple, Macintosh, Power Macintosh, Mac OS 9.XX, OS X, and the Mac logo are registered trademarks of Apple Computer, Incorporated.
TABLE OF CONTENTS I. Introduction...................................................................................................1 II. Installing the SeriTek/1VE2+2.....................................................................5 III. Connecting and Formatting Hard Drives....................................................7 IV. Using SeriTek/1VE2+2 Hot-Swap Functionality..................................... 18 V. Troubleshooting....................................................................
I. Introduction Welcome Congratulations and thank you for purchasing the SeriTek/1VE2+2 Serial ATA host adapter. This product is yet another innovative solution from the innovative folks at FirmTek. About This User Manual This User Manual was written with the assumption you are familiar with your Power Macintosh computer, and are comfortable with opening its case. For further information, and to get acquainted with your computer, please refer to your Power Macintosh User Manual.
SeriTek/1VE2+2 Key Features and Benefits • • • • • • • • • • • • • • • • • • • Two external shielded Serial ATA ports with exclusive hot-swap capability Two internal Serial ATA ports Plug-and-Play ease of use Completely self-contained booting functionality, no driver installation necessary Boosts overall system performance with per-port data transfer rates of up to 150MBytes/sec or 1.
SeriTek/1VE2+2 Specifications General System Hardware Requirements Operating Systems Supported Bus Types External Connectors Drive Types Supported ATAPI Device Support Data Transfer Rates Drive Modes Supported Advanced Data Features Onboard Flash ROM Cables Supported Warranty Physical Dimensions Power Requirements • PCI based Power Macintosh with available PCI expansion slot • PCI-X 1.0a compliant 64-bit at 133/100/ 66MHz bus speeds.
SeriTek/1VE2+2 System Requirements Operating System • • Macintosh OS 9.XX Macintosh OS X version 10.1.
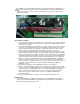
II. Installing the SeriTek/1VE2+2 Caution: Prior to installing the SeriTek/1VE2+2 host adapter and hard drive(s) or peripheral(s), please make sure your data is backed up. The SeriTek/1VE2+2 host adapter and your Macintosh contain sensitive components that can be permanently damaged by Static Electric Discharge. Be sure you are working in an area free of static electricity to prevent them from being damaged.
Caution: The SeriTek/1VE2+2 supports external cables that may be plugged in to one of its two external receptacles. If the SeriTek/1VE2+2 is not properly secured when a cable is inserted into one of the receptacles, it may become loose from the PCI slot and damage the computer. Figure 1: Inserting and securing the SeriTek/1VE2+2 Internal Cable Installation 8.
III. Connecting and Formatting Hard Drives Introduction Up to two internal Serial ATA hard drives may be plugged into the SeriTek/1VE2+2 host adapter. In addition to two internal hard drives, the SeriTek/1VE2+2 supports up to two external hard drives. This section describes how to connect hard drives using external enclosures and a method of formatting your internal and/or external Serial ATA hard drive using Apple’s Drive Setup utility (OS 9.XX) or Apple’s Disk Utility (OS X).
Formatting Serial ATA Hard Drives with Macintosh OS 9.XX Caution: Please make sure your data is backed up before attempting to format or change the partition layout of your hard drives. 1. Turn on your Power Macintosh computer. 2. Open Apple’s Drive Setup. To find and open this application: a) Hold down the Command key and press the “F” key simultaneously. b) Type in “Drive Setup” in the field with the blinking cursor c) Press Return key (See Figure 2).
3. Locate and double click on the Drive Setup “application program” utility (see Figure 3).
4. When the list of hard drives appears, carefully select the drive you wish to format by clicking on it (See Figure 4). If this is a new, unformatted drive, it may show up as . Note: For ideal performance and compatibility, SeriTek/1VE2+2 uses SCSI emulation which allows your Serial ATA drive to appear as a SCSI drive.
5. Click the Initialize button to format the hard drive (see Figure 5). As an alternative, you may use the Custom Setup option if you are comfortable with customizing the hard drive’s partition layout. For more details on the Custom Setup option, please refer to your Power Macintosh User Manual. Figure 5: Initializing the Hard Drive 6. After the hard drive is successfully initialized, it should appear on the desktop as “untitled.” 7.
Formatting Serial ATA Drives Using Macintosh OS X Version 10.1.5 or Later 1. Turn on your Macintosh computer. 2. Open Apple’s Disk Utility which is located in the Utilities folder of the Macintosh OS X start-up volume.
3. Review the list of hard drives show within Disk Utility (see Figure 8). Drives currently in use should have a list of volume names below it. New, unformatted drives typically have no volume names listed. Carefully select the drive you wish to format. Note: Some versions of Apple Disk Utility incorrectly display Serial ATA hard drives as having the Connection Type of “Slave.” Serial ATA hard drives are all in fact “Master” drives.
4. After carefully selecting the hard drive you wish to format, select the Erase tab in Apple’s Disk Utility (see Figure 9). Figure 9: Selecting the Erase tab in Apple’s Disk Utility 5. For Volume Format, the most common choice is “Mac OS Extended.” 6. In the Name field, you may type a name of description for your new hard drive. 7. If you wish to have your new hard drive be recognized by Mac OS 9.XX, select the Install Mac OS 9 Drivers checkbox. Users who dual-boot both Mac OS 9.XX and Mac OS X 10.
Creating a RAID Volume with Serial ATA Hard Drives Using Macintosh OS X version 10.2 or Later The Mac OS X 10.2 or later RAID (Redundant Array of Inexpensive Disks) capability allows you to increase volume sizes, provide data redundancy in case of a hard drive failure, or increase performance by allowing you to join multiple drives into a single volume. Two RAID types are supported, Stripe and Mirror.
5. Carefully select and drag a hard drive to add as a member of the new RAID volume onto the Disk status window. 6. Repeat step 5 for each member for the RAID volume. 7. Choose a RAID Scheme: Stripe or Mirror. 8. Name the new RAID volume. 9. For Volume Format, the most common choice is “Mac OS Extended” (See Figure 11).
10. After reviewing the options you selected, click on the Create button to initialize the new RAID volume (see Figure 12). Figure 12: Creating a new RAID volume 11. After the RAID volume is successfully initialized, it should appear on the desktop.
IV. Using SeriTek/1VE2+2 Hot-Swap Functionality Introduction The SeriTek/1VE2+2 provides advanced hot-swap functionality which provides flexibility similar to that of Universal Serial Bus (USB) and FireWire without the burden of having to power down your system when adding or removing hard drives. Using a unique patentpending method, SeriTek/1VE2+2 supports RAID hot-swap disks under both Mac OS 9 and OS X.
Figure 13: Connecting External Hard Drive(s) Verifying Hard Drive Connections Once you have connected the external hard drive(s) a dialog box will appear which verifies how many devices were added to the system (See Figure 14). There are four Serial ATA channels on the SeriTek/1VE2+2: 0,1,2,3. Channels 0 and 1 are the external ports, channels 2 and 3 are the internal ports . One or more dialog boxes will appear verifying which drive was attached to which channel (See Figures 15 and 16).
Removing External Hard Drive(s) Caution: To prevent loss of data, s ave your work and close associated applications before removing the external hard drive (applications need to be closed since they may keep temporary working files open on the external hard drive). Always unmount the volumes (eject or drag the volumes to trash) associated with an external hard drive before removing it. Eject or drag all of the volumes associated with the hard drive(s) before disconnecting or removing them.
Improperly Removing External Hard Drive(s) Caution: To prevent loss of data, s ave your work and close associated applications before removing the external hard drive (applications need to be closed since they may keep temporary working files open on the external hard drive). Always unmount the volumes (eject or drag the volumes to trash) associated with an external hard drive before removing it.
V. Troubleshooting • The SeriTek/1VE2+2 host adapter does not seem to be recognized Check the SeriTek/1VE2+2 adapter by ensuring it is properly seated in the PCI slot on the Macintosh motherboard. • My hard drive or peripheral won’t work Check cables and connections. Ensure the 7-pin Serial ATA cable is properly oriented to the connectors on the SeriTek/1VE2+2 host adapter and the external enclosure. Ensure the hard drives in the enclosure are properly powered. • Apple’s Drive Setup utility (OS 9.
Apple System Profiler under Mac OS X 1. Open the Apple System Profiler by clicking opening the Finder, opening Applications, opening the Utilities folder, and double clicking on Apple System Profiler. 2. Select the Devices and Volumes tab (early OS X version) or open Hardware and select PCI/AGP Cards (See Figure 23). Figure 22: SeriTek/1VE2+2 listed under PCI/AGP Cards 3. Under PCI/AGP Cards section, SeriTek/1VE2+2 should show up as an “ata” card type. 4.
VI. Product Support Technical Support For additional information on how to use SeriTek/1VE2+2, download the latest firmware updates, or for technical assistance, please visit us at www.firmtek.com , or email us at support@firmtek.com. Please provide the following information when contacting us: Product model and serial number • Firmware version (You may use the Apple System Profiler as described in the troubleshooting section to determine the firmware version.
VIII. Regulatory Compliance Statements Federal Communications Commission Radio Frequency Interference Statement WARNING: Changes or modifications to this unit not expressly approved by the party responsible for compliance could void the user’s authority to operate the equipment. This equipment has been tested and found to comply with the limits for a Class B digital device, pursuant to Part 15 of the FCC rules.