
Computer Hardware User Manual


-15-
Creating a RAID Volume with Serial ATA Hard Drives Using Macintosh OS X version 10.2
or Later
The Mac OS X 10.2 or later RAID (Redundant Array of Inexpensive Disks) capability allows
you to increase volume sizes, provide data redundancy in case of a hard drive failure, or
increase performance by allowing you to join multiple drives into a single volume.
Two RAID types are supported, Stripe and Mirror. A volume that is striped (also known as
RAID 0) has its data broken up and spread across multiple hard drives. Read/write
performance, especially for sequential access, is improved when the data is read and written
across multiple drives simultaneously. No data integrity is provided with striping however,
and since data is spread across multiple drives, if one of the hard drives fails, all of the
volume’s data will be lost.
A volume that is mirrored (also known as RAID 1) has its data duplicated from one hard drive
onto another. A mirrored volume offers data integrity and immediate access to data in the
event one hard drive fails. Because data is mirrored and duplicated across two hard drives,
only half of the combined capacity of the two drives is available.
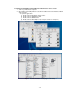
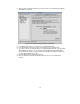
1. Turn on your Macintosh computer.
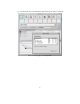
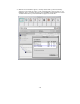
2. Open Apple’s Disk Utility which is located in the Utilities folder of the Macintosh OS X
start-up volume.
To open this application:
a) Double click the Mac OS X startup volume
b) Double click the Applications folder
c) Double click the Utilities folder
d) Double click the Disk Utility icon (See Figures 6 and 7 for examples)
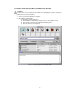
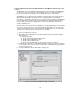
3. Review the list of hard drives show within Disk Utility (see Figure 8). Drives currently in
use should have a list of volume names below it. New, unformatted drives typically have
no volume names listed.
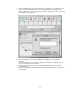
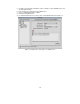
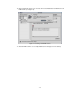
4. Select the RAID tab in Apple’s Disk Utility (see Figure 10).
Figure 10: Selecting the RAID tab in Apple’s Disk Utility