Indoor/Outdoor Analog Wired Cameras with 15" LCD Monitor and Built-In DVR Model 1501 USER'S MANUAL
WELCOME Welcome Thank you for choosing First Alert for your security needs! For more than half a century, First Alert has made the home-safety and security products that make your job easier. Our products are built to the highest standard which has earned us a leadership role in the home-safety and security product categories. We are committed to serving our customers, from the professionals who install our products, to the families and businesses who count on them.
Table of Contents Safety ............................................................................................................................. 1 Safety Precautions ........................................................................................................................... 1 FCC Compliance ............................................................................................................................. 1 Disposal .............................................................
Table of Contents Model 1501 User's Manual Basic .............................................................................................................................................. 23 Language ................................................................................................................................ 24 Date/Time .............................................................................................................................. 24 Password ..........................
Safety SAFETY PRECAUTIONS Do not drop, puncture, or disassemble the camera. Never tug on the power adapter. Use the plug to remove it from the wall. Do not expose the camera to high temperatures. For your own safety, avoid using the camera when there is a storm or lightning. Use the device with care. Avoid pressing hard on the camera body. Do not crush or damage the power cable.
Safety Model 1501 User's Manual DISPOSAL These symbols indicate that it is prohibited to dispose of these bat teries in the household waste. You can take spent batteries that can no longer be charged to the designated collection points in your community.
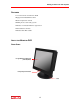
Getting to Know Your Model 1501 System Congratulations on purchasing your First Alert Security Camera product. First Alert has been helping families and businesses stay safe for over 50 years. By having a First Alert Security Camera, you’re taking the first step in protecting your home or business from damage or theft. We’re watching, even when you’re not. CHECK PACKAGE CONTENTS After unpacking the carton, check the contents for damage.
Getting to Know Your 1501 System Model 1501 User's Manual FEATURES 15” LCD monitor with built-in DVR Equipped with 500GB hard drive H.
Getting to Know Your 1501 System Model 1501 User's Manual REAR PANEL 5 ① Audio Output ② Video Output ③ Audio Input (1–4) ④ Video Input (1–4) ⑤ DC 12V Power Socket ⑥ USB Ports ⑦ Alarm Input (1-4) GND: Ground NO/COM: Alarm Output 485A/B: PTZ Control +/232TX/RR: RS232 connector to PC +12V, 100 mA connectors to DC power relays ⑧ RJ45, Ethernet 10/100Base-T 5 4 3 2 1 6 7 8
Getting to Know Your 1501 System Model 1501 User's Manual ABOUT THE REMOTE CONTROL Open PTZ control window* Keyboard 0-9 Input numbers and letters; in preview mode select channels Open Device Number input dialog box Back space to delete current input Page up; turn up Page down; turn down Move cursor up Move cursor down Move cursor left Move cursor right Enter Return to previous menu; exit operation Open main menu Switch display modes (quad/single picture view); press with direction key to choose video ou
Getting to Know Your 1501 System Model 1501 User's Manual ABOUT THE CAMERAS AND MOUNTING KITS The Model 1501 security system includes four wired-indoor/outdoor color CCD security cameras, four camera stands, mounting kits and 60 ft of BNC cables for each camera.
Setting Up Your Model 1501 System GENERAL PRECAUTIONS Use only the two power supplies provided with the system. Unplug the power supplies when the system is not in use for extended time periods. Do not place any of the equipment near a radiator, vent, or other place where it might be exposed to heat, moisture, dust, vibrations or strong magnetic fields. Place the monitor in a well-ventilated location to prevent overheating. Do not attempt to repair the equipment.
Setting Up Your Model 1501 System Model 1501 User's Manual INSTALLING AND CONNECTING THE CAMERAS 1 Select the position for the camera and install a mounting bracket (supplied). Screws and anchors are supplied. Use an appropriate screw type for the mounting surface. 2 Screw the camera on the bracket. Tighten the lock nut to secure the camera on the bracket. lock nut thumb bolts camera mounting bracket 3 Adjust camera to the proper view angle. Make sure the lens is upright relative to your subject.
Setting Up Your Model 1501 System Model 1501 User's Manual video connection audio connection CONNECTING THE MONITOR-DVR TO AN EXTERNAL CONNECTION EXTERNAL HDD The Model 1501 system has an internal SATA 500GB HDD (hard disk drive), which can be expanded with an external SATA HDD to 1TB by setting the jumper on SATA I, limit to 1.5GB/s operation mode. Connect the HDD using the available USB port on the bottom of the monitor-DVR.
Setting Up Your Model 1501 System Model 1501 User's Manual Normal-Close Connection Normal-Open Connection Alarm Output Connection 11
Mouse Operations In addition to operating the system by using the buttons on the remote control, the system can be operated using a mouse. This chapter provides a quick start overview of the operating commands available using the mouse functions. For detailed descriptions of the menu options, see the next chapter Operating Menus. SURVEILLANCE INTERFACE Connect the DC 12V power supply adapter to the monitor-DVR to power-up the system.
Mouse Operations Model 1501 User's Manual MOUSE MENUS Click the right mouse key to open the Shortcut Menu. Scroll the cursor to highlight an option and click the left mouse key to open the sub-menu. SHORTCUT MENU Click the right mouse key to open the Shortcut menu from the surveillance interface. Click the left mouse key to select an option: go to the Main menu; lock the system; change the channel; search the recording; control PTZ*; mute the sound; and manually begin and stop recordings.
Mouse Operations Model 1501 User's Manual PTZ CONTROL (OPTION) The PTZ is an optional feature available on some cameras. This feature is not available on the cameras supplied with the Model 1501 system, but the system software is PTZ-ready. Click right key on the surveillance interface to open the Shortcut menu. Choose PTZ to enter the PTZ control interface. Drag the cursor to adjust the PTZ moving speed. Use the direction keys to move the PTZ up/down/left/right.
Operating Menus This chapter provides information about the menu screens displayed on the LCD monitor. The menus are used to control the various functions of the DVR system. The user s elects options from a series of menus and executes the actions by using the keypad on the DVR or the remote control. MAIN MENU Use the Main Menu to access all the operating and programming menus.
Operating Menus Model 1501 User's Manual SEARCH Access the Record Search menu from the Main Menu. Use this menu to search for recordings made on a specific date. Double click a time box (hourly increments for the date selected) to select video for that hour. Click SEARCH to search all files. Click PLAYBACK to play the video. RECORD SEARCH Click right key on the surveillance interface to open the Shortcut menu. Choose RECORD to search and playback the recording. Note: Green means normal recording.
Operating Menus Model 1501 User's Manual FILE LIST Choose a date from the Record Search menu and select the FILE LIST to show a detailed list of videos for that date. Select the channel (CHN SWITCH) and type of video to focus the search. CH Channel on which the video was recorded TIME Time period covered by the video SIZE Size of video file (Mb) TYPE Type of video recording (normal, alarm) BAK (Backup) Click box to export selected video file to USB storage To playback a file: 1.
Operating Menus Model 1501 User's Manual To backup a file: 1. Select a video file (check in box). 2. Click BACKUP to start backup via USB to storage device. 3. Prompt box shows backup progress.
Operating Menus Model 1501 User's Manual LOG SEARCH Choose a date from the Record Search menu and select LOG SEARCH. Choose the log date and type. Click SEARCH to check the recording logs. RECORD Access the Record Search menu from the Main Menu. Use this menu to set the recording parameters for each video channel.
Operating Menus Model 1501 User's Manual CHANNEL ON means the channel is enabled for recording. OFF means the channel is disabled for recording. RESOLUTION Select resolution: HIGHEST, HIGH, or NORMAL. QUALITY Set stream size for video quality: BEST, FINE, or NORMAL. AUDIO Select ENABLE for audio recording on all channels. Select DISABLE for no audio recording. REC. MODE Select POWER UP to begin recording immediately at DVR startup; select Timer Record to open Schedule menu and set recording times.
Operating Menus Model 1501 User's Manual HDD MANAGEMENT Access the HDD Management menu from the Main Menu. Use this menu to check hard drive status, capacity, free space, and usage. The system is equipped with a 500GB hard drive, but can support up to a 1000GB hard drive. Note: Stop recording before formatting the hard drive. Formatting will erase all information on the hard drive.
Operating Menus Model 1501 User's Manual No.
Operating Menus Model 1501 User's Manual BASIC Access the Basic Setup menu from the Main Menu. Use this menu to set the system language, date and time, password, display parameters, and video and audio parameters.
Operating Menus Model 1501 User's Manual LANGUAGE Click the LANGUAGE icon on the Basic Setup Menu to display the system language setup menu. This DVR supports English and Chinese. Click APPLY to save the change and reboot the system. DATE/TIME Click the DATE/TIME icon on the Basic Setup Menu to display the time setup menu. Use this menu to set the date, date format (MM/DD/YY), time, time format (12 hours or 24 hours), and time zone, including Daylight Saving Time option.
Operating Menus Model 1501 User's Manual PASSWORD Click the PASSWORD icon on the Basic Setup Menu to display the password security setup menu. Click APPLY to save the new parameters. When Password is set to DISABLE, a login password is not required to use the system. When Password is set to ENABLE, a login password is required for both users and the system administrator. Note: When passwords are used, anyone using the system must enter a user login and will only be able to “Search Record” and "Playback.
Operating Menus Model 1501 User's Manual COLOR Click to access Color Setup menu to set the video chromaticity, brightness, contrast, and saturation for each channel. Use the sliding scale to set video brightness, contract, and saturation. PREVIEW ON means the channel is allowed to view live mode, OFF means the channel is not allowed. PREVIEW TIME ON means time/date information is placed in livemode view, OFF means time/date is not placed.
Operating Menus Model 1501 User's Manual ADVANCE Access the Advanced Setup menu from the Main Menu. Use this menu to view system information, set the system alarm and email notification parameters, and set motion detect, mobile, system maintenance, PTZ* and network parameters. * Cameras supplied with 1501 system are not equipped with PTZ feature.
Operating Menus Model 1501 User's Manual ALARM Click the ALARM icon on the Advanced Setup menu to display the setup menu. Click APPLY to save the new parameters. I/O CHANNEL Video channel. I/O ALARM Select alarm input contact configuration: NO (normal open), NC (normal closed), or OFF. HDD LOSS ON means the system will sound an alarm if there is no HDD, the HDD is unformatted, or unavailable, and it will display an “H” in the live view.
Operating Menus Model 1501 User's Manual E-MAIL Setup The system can send an email notification with a JPEG snapshot for triggered events on the system. Use the E-mail Setup menu to set the system parameters. Click APPLY to save the new parameters. SYSTEM INFORMATION Click the INFO icon on the Advanced Setup menu to display the information screen. This interface shows system software/firmware versions, MAC address, and system serial number.
Operating Menus Model 1501 User's Manual MOTION DETECT Click the MD (Motion Detect) icon on the Advanced Setup to display the set up screen. Click APPLY to save the new parameters. CHANNEL Set motion detect for each channel STATUS Select motion detect ON or OFF SENSITIVITY Select sensitivity: 1–4 (low–high) MD AREA Select the motion detect area. Each channel has 12x15 small panes. Red area means activated motion detection; transparent block means not activated.
Operating Menus Model 1501 User's Manual MOBILE Click the MOBILE icon on the Advanced Setup to display the set up screen. Select the mobile network option: 2.5, 2.75G, or 3G. The transport speed in 2.5G mobile net work is 3 fps and the picture resolution is 160 x 120. The transport speed in 2.75G is 10 fps in 3G is 15 fps. Click APPLY to save the new parameters. SYSTEM MAINTENANCE Click the MAINTAIN icon on the Advanced Setup to display the set up screen. Click APPLY to save the new parameters.
Operating Menus Model 1501 User's Manual To update system: 1. Insert an empty flash disk into the USB port. 2. Create a folder on flash disk called “DVR Upgrade.” 3. Copy the firmware file to DVR Upgrade folder of the flash disk. 4. Click SYSTEM UPDATE on the System Maintenance screen to upgrade firmware, and display the progress of the system upgrade. Note: Do not remove USB flash drive while the upgrade process is taking place. 5. System automatically reboots. To restore factory settings; 1.
Operating Menus Model 1501 User's Manual STOP BIT Select stop bit: 1 or 2 (default setting is 1) VERIFY Select verify: None, Odd, Even, Mark, or Space (default setting is None) ADDRESS Enter PTZ code; refer to PTZ camera instruction manual NETWORK SETUP Click the NETWORK SETUP icon on the Advanced Setup screen to display the set up screen. Three TYPE options are available: DHCP Server automatically assigns IP address for the DVR.
Operating Menus Model 1501 User's Manual DDNS Setup DDNS allows access to your network using domain names instead of IP addresses. The service manages changing IP address and updates your domain information dynamically. Sign up for the service through www.TZO.com or www.DynDNS.org. The DVR can be accessed remotely via a network browser, if DDNS service is used. Set the DNS network router number in the Network Setup menu and then click DDNS Setup to turn on and set the required DDNS parameters.
IE Operation This chapter describes the browser software that can be installed on a PC and used to record, playback, and search video segments. DOWNLOAD AND INSTALL ACTIVEX Input the DVR IP and port (for example: http://172.18.6.202:8080/) in IE address blank and click ENTER to connect the DVR. The PC will download and install ActiveX automatically Note: If ActiveX download is not successful, check the IE Security Level and Firewall Setting. USER LOGIN LOGIN Input the DVR local IP in the IE address.
IE Operation Model 1501 User's Manual LIVE After successful login, enter into real time preview interface and the software will connect video and audio automatically. Play Control Open or close window Capture picture Remote recording (to save route refer to “System Setting”) 1, 4, 9, 16, multi-screen display Volume PTZ Control (option) The PTZ is an optional feature available on some cameras.
IE Operation Model 1501 User's Manual PLAYBACK Click PLAYBACK to access the playback interface. To playback a video: 1. Choose the date, channel, and record type. 2. Click SEARCH to list all eligible files. 3. Select the file to playback and click PLAYBACK to play the file. 4. Click BACKUP to save the file in a specified directory. SETUP Click SETUP to access the setup interface. Use this screen to access the Record, Alarm, PTZ*, Network, Setting, and System Information menus.
IE Operation Model 1501 User's Manual Record Click RECORD to access the setup interface. Check the parameter settings in user interface of DVR. Alarm Click ALARM to access the setup interface. Check the parameter settings in the user interface DVR. PTZ* Click PTZ to access the PTZ setup interface. * Cameras supplied with 1501 system are not equipped with PTZ feature.
IE Operation Model 1501 User's Manual Network Click NETWORK to access the network setup interface. Setting Click NETWORK to access the network setup interface. Set the bandwidth in kbps (128k, 192k, 256k, 384k, 512k, or 1024k) to match the Internet traffic. This bandwidth does not include audio. Enter file save path location for capturing picture and recording video.
IE Operation Model 1501 User's Manual Host Info Click HOST INFO to access the Host Info interface. Use this screen to check the HDD status, remaining record time, firmware version, and MAC Address.
Technical Information Video Compression H.264 Total Resource 120 frame (30 fps/ch) Live Picture Resolution D1 (704×480) Playback Resolution CIF (352×288) Input 4 CH BNC Output 1 CH BNC (max.
Technical Information Model 1501 User's Manual Control Remote Supported Mouse Supported USB mouse Panel Not supported Network Control Supported Power DC 12V, 5A Working Condition Humidity 20-95% Temperature 32° F – 122° F Display Display Mode 15”HD LCD display Resolution 1024 x 768 RGB Power DC 12V, 5A Camera Image Device CCD Resolution 420 TV lines Effective Pixels NTSC: 510(H) x 492(V) Operating Temperature 32 - 122°F Lens 3.6mm/6.
Warranty PRODUCT LIMITED WARRANTY BRK Brands, Inc., (“BRK”) the maker of First Alert® brand products warrants that for a period of one year from the date of purchase (the “Warranty Period”), this product will be free from defects in material and workmanship. BRK, at its sole option, will repair or replace this product or any component of the product found to be defective during the Warranty Period. Replacement or repair will be made with a new or remanufactured product or component.
Warranty Model 1501 User's Manual software via its website. This warranty does not cover any alteration or damage to any other software that may be or may become resident on the users system as a result of installing the software provided. This warranty is in lieu of other warranties, expressed or implied, and BRK neither assumes nor authorizes any person to assume for it any other obligation or liability in connection with the sale or service of the product.