BRK Series H.264 Digital DVR quick install guide MODELS PRO-D1610 16 Channel 1.0TB H.
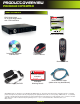
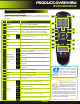
product overview package contents , What s in the box PRO-D810 H.264 16 Channel Digital DVR with 1TB Hard Drive BRK Series H.264 Digital DVR quick install guide MODELS PRO-D1610 16 Channel 1.0TB H.264 VIDEO COMPRESSION DIGITAL DVR RECORDER MOBILE PHONE/ WEB READY DVR OPTIMIZED SATA HDD Quick Install Guide Installation Software and Manuals USB 2.
product overview dvr controls About this Quick Start Guide Thank you for choosing First Alert for your security needs! This Quick Start Guide is designed to provide you with the basic operation of your PRO-D1610 DVR. Please consult the complete User’s Manual included on the CD disk for a detailed explanation of all the features and functions of this DVR. We also encourage you to visit our website at www.brkelectronics.
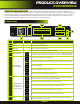
product overview dvr controls back Panel 10 8 1 3 Item 2 5 6 7 4 9 Function Description 1 POWER Input DC 12V/3A power connection 2 Network For connecting RJ45 ethernet cable to PC or router 3 VGA Output For connecting to a VGA monitor 4 Video Output For connecting to a BNC monitor (800 x 600) - NTSC or PAL Alarm Input 4 alarm inputs Alarm Output 2 alarm outputs RS485 For connecting PTZ cameras +12V Power supply for alarm block inputs, the current is 100mA (to prevent short c
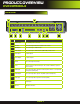
product overview DVR controls remote control Remote Control Operation The remote control is the secondary input device for navigating the system’s interface. In device operation, the OK key has the same function as “left click” of the mouse. Item 2 1 Function Description 1 STANDBY Press to turn standby mode ON/OFF 2 LOGIN/LOCK If “Security” has been enabled in the setup menu, press to open the user password login screen or log off system.
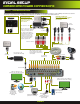
initial setup camera and power connections Step 1 ... connecting devices Follow this diagram to make device connections. This diagram is for illustration purposes only. Cabling and other accessories shown are not included with this DVR unless indicated. See “What’s in the Box” for included devices. DVR Front Face Connect Mouse & USB Drive Powering Cameras Powering Cameras Power from a single Power Adaptor and 8-way splitter. 2 required. Not included.
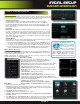
initial setup system operation Step 2 ... system start up Power On/Off To power the system On/Off, connect the power cable to the DC 12V port on the rear panel. At startup, the system performs a basic system check and runs an initial loading sequence. After a few moments, the system loads a live display view. Default Video Output The default video output for the DVR system is VGA.
initial setup system operation Step 3 ... language, date and time Setting Up Language/Date/Time Use the SYSTEM SETUP Menu to set the system language, date and time, device IDs and passwords, system maintenance, configure video settings and gather system information like serial number and software version. Language To change the system language:, from the drop-down menu select LANGUAGE. Click APPLY. Click OK in the confirmation window. NOTE: The system will restart when you finish system language setup.
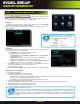
initial setup system operation STEP 4 ... camera display setup Setting Up Cameras for Viewing and Recording Use the Display Setup menu to customize channel titles, show/hide the date and time in live viewing and playback, and enable/ disable preview channels. To customize Display settings, click DISPLAY from the Main Menu: Display 1.
initial setup Basic operation Step 5 ... recording RECORD Mode Configure Recording Options: In this Menu you have three recording options: POWER UP (Continuous), TIMER RECORD (enables SCHEDULE menu) and ALARM (within SCHEDULE menu). By default, the DVR is set to record continuously. Set parameters as follows: 1. From the Main Menu click RECORD. Under SWITCH, use the drop-down menus and select ON/OFF to enable/disable recording from the selected channel.
initial setup Basic operation Motion Detect Setup You can configure motion detection for each channel (Camera) connected to the DVR. To configure motion detection: 1. From the Main Menu click DEVICES. Then click MOTION. 2. Under STATUS, select ON to enable motion detection for the desired channel. Scroll down for additional channels. Note: If in the RECORD screen a Channel is set to OFF, MOTION is also disabled for that Channel. 3. Under SENSITIVITY, select 1 through 8.
©2012 BRK Brands, Inc. a Jarden Corporation Company (NYSE:JAH) 3901 Liberty Street Road, Aurora, IL 60504-8122 Phone: 630-851-7330 Tech Services: 800-323-9005 www.brkelectronics.