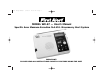
WX-67 Large Manual 3/12/02 10:25 AM Page 1 MODEL WX-67 — User’s Manual Specific Area Message Encoding (S.A.M.E.) Emergency Alert System IMPORTANT! PLEASE READ ALL INSTRUCTIONS CAREFULLY BEFORE USING THE UNIT.
WX-67 Large Manual 3/12/02 10:25 AM Page 2 TABLE OF CONTENTS IMPORTANT SAFEGUARDS . . . . . . . . . . . . .1 Contents in product package INTRODUCTION . . . . . . . . . . . . . . . . . . . . .2 In the Package, you will find: CHOOSING A LOCATION . . . . . . . . . . . . . . .3 • Emergency Alert Radio – WX-67 INSTALLATION . . . . . . . . . . . . . . . . . . . . . .4 • One AC Power Adapter – 120VAC: 12VDC LOCATION OF CONTROLS . . . . . . . . . . . . . .6 OPERATION . . . . . . . . . . . . . . . . . .
WX-67 Large Manual 3/12/02 10:25 AM Page 3 Important Safeguards This product is designed to operate using the AC adapter (120V) supplied in a household application. - Do not allow anything to rest on the power cord. Do not locate this product where persons walking on it could damage the cord. Keep cord away from heated surfaces. - The output terminal blocks for Remote Alert provides a floating relay contact output to external warning devices.
WX-67 Large Manual 3/12/02 10:25 AM Page 4 For up-to-date information on NOAA and weather frequencies used in your area, Check the NOAA National Weather Service web site at http://www.nws.noaa.gov/nwr. Your can also call 1-888-NWR-SAME (1-888-697-7263) to obtain the FIPS code number for programming your radio. Introduction Congratulations on your purchase of the First Alert® Specific Area Message Encode (S.A.M.E.) Emergency Alert Radio – WX67.
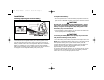
WX-67 Large Manual 3/12/02 10:25 AM Page 5 Choosing A Location For Installation Display Backlight: Allows you to read the LCD display in low light situations. When powered from an AC adapter or 12V DC source, the backlight will stay on continuously. During a power failure, to reserve power from backup battery, the backlight will stay on for about 10 seconds every time you press a key. The Emergency Alert Radio is designed for desk top or wall mount installation.
WX-67 Large Manual 3/12/02 10:25 AM Page 6 Installation To replace the battery: Installing/replacing the receiver battery - Turn unit upside down. Locate the battery compartment door tab, press down on ARROW and slide cover open in direction of arrow. CAUTION! DO NOT TRY TO CHARGE AN ALKALINE BATTERY - Always select “Non-rechargeable” (NB) before installing an alkaline battery. Using the “Rechargeable” (RB) setting with an alkaline battery may cause fire hazard.
WX-67 Large Manual 3/12/02 10:25 AM Page 7 Connecting the power WALL MOUNT INSTALLATION USING STANDARD 120V AC OUTLET 1. Take the wall mount bracket from the package. hold the bracket at the mounting location and, using it as a template, mark the positions for the screw holes on the wall or other mounting surfaces. 2. Drill the two screw holes, fix the screws onto the wall, leaving a space of about 3mm (1/8”) between the head of the screw and the wall. Step 3 3.
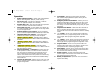
WX-67 Large Manual 3/12/02 10:25 AM Page 8 Location Of Controls 1. Battery Selection Switch 2. DC Power Jack 3. Remote Alert Jack 4. Alert Audio Out Jack 5. External Antenna Jack/Connector 6. Integrated Telescopic Antenna 7. YELLOW Color Indicator (Watch) 8. RED Color Indicator (Warning) 9. GREEN Color Indicator (Statement) 10. ALERT ON/OFF Switch 11. Function Knob 12. Liquid Crystal Display (LCD) 13. Emergency Radio ON/OFF Button 14. STOP ALERT TONE 15. (Denoted in text as “>”) 16.
WX-67 Large Manual 3/12/02 10:25 AM Page 9 12. LCD Display – Displays time and alert messages. Also used to display different options when you are programming the unit. 13. Emergency Radio On/Off Button – Allows you to unmute the loudspeaker and listen to the 24 hours voice broadcast of the National Weather Service. The function will go on and off alternatively every time you press the button. 14. Stop Alert Tone Button – When the radio receives an alert, it activates the alert tone.
WX-67 Large Manual 3/12/02 10:25 AM Page 10 PROGRAMMING THE RADIO After the radio is properly installed and powered up, you can: • Select Correct Channel • Select Location Code • Select Voice or Tone Alert Mode • Set the digital clock • Select Single or Multiple FIPS location codes, and enter the codes • Press “PROGRAM” button to switch the unit into program mode. By pressing “>”, “<” buttons or rotating the “Function (Scroll) Knob” to view all the menu options.
WX-67 Large Manual 3/12/02 10:25 AM Page 11 Alert Description Table: The table below shows what the LCD readout displays on your WX-67 Emergency Alert Radio when receiving weather emergency signals from NOAA. In addition, depending on your prior selection, an alert tone will sound and/or a voice broadcast will be heard from the radio.
WX-67 Large Manual 3/12/02 10:25 AM Page 12 TO REVIEW THE OVERLAPPING ALERT MESSAGES: D) ENTER LOC CODE- In order to receive the alert signals in a specific county or a portion of a state, the FIPS location codes have to be set up properly in the memory locations of the unit. The Emergency Alert Radio can store up to 10 alert messages in its memory in a First in First Out (FIFO) basis.
WX-67 Large Manual 3/12/02 10:25 AM Page 13 E) SETTING the CLOCK- NOTICE TO USERS - Press “ENTER” button while “SETTING CLOCK” is displayed in the program mode. The system may cause interference to a TV or radio even when it is operating properly. To determine whether the system is causing the interference, turn it off. If the interference goes away, the system is causing the interference.
WX-67 Large Manual 3/12/02 10:25 AM Page 14 WX 67 Specifications SERVICE PROCEDURE FREQUENCY COVERAGE – WEATHER CHANNELS Channel 1............................... 162.400 MHz Channel 2............................... 162.425 MHz Channel 3............................... 162.450 MHz Channel 4............................... 162.475 MHz Channel 5............................... 162.500 MHz Channel 6............................... 162.525 MHz Channel 7............................... 162.
WX-67 Large Manual 3/12/02 10:25 AM Page 15 NOTES
WX-67 Large Manual 3/12/02 10:25 AM Page 16 90-Day Limited Warranty Sima Products Corp. (“Company”) warrants that if the accompanying product proves to be defective to the original purchaser in material or workmanship within 90 days from the original retail purchase, the Company will, at the Company’s option, either repair or replace same without charge (but no cash refund will be made). Conditions 1.