
Use and Care Manual


Page 32
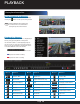
RECORDING AND CAPTURE SETTINGS
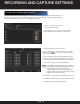
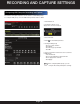
1. Choose the camera to schedule.
2. Check Enable Schedule.
3. Click Edit or choose a color icon under the Edit
button and draw the schedule line on the panel.
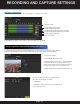
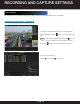
1. Select the day of the week to schedule
2. Check All Day item to schedule an all-day recording.
Click on the the
clock to set the accurate Start / End
times for the recording.
3. For a non-All Day schedule, leave All Day unchecked
and set the Start / End time (up to eight recording periods
can be schedule for each day and times cannot overlap).
4. Select the record type from the dropdown list.
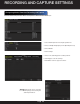
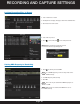
NOTE
:
To enable Motion, Alarm, M | A (motion or alarm),
M & A (Motion and alarm) and VCA (Video Content
Analysis) triggered recording and capture,
configure motion detection settings, alarm input
settings or VCA settings. The VCA settings are only
available to the smart IP cameras.
5. Click Copy to copy settings to another day of the week.
6. Click OK to save setting and return to upper level menu.
7. Click Apply in Record Schedule interface.
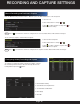
Record schedules are used to set times for cameras to automatically start or stop. The following steps can
also be taken to set a schedule for automatic capture by entering the Capture tab in the Schedule interface:
Menu > Record/Capture > Schedule > Record/Capture Schedule.
Configuring Recording/Capture Schedule