
Use and Care Manual


Page 74
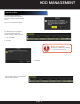
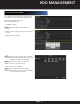
5. Select HDD from the list and click icon to enter the Local HDD settings interface.
6. Select the Group number for the current HDD.
NOTE
:
The default group No. for each HDD is 1.
7. Click OK to confirm the settings.
8. Click Yes to finish the settings.
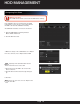
Setting HDD Property
Before you start
Set storage mode to Group before setting the HDD property.
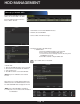
Enter the HDD Information interface:
Menu > HDD > General.
1. Select HDD from the list and click the
icon to enter the
Local HDD Settings interface.
2. Set the HDD property to either R/W, Read-Only, or
Redundancy. 3. Click Apply and then the OK button.
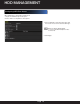
NOTE
:
Read-only to prevent recorded files from being
overwritten when the HDD becomes full in overwrite
recording mode.
NOTE
:
Redundancy allows video to be recorded both onto
the redundancy HDD and the read/write HDD
simultaneously to ensure high security and reliability
of video data.
NOTE
:
At least two hard disks must be installed on the NVR
when the HDD is set to Redundancy and one is set to
R/W.
HDD MANAGEMENT
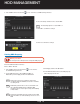
3. Click Apply and then the OK button.
4. In the HDD Information menu, the HDD property
will be displayed in the list.