USER GUIDE PACIFIC AR NEWPORT AR DAYTONA AR
Introduction Congratulations on your purchase of Rower. FIRST DEGREE FITNESS is proud to present the Rower as a home use product featuring patented Adjustable Fluid Resistance. Follow all instructions carefully for correct assembly, tank filling, water treatment, service and safety. Access to our world-wide distributor and service network is available at www.firstdegreefitness.com Check contents of Box 1 and Box 2 to assure all parts are present and correct prior to assembly. Training with the Rower 1.
Contents Safety ................................................................................... 4 Assembly .............................................................................. 6 Fluid Rower Box 1 & 2 Contents ............................................... 7 Assembly Instructions ............................................................. 8 Operation Instructions ............................................................... 11 Computer Operation ............................................
Safety Safety Information • Before using this product, it is essential to read this ENTIRE operation manual and ALL instructions. The Rower is intended for use solely in the manner described in this manual. • UNDERSTANDING EACH AND EVERY WARNING TO THE FULLEST IS IMPORTANT • As with any piece of fitness equipment, consult a physician before beginning your Rower exercise program.
Safety Proper Usage • Do not use any equipment in any way other than designed or intended by the manufacturer. It is imperative that FIRST DEGREE FITNESS equipment is used properly to avoid injury. • Injuries may result if exercising improperly or excessively. It is recommended that all individuals consult a physician prior to commencing an exercise program. If at any time during exercise you feel faint, dizzy or experience pain, STOP EXERCISING and consult your physician.
Assembly Product Specifications Product Class: HC Braking System: Speed Independent Product Net Weight: 27.6kg (63.05lbs) Product Gross Weight: 34kg (74.96lbs) Minimum Safe Operating Surface Area: 319cm (125.59”) x 172cm (67.71”) Dimensions: 1990mm (78.35”) Length x 520mm (20.47”) Width x 560mm (22.
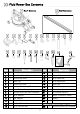
Fluid Rower Box Contents Box 2 Contents Box 1 Contents Item Qty. Description Item Qty.
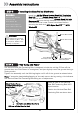
Assembly Instructions STEP 1 Installing the Seat and Rear Leg to Seat Rail REQUIRED Seat Rail [2] Install the Rower Seat[3] onto the Seat Rail[2], as shown, with seat indentation facing rearward. Rower Seat [3] Seat Rail Rower Seat STEP 2 REQUIRED Rubber Bumpstop [7] 2 x M6 x 10mmBolts [15] 2 Next, install Rear Bumpstop[7] on underside of the Seat Rail using 2x M6 x 10mm Bolts[15]. Beveled edge must face forward.
Assembly Instructions STEP 3 Installing the Rear Leg REQUIRED Rear Leg [4] Rubber End Cap [5] 2 Internal Mounting Plate [6] Using the 2x M8x15mm Bolts[14], 2x M8 Washers[10], Internal Mounting Plate[6] and Rear Leg[4], install as shown. Once Rear Leg is tightened, install the Rear Rubber End Cap[5].
Assembly Instructions STEP 5 Installing the Seat Rail to Mainframe REQUIRED Vertical Seat Rail Bolt Dampener [8] 2 M10 Washer [9] Plastic Dome Cap [11] M10 x180mm Bolt [12] Install the M10x180mm Vertical Seat Rail Tensioning Bolt[12] with the Plastic Dome Cap[11] through the Seat Rail as shown, then fit the Vertical Seat Rail bolt Dampener[8] onto the bolt between the bottom of the Seat Rail and the Lower Frame (not shown) before securing the bolt with M10 Nyloc Nut[17] and M10 Washer[9].
Operation Instructions Adjustable Resistance (AR) Tank The Adjustable Resistance (AR) Tank, developed and patented by FIRST DEGREE FITNESS. offers a true multi-level experience. Water is moved between the "storage" and "active" chambers of the AR Tank. Your new Rowing Ergometer can adapt - at the turn of a dial - to the resistance preferred by each user in the Getting Started To achieve minimum resistance, select "MIN" on the tank adjuster.
Operation Instructions Removing/Changing Tank Water Row a minimum of ten complete strokes before commencing tank draining. Remove tank plug, insert rigid end of siphon into tank and begin draining. a) b) Tank Plug Siphon Set Adjuster handle to “MIN” Row at least ten strokes to fill the storage reservoir as completely as possible. c) Remove Tank Plug. d) Insert rigid end of siphon into the tank, and flexible hose into a large bucket. e) Drain tank (approx.
Operation Instructions Adjust Footplates The Slider Footplate accommodates most foot sizes, and is designed to keep your feet securely in place as you row. TO ADJUST: Lift the top of the footplate from the mounting peg and slide vertically between 1-6 to suit your foot length. Secure by hooking the footplate back onto the mounting peg and pushing down firmly to lock it into position. Place feet on the foot plates and tighten the foot straps to ensure your feet sit firmly against the heel captures.
Operation Instructions Start Rowing There are six phases to completing a rowing stroke 1. Sit with straight legs and back, leaning forward slightly at the hips with arms out straight and hands level with the lower ribs. Swing back. 2. Legs and back straight, leaning slightly forward from the hips, arms out in front. Lean and slide forward. Note: Hands should now be around your knees, keeping legs straight. 3. Legs come forward, aiming to get the shins vertical.
Computer Operation Functions Auto Start: Commence rowing to activate. Reset all values: Press and hold RESET button for 3 seconds. Distance: Each single press of RESET adds 100m distance, up to 1000m then adds 500m. Auto-Pause: A temporary halt in exercise will result in the following: For over 5 seconds and under 5 minutes: a)SPM/500METER/WATT to zero. b)Distance/TIME values are saved. c)CAL per hour defaults to Total CAL.
Using the FIRST DEGREE FITNESS USB Interface Description: The USB connectivity now built in to all new models of FDF Console and IPM allow you to enhance your exercise experience by connecting to your home PC or Laptop. Using FDF's own sample applications you can exercise while enjoying your favorite movies. NetAthlon 2 XF for Rowers lets you race with other Internet connected rowers in a Virtual Reality 3D environment or train solo. Setting Up USB connectivity 1.
Detaching the Rower Belt Bungee Shock Cord Bungee Attachment Point 1.To detach belt, simply pull beyond the range of the normal rowing stroke until the belt detaches from the Belt Bungee Pulley. Tip: You’ll hear the Velcro separating just before the belt detaches. 2.Cut plastic tie holding bungee at the Bungee Attachment Point, pull the Cord through all three pulleys and leave excess on top of the tank for now.
Reattaching the Rower Belt Velcro Facing Upward Idle Wheel Rower Handle Belt/Bungee Pulley Bungee Pulley Begin reattaching the Rower Belt by threading around the Rower Belt Pulley with the Velcro side facing upward as illustrated. Next, thread the Belt around the Idle Wheel as shown. Once around the Idle Wheel, attach the Rower Belt to the Belt/Bungee Pulley. There is an obvious “lip” at the attachment point.
Removing the Bungee Shock Cord Upper Frame Plug Move the Rowing Handle to it’s farthest forward point on the Mainframe, then cut the plastic end tie and follow the drawing above for bungee removal. Next, remove the Upper Frame Plug to allow the Bungee Shock Cord to be threaded through the top of the frame. Note: You will need to rotate the Belt/ Bungee Pulley to align the holes properly.
Maintenance All preventive maintenance activities must be performed on a regular basis. Performing routine preventive maintenance actions can aid in providing safe, trouble-free operation of all FIRST DEGREE FITNESS equipment. FIRST DEGREE FITNESS is not responsible for performing regular inspection and maintenance actions for your machines. Instruct all personnel in equipment inspection and maintenance actions and also in accident reporting and recording.
Troubleshooting Fault Probable Cause Solution Water changes color or becomes cloudy. Fluid Rower is in direct sunlight or has not had water treatment. Change Rower location to reduce direct exposure to sunlight. Add water treatment or change tank water as directed in the water treatment section of this manual. Consider using distilled water to refill tank. Rower Belt slipping off belt/ bungee pulley. Bungee not under enough tension.
Optional Fixture Kit Installation A fixture kit for upright storage can be purchased separately. Install the Z bracket onto the Storage Base. Install the bracket onto the rower as shown. Note: Do not tighten the Knob and the Bolt. Tighten the Z Bracket knob to fix to the rower. Note: Ensure the Z bracket is secure before tightening. 22 Stand the rower up vertically with the main frame on the floor. Using the 8mm Allen Wrench tighten the Bolts.
Product Exploded Diagram 23
Product Exploded Diagram 24
Product Exploded Diagram 25
International Warranty HOME USE FIRST DEGREE FITNESS Limited warrants that the PACIFIC AR / NEWPORT AR / DAYTONA AR Fluid Rower (MODEL PACAR / NPTAR / DAYTONA AR), purchased from an authorized agent and in its undamaged original packaging, is free from defects in materials and workmanship. FIRST DEGREE FITNESS Limited or its agent will, at their discretion, repair or replace parts that become defective within the warranty period, subject to the specific inclusions and exclusions below.
CONTACT US For customer support please visit firstdegreefitness.com/support TAIWAN T: +886 3 478 3306 764 Chung Shan South Rd Yangmei Taoyuan Taiwan R.O.C.