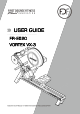
USER GUIDE FR-E520 VORTEX VX-3
Introduction Congratulations on your purchase of Rower. FIRST DEGREE FITNESS is proud to present the Rower as a home use product featuring patented Adjustable Fluid Resistance. Follow all instructions carefully for correct assembly, tank filling, water treatment, service and safety. Access to our world-wide distributor and service network is available at www.firstdegreefitness.com Check contents of Box 1 and Box 2 to assure all parts are present and correct prior to assembly. Training with the Rower 1.
Contents Safety ................................................................................... 4 Assembly - FR-E520 ............................................................... 6 FR-E520 Box 1 & 2 Contents ......................................................... 7 Assembly - VX-3 ............................................................................. 8 VX-3 Box 1 & 2 Contents ............................................................ 9 Assembly Instructions - E-520 .........................
Safety Safety Information • Before using this product, it is essential to read this ENTIRE operation manual and ALL instructions. The Rower is intended for use solely in the manner described in this manual. • UNDERSTANDING EACH AND EVERY WARNING TO THE FULLEST IS IMPORTANT • As with any piece of fitness equipment, consult a physician before beginning your Rower exercise program.
Safety Proper Usage • Do not use any equipment in any way other than designed or intended by the manufacturer. It is imperative that FIRST DEGREE FITNESS equipment is used properly to avoid injury. • Injuries may result if exercising improperly or excessively. It is recommended that all individuals consult a physician prior to commencing an exercise program. If at any time during exercise you feel faint, dizzy or experience pain, STOP EXERCISING and consult your physician.
Assembly - FR-E520 Product Specifications Product Class: SC Braking System: Speed Independent Product Net Weight: 61.9kg (136.47lb) Product Gross Weight: 72.5kg (159.84lb) Minimum Safe Operating Surface Area: 315cm (124.02”) Length x 201cm (79.13”) Width Dimensions: 1950mm (76.77”) Length x 810mm (31.89”) Width x 860mm (33.
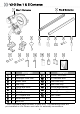
FR-E520 Box 1 & 2 Contents Box 2 Contents Box 1 Contents Item Qty. Description Item Qty. Description 1 1 Mainframe 11 4 M10x47.
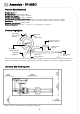
Assembly - VX-3 Product Specifications Product Class: SC Braking System: Speed Independent Product Net Weight: 66.4kg (146.39lb) Product Gross Weight: 77.3kg (170.42lb) Minimum Safe Operating Surface Area: 312cm (122.83”) Length x 201cm (79.13”) Width Dimensions: 1910mm (75.2”) Length x 820mm (32.28”) Width x 855mm (33.
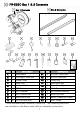
VX-3 Box 1 & 2 Contents Box 2 Contents Box 1 Contents Item Qty. Description Item Qty. Description 1 1 Mainframe 11 5 M10x47.
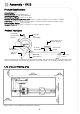
Assembly Instructions- E-520 STEP 1 Installation Rowing Front Leg for E-520 REQUIRED Mainframe 1[1] 2 x Front Leg [5] 8 x M10 2 Washer [7] a) Remove the Mainframe[1] and all components from Box 1 Check all parts against the box contents. b) Lay on soft surface such as carpet as shown. Tilt frame upward slightly and install rower Front Leg [5] with 4x M10x20mm Bolt [10] and M10 Washer[7]. Repeat for other leg.
Assembly Instructions- E-520 STEP 2 Attach Seat Rails to Frame REQUIRED Mainframe 1[1] a) 11 Left/Right Seat Rail [2] Locate and unwrap the Bungee Shock Cord from the frame before moving onto the installation of the seat rails. .
Assembly Instructions- E-520 Attach Seat Rails to Frame d) Begin with left Seat Rail[2]. using the preinstalled M10x70mm[12] Secure from behind with M10 Nylock[8]. 1 1 Left Seat Rail e) Install lower left Seat Rail[2] using M10x70mm Bolts[12], Nylock Nuts[8] and M10 Washers[7].
Assembly Instructions- E-520 STEP 3 Assemble Rowing Seat CAUTION The Rower Seat[3] is Heavy. Use Both Hands and Keep Fingers Clear of the Rower Channels When Guiding the Seat down the seat Rails. a) Slide the assembled Seat Rails[2] facing in the direction of the arrow in the above graphic. The Seat indentation Must be towards the rear of the rower.
Assembly Instructions- E-520 Install Rear Leg STEP 4 REQUIRED Rear Leg [4] a) 3 4 x M6 Washers [6] Mount the Rear Leg[4] onto the seat Rails and secure as shown. 9 6 4 x M10 Washers [7] Rear Leg 4 x M6x20mm Bolts [9] 4 x M10x47.5mm Bolts [11] b) c) Install all M10x47.5mm bolts[11] and M10 washers[7] first from the outside to hold the Rear Leg[4] in position. Secure the Rear Leg from the inside with the M6x20 mm Bolts[9] and M6 Washers[6].
Assembly Instructions- E-520 STEP 5 Attach Bungee Shock Cord a) CAUTION Connect the Bungee Shock Cord to the Seat Rail and install The Bungee Shock Cord will be Under Tension when Stretching to Install. Do Not Let Go of the Bungee While Under Tension as This Could Cause Injury And/ or Damage to the Rower Connect the Bungee Shock Cord to the Seat Rail as shown. Nest install the Rower Seat as shown below.
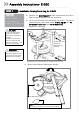
Assembly Instructions – VX-3 STEP 1 Remove Mainframe From the Box REQUIRED Mainframe [1] 1 2 a) Remove the Mainframe[1] and all components from Box 1 Check all parts against the box contents. b) Slowly stand the rower mainframe upright. CAUTION Do Not Free The Rowing Handle, Heel Adjuster or Computer Stalk Before The Assembly is Complete. The Rower Components Such as Mainframe and Seat Rails are Heavy. Use Care During Assembly.
Assembly Instructions– VX-3 STEP 2 Attach Seat Rails to Frame REQUIRED Mainframe 1[1] a) Left/Right Seat Rail [2] Align and secure lower attachment points using M10 x 80 mm Bolts[12], M10 Nylock Nuts[8] and M10 Washers[7] 2 Washers [7] 4 x M10 4 x M10 Nylock Nuts [8] 12 2 x M10 x 80mm Bolts [12] 8 CAUTION Nylock Nuts Must Be Outside The Standard Nut and Washer to Properly Secure Assembly Seat Rail Attachment Points Left Seat Rail Right Seat Rail Note: 2 x M10 x 80mm Bolts are Preinstalled on th
Assembly Instructions – VX-3 Attach Seat Rails to Frame c) Install lower left Seat Rail[2] using M10x80mm Bolts[12], Nylock Nuts[8] and M10 Washers[7].
Assembly Instructions – VX-3 STEP 3 REQUIRED Assemble Rower Seat a) 3 Rower Seat [3] 9 4 x M6 Washers [6] 6 4 x M6 x 20mm Bolts [9] Install the Rower Seat[3] onto the rower frame using 4x M6x20mm bolts[9] and 4x M6 washers[6] the seat indentation must be facing towards the rear of machine. Rower Seat 4x M6x20mm bolts and 4x M6 washers Indentation CAUTION The Rower seat[3] is heavy. Use both hands and keep fingers clear of the rower channels when guiding the seat down the seat rails.
Assembly Instructions – VX-3 STEP 4 REQUIRED Rear Leg [4] Install Rear Leg a) 3 5 x M6 Washers [6] 9 Mount the Rear Leg[4] onto the seat Rails and secure as shown. 6 5 x M10x47.5mm Bolts [7] Rear Leg 5 x M6x20mm Bolts [9] 5 x M10 Washers [11] b) c) Install all M10x47.5mm Bolts[7] and M10 Washers[11] first from the outside to hold the Rear Leg[4] in position. Secure the Rear Leg from the inside with the M6x20mm Bolts[9] and M6 Washers[6].
Assembly Instructions – VX-3 STEP 5 Attach Bungee Shock Cord a) CAUTION The Bungee Shock Cord will be Under Tension when Stretching to Install. Do Not Let Go of the Bungee While Under Tension as This Could Cause Injury And/ or Damage to the Rower Connect the Bungee Shock Cord to the Seat Rail and install the rower Seat. Connect the Bungee Shock Cord to the Seat Rail as shown. Nest install the Rower Seat as shown below.
Operation Instructions Tank Filling and Water Treatment REQUIRED Funnel and Hose [5]. CAUTION Use a drop cloth under the tank when filling to avoid damage floor or carpet. Do not fill past the calibration mark as indicated on the tank level sticker or water spillage may occur. WARNING a) Filling requires a large bucket (not Supplied) and the supplied water Funnel and hose[5]. Filling will take approximately 8 liters of water.
Operation Instructions Long-Term Water Treatment The amount of time between water treatments can vary greatly depending on your unit’s location and exposure to sunlight. Typically you can expect to treat your tank water every 12-24 months. If water becomes discolored or shows signs of algae/ bacterial growth simply add one Water Treatment Tablet. Please consult your nearest regional dealer to arrange the purchase of further treatment tablets or visit www.firstdegreefitness.
Operation Instructions Adjust Footplates The Slider Footplate accommodates most foot sizes, and is designed to keep your feet securely in place as you row. TO ADJUST: Lift the top of the footplate from the mounting peg and slide vertically between 1-6 to suit your foot length. Secure by hooking the footplate back onto the mounting peg and pushing down firmly to lock it into position. Place feet on the foot plates and tighten the foot straps to ensure your feet sit firmly against the heel captures.
Operation Instructions Start Rowing There are six phases to completing a rowing stroke 1. Sit with straight legs and back, leaning forward slightly at the hips with arms out straight and hands level with the lower ribs. Swing back. 2. Legs and back straight, leaning slightly forward from the hips, arms out in front. Lean and slide forward. Note: Hands should now be around your knees, keeping legs straight. 3. Legs come forward, aiming to get the shins vertical.
Using the First Degree Fitness USB Interface Description: The USB connectivity now built in to all new models of FDF Console and IPM allow you to enhance your exercise experience by connecting to your home PC or Laptop. Using FDF's own sample applications you can exercise while enjoying your favorite movies. NetAthlon 2 XF for Rowers lets you race with other Internet connected rowers in a Virtual Reality 3D environment or train solo. Setting Up USB connectivity 1.
Maintenance All preventive maintenance activities must be performed on a regular basis. Performing routine preventive maintenance actions can aid in providing safe, trouble-free operation of all First degree fitness equipment. First degree fitness is not responsible for performing regular inspection and maintenance actions for your machines. Instruct all personnel in equipment inspection and maintenance actions and also in accident reporting and recording.
Troubleshooting Fault Water changes color or becomes cloudy. Probable Cause Solution Rower is in direct sunlight or has not had water treatment. Change rower location to reduce direct exposure to sunlight. Add water treatment or change tank water as directed in the water treatment section of this manual. Consider using distilled water to refill tank. Rowing stroke Bungee not under return is too light. enough tension. Cut Bungee Tie Rack and tighten slightly on Bungee Hook.
Tank Belt Adjustment 2. Using a long tool, push out the rear end cap as pictured below left. This will give you access to the tank tensioning bolt (shown lower right). 1. Remove large metal inspection plate. End Cap 4. Using a 6mm Allen Key, tighten the Belt using the Tank Tensioning Bolt until the belt no longer slips during hard rowing. 3. Loosen both the rear and front tank bolts slightly as shown left. Remove front Rubber Belt Cover. Note: Do not over tighten tank bolts.
Bungee Cord Replacement. Dealer Assistance Required (Expect 2-5 years bungee life in commercial use. Damage during initial rower assembly is not covered under warranty) 1. Unhook Bungee Cord Hook. Remove computer mount with 6mm Allen key. 2. Carefully peel back and remove the Belt Pulley Sticker. Then remove C-Clip and Black Spacer as shown. Spacer C-Clip Pulley Sticker 3. Remove the Belt Pulley and the Spacer. Unhook the Bungee Cord End from the Pulley and remove by pulling out from the bottom. 4.
International Warranty FULL COMMERCIAL USE This product is designed and constructed for use in any Health Club / Fitness Studio application. FIRST DEGREE FITNESS Limited warrants that the FLUID ROWER E520 & VORTEX VX-3 , purchased from an authorized agent and in its undamaged original packaging, is free from defects in materials and workmanship.
NOUS CONTACTER Pour le soutien à la clientèle, veuillez visiter firstdegreefitness.com/support TAÏWAN T: +886 3 478 3306 764 Chung Shan South Rd Yangmei Taoyuan Taiwan R.O.C.