
User's Manual


System Upgrade 7
119
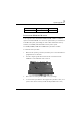
3. Pull out the HDD by locking bar firmly and slowly.
4. Take out the hard disk from the compartment by finger carefully
5. Remove the connector from the hard disk gently.
6. Remove the crane screws located at each side of the hard disk.
7. Rotate and tighten the crane screws to the new hard disk.
8. Attach the connector to the new hard disk precisely.
9. Place the hard disk back into the HDD compartment that is next to the inner
part of the battery bay.
10. Lock the bar as depicted in Chapter 2.1."Installing the Hard Disk".