FIC GE2 (Mini Entertainment PC) User Guide
G E2 USER GUIDE Copyright©2006 All Rights Reserved - Printed in Taiwan Notebook Computer User Guide Original Issue: 2006/04 This manual guides you in setting up and using your new notebook computer. Information in this manual has been carefully checked for accuracy and is subject to change without notice.
G E2 USER GUIDE FCC Information to User Safety and Care Instructions No matter what your level of experience with computers, please make sure you read the safety and care instructions. This information can help protect you and your computer from possible harm. Radio and television interference Warning: Use the specified shielded power cord and shielded signal cables with this computer, so as not to interfere with radio and television reception.
G E2 USER GUIDE • Consult the dealer or an experienced radio/television technician for help. You may find helpful the following booklet, prepared by the Federal Communications Commission: Interference Handbook (stock number 004-000-00345-4). This booklet is available from the U.S. Government Printing Office, Washington, DC20402 Warning: The user must not modify or change this computer without approval. Modification could void authority to this equipment.
G E2 USER GUIDE Gunag St., Neihu, Taipei, Taiwan Telephone:+886-2-8751-8751 ext.7935 Fax: +886-2-87518822 Emaill: rex_kuo@pcg.fic.com.tw Fremont CA 94538 USA Telephone : +1-510-252-7755 Fax : +1-510-2528895 Email : tomwong@fic.com.tw Changes or modifications not expressly approved by the party responsible for compliance could void the user's authority to operate the equipment 5.
G E2 USER GUIDE ---Consult the dealer or an experienced radio/TV technician for help. 5.21 Regulatory information / Disclaimers Installation and use of this Wireless LAN device must be in strict accordance with the instructions included in the user documentation provided with the product. Any changes or modifications (including the antennas) made to this device that are not expressly approved by the manufacturer may void the user’s authority to operate the equipment.
G E2 USER GUIDE Radio Frequency Interference Requirements This device is restricted to INDOOR USE due to its operation in the 5.15 to 5.25GHz frequency range. According to FCC 15.407(e), requires this product to be used indoors for the frequency range 5.15 to 5.25GHz to reduce the potential for harmful interference to cochannel of the Mobile Satellite Systems. High power radars are allocated as primary user of the 5.25 to 5.35GHz and 5.65 to 5.85GHz bands.
G E2 USER GUIDE The optical disk drive is Class 1 Laser Product. Caution Changes or modifications not expressly approved by the manufacturer may void the user’s authority, which is granted by the Federal Communications Commission, to operate this computer. Use Conditions This part complies with Part 15 of the FCC Rules.
G E2 USER GUIDE EN 301 489-1 V.1.4.1 (2002) / EN 301 489-17 V.1.2.1 (2002) EN 301 893 V1.3.1:2005 EN 50371 (2002) EN 55022: 1998+A1:2000+A2:2003 EN 55024: 1998+A1:2001+A2:2003 EN 60950: 2000 EN 61000-3-2: 2000 EN 61000-3-3: 1995 + A1: 2001 802.11b & 802.11g Restrictions: - European standards dictate maximum radiated transmit power of 100mW EIRP and frequency range 2.400-2.4835GHz; - In France, the equipment must be restricted to the 2.44652.4835GHz frequency range and must be restricted to indoor use.
G E2 USER GUIDE Italy General authorization required if used outside own premises Latvia Limited to 5150 – 5300 MHz, Under Study Luxembour g None; General authorization required for public service Austria Not implemented; Military band Bulgaria Not implemented Croatia Not implemented Czech Republic Not implemented; Planned France Not implemented; France will implement this band identified by the ERC DEC(99)23 when the efficiency of the mitigation techniques made mandatory by this Decision i
G E2 USER GUIDE Notification Letter Subject: Confirmation of 18 Frequency Notifications Submitted to the National Authorities of the Spectrum Management Dear Sir We , First International Computer, Inc. for performing the Annex IV procedures in Article 10.5 of R&TTE directive 99/5/EC, would like to inform you that the frequency notification regulated in Article 6.
G E2 USER GUIDE Contents 1 INTRODUCTION .............................................................................. 15 1.1 FEATURE HIGHLIGHT .........................................................................................15 1.2 UNPACKING THE MINI EPC................................................................................17 1.3 THE FRONT SIDE OF THE MINI EPC ..................................................................18 1.4 THE REAR SIDE OF THE MINI EPC ..........................
G E2 USER GUIDE USING THE IEEE 1394 PORT........................................................................................56 USING THE WIRELESS LAN...........................................................................................57 USING THE MODEM PORT..............................................................................................58 6 BIOS SETUP ..................................................................................... 59 6.1 6.2 6.3 6.4 6.6 6.
1 Introduction 1 Introduction Explore endless entertainment options from the comfort of your couch. With an Intel® ViivTM technology-based PC and supporting devices, you can enjoy a growing universe of digital media content. With mini EPC, every member of your family can enjoy the immersive experience of PC games and movies on a big screen, enhanced by a home theater system.
G E2 USER GUIDE • Fully compatible with an entire library of PC software based on operating systems such as Windows XP Window Media Center Edition 2005. Wireless LAN Intel PRO/Wireless 3945ABG Network Connection (IEEE 802.11a/b/g, Tri-mode) Memory This notebook provides two memory slots for installing DDR2 SDRAM 200-pin SODIMM modules up to 2GB using 256MB, 512MB, or 1024MB DDR2 SDRAM modules. USB 2.
1 Introduction 1.2 Unpacking the mini EPC Your mini EPC comes securely packaged in a sturdy cardboard shipping carton. Upon receiving your computer, open the carton and carefully remove the contents.
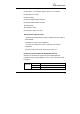
G E2 USER GUIDE Carefully inspect each component to make sure that nothing is missing and/or damaged. If any of these items is missing or damaged, notify your dealer immediately. Be sure to save the shipping materials and the carton in case you need to ship the computer or if you plan to store the computer away sometime in the future. 1.3 The Front Side of the mini EPC 1. Eject Button 2. 4-in-1 Card Reader 3. USB Port 4. Slot-in ODD 5. Power/Resume Button on Feature 18 Description 1.
1 Introduction Feature Description card format. You can use either of the 4 types flash memory cards for extra storage media. 3. USB Port The Universal Serial Bus (USB) port allows you to connect up to USB-equipped peripheral devices (for example, USB mouse, digital camera, USB storage device and so on). 4. Optical Disk Drive This optical disk drive is Slot-in type ODD. It allows you to load and start programs from a CD/DVD and play DVD movies and audio CDs. It also can burn CD/DVD. 5. 1.
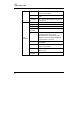
G E2 USER GUIDE 1. IEEE 1394 3. Antenna connector 5. Microphone Jack 7. DVI-I Socket 9. TV Port (S-video) 11. USB Port Feature 20 2. Modem Port 4. AV_In Port 6 Headphone Jack 8. LAN Port 10 USB Ports 12. DC_In Description 1. IEEE 1394 IEEE 1394 port is a high speed I/O port that can transfer high levels of data in real-time, such as Digital Video Camera, external hard disk. 2. Modem Port A 56K internal fax/data modem is build-in. It keeps you connected to the outside networks through telephone line.
1 Introduction Feature Description connector signal for watching and recording TV programs. 4. AV_In Port This port is for Audio and Video input. 5. Microphone Jack Allows you to connect an external microphone. 6 Headphone Jack Lets you plug in high-definition headphone, powered speakers, or earphone. (The SPDIF transmits digitized audio signal by optical fiber. The external audio amplifier can get the best audio quality without loss.) 7.
G E2 USER GUIDE 1.5 Memory Upgrade Your notebook computer offers 200-pin SODIMM (Small Outline Dual Inline Memory Module) at least 256MB DDR2-SDRAM. The memory compartment is located inside your computer. The table below lists the possible combinations of different memory module and memory size. NOTE: Please contact dealer for changing or adding DDR2SDRAM module. It is not available for users to change it by themselves.
1 Introduction This page is intended to be blank.
Getting Started 2 2 Getting Started Your mini EPC is designed and pre-configured for easy setup and use. This chapter describes the installation steps you should follow to get the notebook up and running as quickly as possible. Contact your dealer if they have pre-installed all the needed drivers to fully operate your mini EPC or if there is an update on the driver installation of the notebook. 2.
G E2 USER GUIDE 2. Plug the connector of the AC adapter to the DC-IN port found at the rear side of the mini EPC. + y For the power supply of this equipment, an approved power cord has to be used. y Make sure the socket and any extension cord(s) you use can support the total current load of all the connected devices. y Before cleaning the computer, make sure it is disconnected from any external power supplies (i.e. AC adapter). 2.
Getting Started 2 Online Spotlight's offerings on the big screen from the comfort of your couch—and you can control it all with a single remote. ATTACH AN ANTENNA TO YOUR MINI EPC The GE2 has built-in a TV tuner card to process analog television signals. (Beside, this TV tuners card functions as video capture cards to record television programs onto a hard disk.
G E2 USER GUIDE CONNECT TO A TV WITH AN S-VIDEO CONNECTION 1. Connect the S-Video cable to your video card's S-Video output connection, located on the back of your Media Center PC.
Getting Started 2 2. Connect the other end of the S-Video cable to an S-Video input connection on the back of your TV.
G E2 USER GUIDE 2.3 Connect mini EPC to a PC Monitor You can also connect a monitor to your PC (running Microsoft Windows XP Media Center Edition 2005) just like you would with any other computer. All you have to do is plug the cable from the monitor into the back of the high-level computer with a DVI-I Socket. However, most monitors use a VGA cable to connect to a PC. Connect the VGA cable from the monitor to the DVI-I Socket on the back of your Media Center PC via a DVI-VGA Adapter.
Getting Started 2.3 2 Installing the GE2 Device Drivers It is best to install the needed device drivers for using the built-in devices of your computer. Before installing the drivers, check with your dealer first if they have already installed all the drivers along with the operating system. If not, follow the procedures below: DRIVER INSTALLATION NOTE: + Please be notified that whenever you install the driver utility, it should be install the CHIPSET Driver first.
G E2 USER GUIDE "E:\Drivers\MCE\VGA\Setup.exe" Audio device "E:\Drivers\MCE\Audio\Setup.exe" Modem driver "E:\Drivers\MCE\Modem\ssetup.exe" Wireless LAN driver and Utility “E:\Drivers\MCE\Wireless LAN\Autorun.exe” LAN driver "E:\Drivers\MCE\LAN\Autorun.exe" Card Reader driver "E:\Drivers\MCE\Card Reader\setup.exe" East Fork driver "E:\Drivers\MCE\East Fork\setup.exe" TV Tuner driver "E:\Drivers\MCE\TV Tuner\installdriver.exe" TV Tuner software encoder "E:\Drivers\MCE\TV Tuner\installfilter.
Getting Started 2 33
Using Your Mini EPC 3 3 Using Your Mini EPC This chapter describes how to operate the standard features of the mini EPC. With mini EPC, every member of your family can enjoy the immersive experience of PC games and movies on a big screen, enhanced by a home theater system. Users can interact with an entertainment PC with an USB mouse and keyboard, or with an optional remote control, which provides an exciting viewing experience from the comfort of the living room sofa. 3.
G E2 USER GUIDE Media Center Remote Control Button Description Press the RECORD button on the remote to begin recording what you’re currently watching. To find and watch it later, simply press the RECORD TV button. The MORE INFO button brings up additional option related to where you are in the menu system. You can also press MORE INFO to get details on the music, TV, pictures, or video that is selected.
Using Your Mini EPC Button 3 Description When navigating through the Media Center menu system, press the BACK button to go to the previous screen. Use the CURSOR ARROWS to navigate up, down, left, or right through the Media menu system. When you find what you want, press OK button in the center of the arrows to select it. The GREEN START BUTTON will launch the Media Center menu system when you are in Windows XP.
G E2 USER GUIDE Button Description Press the DVD MENU button to access the main menu of the DVD in your DVD drive and to begin watching it. Use the NUMBER KEYS to go directly to the TV channel you want to watch or use them to type letters, numbers, or symbols into a search box. 3.2 Wireless USB Keyboard (option) Before using the wireless USB keyboard, you must activate communication between the mini EPC and the wireless USB Keyboard. Please follow the steps to install the wireless USB keyboard. 1.
Using Your Mini EPC 3 [The real Wireless USB Keyboard for shipment is still NOT available. This one is for symbol only.] Key numbers: 99Keys (including hot-keys) Battery: AA size Battery x4 Parameters for Remote Control Distance for remote control: within 5m. Angle for remote control: 360 degrees Frequency band for signal transmitted: at 2.4GHz frequency. Standby Mode: System will wait for 5 minutes to activate Standby Mode if there is no any input signal.
G E2 USER GUIDE 3.3 Configuring Your Screen Display Possible Display Configurations The table below shows you the possible display resolution you can set when using either the LCD display or the external monitor (CRT): Display Maximum Resolution Maximum Colors External Monitor 1600x1200, 85Hz 32-bit true colors + 65,536 or 64K colors is also equivalent to 16-bit high color while 16 million or 16M colors is equivalent to 32-bit true color. 3.
Using Your Mini EPC 3 3. To remove the optical disc. Be sure close CD/DVD player related programs. 4. Press the eject button under the optical drive slot. Then the optical disc will slide out. How to care the CD/DVD When you handle CDs, pay attention to the following guidelines: • Always pick up the CD by its edges. • Avoid scratching or soiling either side of the CD.
G E2 USER GUIDE 3.5 • Do not write with the hard ball-point pen or apply labels on either side of the CD. • Keep the CD away from direct sunlight or high temperatures. • Clean fingerprints or dust from the CD by wiping it with a soft cloth. Using Flash Memory Cards What is Flash Memory Card? Flash Memory is a memory storage media. They are used by most digital camera, mobile phone, and PDA. Flash memory cards are built with different form factor and brand name.
Using Your Mini EPC 4 in 1 SD (Secure Digital) MMC (MultiMedia Card) MS (Memory Stick) MS_Pro 3 Bottom side Bottom Top side Top side Only one correct side can be accepted for the 4 in 1 card slots. If you cannot insert the card into the 4 in 1 slot or you had inserted the card but it is not recognized by the computer, please remove the card and turn the card upside down and insert it again. To prevent the damage made both on card and the slot, never forced an entry into the slot with incorrect side.
Microsoft Media Center 4 4 Microsoft Media Center The GE2 (Mini Entertainment PC) integrated in a highly compact platform is designed for digital entertainment. That means you can take charge of your media, share moves, TV, photos, and music with your friends and family. It simplifies our digital life. At the heart of a Media Center PC is a powerful Windows XP-base computer so you can send e-mail, browse the web, and get your work done. 4.
G E2 USER GUIDE Start the Windows XP Media Center Now you should try Windows XP Media Center Edition 2005 for yourself. Click the START button, then select MEDIA CENTER, or you can press the GREEN START BUTTON on the Media Center Remote Control to launch Media Center setup wizard for the first time.
Microsoft Media Center 4 The Welcome screen appears. (Welcome to the Media Center setup wizard) Press the NEXT button to continue.
G E2 USER GUIDE 48
Microsoft Media Center 4 49
G E2 USER GUIDE 50
Microsoft Media Center 4 51
G E2 USER GUIDE 52
Microsoft Media Center 4 53
G E2 USER GUIDE 54
Connecting to Peripherals 5 5 Connecting to Peripherals This chapter describes how you attach peripheral devices to your mini EPC. You can attach a printer or mouse; connect an external monitor and keyboard, or any other peripheral device. Using the USB Port USB (Universal Serial Bus) is a hardware interface that enables you to connect multiple devices (such as mouse, keyboard, storage device, joystick, digital camera, and video conference cameras, etc.) to your notebook computer.
G E2 USER GUIDE computers/networks through a local area network (LAN) and supports data transfer rates at 10/100Mbps and can be up to 1000Mbps. The 100Base-TX is called Fast Ethernet. To meet higher bandwidth demand, this mini EPC has upgraded Fast Ethernet to Gigabit Ethernet. The network becomes more efficient while downloading movies, music or other multimedia files. The built-in Gigabit Ethernet LAN module provides a standard RJ-45 connector.
Connecting to Peripherals 5 Using the Wireless LAN Wireless LAN is the major breakthrough in computer communication technology. It lets user connect to the LAN environment without using any wire to traditional RJ-45 jack. User can enjoy the wireless connection within the range of Access Point (AP) of LAN. Access Point (AP) is the wireless transmission and receiving device, it generally connects to the server of a LAN environment or act as a LAN hub with wireless connection.
G E2 USER GUIDE Using the Modem Port This notebook comes equipped with a 56K internal fax/data modem that allows you to communicate with others via fax, email, or to connect to an online service or bulletin board. The built-in fax/data modem provides on standard phone connector. To connect the analog phone cable to your modem: 1. Locate the analog phone cable in the accessories box in notebook shipping carton. Each end of the cable has a RJ-11 connector. 2.
BIOS Setup 6 6 BIOS Setup Your mini EPC also uses the Phoenix BIOS Setup program that allows you to set several system configuration in changing the way your computer performs. This includes your system time and date, disk drive configuration and password setup. This information is then stored in the CMOS RAM and will remain permanent unless you change it again.. 6.1 Running the BIOS Setup Program Your mini EPC is likely to have been properly setup and configured by your dealer prior to delivery.
G E2 USER GUIDE the screen are some brief help descriptions of each item you want to change. To exit the BIOS Setup program, simply press the key and select from the Exit menu whether you want to Save changes and exit; Discard Changes and exit. 6.2 Using the Main Menu Setup Phoenix BIOS Setup Utility Main Advanced Security Boot Exit Item Specific Help System Time: [10 :28 :32] , , System Date: [03/31/2006] or selects field.
BIOS Setup 6 • System Time Allows you to change the system time using the hour: minute: second format of the computer. You can also change the system time from your operating system. • System Date Allows you to set the system date using the month/date/year format. You can also change the system time from your operating system. • IDE Channel 0 Master This field display various parameters for the hard disk drive. If type [Auto] is selected, the system automatically sets these parameters.
G E2 USER GUIDE 6.3 • Extended Memory This field reports the amount of extended memory found by the BIOS during Power-On Self-Test (POST). • BIOS Version This field is for information only as the BIOS displays the BIOS version during the Power-On Self-Test (POST).
BIOS Setup 6 Select boot screen using options: [Enabled] to display POST screen, or [Disabled] to display Logo screen. 6.
G E2 USER GUIDE 64 • Set Supervisor Password Supervisor password gives you the authority in accessing the setup utility. You also need to enter this password in system booting and resuming from suspend mode. When you press in this field, the Set Supervisor Password dialog box appears. Enter a new password with up to 8 alpha-numeric characters, and then re-enter it for confirmation. • Set User Password This field is only available when Supervisor Password has set.
BIOS Setup 6.6 6 Using the Boot Setup This item allows you to set the search drive sequence where the system will try to boot up first. Phoenix BIOS Setup Utility Main Advanced Security Boot Exit Item Specific Help Boot priority order: IDE CD: MATSHITADVD-RAM UJ-845S-( Keys used to view or IDE HDD: FUJITSU MHT2080BH-(S1) configure devices: PCI BEV: IBA GE Slot 0200 v1231 Up or Down arrows Select a device. <+> and <-> moves The device up or down.
G E2 USER GUIDE 6.7 How to Exit the Setup Program There are two choices to escape from the Setup program. Phoenix BIOS Setup Utility Main Advanced Security Boot Exit Item Specific Help Exit Saving Changes Exit System Setup Exit Discarding Changes and save your Load Setup Defaults changes to CMOS.
BIOS Setup • 6 Save Changes Saves Setup data to CMOS.
Caring for Your Notebook 7 7 Caring for Your mini EPC Important Safety Instructions This section gives you detailed information about how to maintain a safe environment while using the mini EPC. You can maintain its condition and performance by following these guidelines. Please read it carefully to ensure maximum safety. • Lay the mini EPC on a reliable surface when installing. A drop or fall may cause injury.
G E2 USER GUIDE • Though your AC adapter is suitable for universal international voltage, it still requires a stable and continual power supply. Make sure the voltage of the power source when connect the mini EPC to the power outlet. If your are unsure of your local power specifications, consult your dealer or local power company. • Do not leave this mini EPC in an environment unconditioned. Storage temperature above 60ºC (140ºF) may damage the mini EPC.
Caring for Your Notebook • 7 To avoid any damage happened to the internal device, you should first disconnect the AC adapter when replacing any internal device. Cleaning Your Mini EPC When it is necessary to clean the plastic case, use a soft, lint-free cloth, slightly dampened with a mild detergent solution. When cleaning, do not use liquid or sprayed detergent for cleaning. Instead, use moisture sheet or a cloth for cleaning.
System Specifications A APPENDIX A System Specifications This appendix gives information on the technical and hardware specifications of your computer. Please note that the information mentioned here may not be exactly the same with your computer as specification is subject to change without notice or modifying this manual. Designed with an advanced modular architecture, your Notebook PC also allows you for several levels of customization and expansion that are previously available only on desktop PCs.
G E2 USER GUIDE System Specifications GE2 Specifications Processor Unit z Intel® z z Viiv™ technology-based PC Intel® Core™ Duo processor T2300~ T2700 2MB/1MB integrated L2 cache System Memory Two 200-pin memory slots User-upgradeable to maximum 2GB using 200-pin SODIMM 256MB, 512MB or 1024MB modules z DDR2 –667/533/400 SDRAM modules z z Storage z z 2.5” Format 9.
System Specifications GE2 A Specifications z Audio z z Sound Codec chip: Azalia ACL260 Compliant with Intel HD Audio I/O Ports z One DVI-I Socket One AV-In Port One TV Port (S-Video) Three USB2.
G E2 USER GUIDE GE2 Specifications Wireless Bluetooth 2.0 z IEEE z z 802.11a/b/g USB Interface External Bluetooth Headphone, Keyboard & Mouse Intel® Pro/Wireless 3945ABG Network Connection (Tri-mode 802.11a/b/g) Power System z Adapter, AC 100-240Volt, 50-60 Hz, 65W, 20 Voltage or Less Operating System OS z Windows XP Media Center Edition 2005 Weight and Dimension Dimension s Weight 76 z z 226mm (W) x 172mm (D) x 42mm (H) Approximately 1.
System Specifications A 77