Getting Started 2 ☞ Danger of explosion if battery is incorrectly replaced. Replace only with the same or equivalent type recommended by the manufacturer. Dispose of used batteries according to the manufacturer’s instructions. EXTENDING BATTERY LIFE It is important to be aware of the simple things for extending the life of the system main battery while you are on the road. You should find a working place where the external lighting is not too bright and turn down the screen brightness.
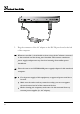
N otebook User Guide 3. Plug the connector of the AC adapter to the DC-IN port found at the left of the computer. ☞ Whenever possible, it is advisable to always have the AC adapter connected to the notebook and the battery pack installed. This ensures continuous power supply and prevents any data loss incurring from sudden power breakdown. ☞ Please be sure to use LSE0202A1990 power supply adapter for this notebook computer.
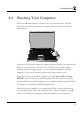
Getting Started 2.3 2 Starting Your Computer The Power/Resume button is found on the top of the base unit. Press the Power/Resume button to start your computer and check that if the Power LED turns on. After a few seconds, the computer’s display will turn on and your computer will begin to execute the Power On Self Test or POST to check if all system components are running properly. Any error found during the test will be displayed on the screen and may generate short beep sound as well.
N otebook User Guide Consult the Windows manual on how to use the program. If not, contact your dealer for assistance. 2.4 Adjusting the Display Controls The LCD brightness adjustment is controlled by + and + keys respectively. You need to press these hot-key controls after powering on your notebook to suit your viewing pleasure. The Brightness hot-key control adjusts the brightness on the LCD.
Getting Started 2 Changes". Accordingly, insert the Windows XP installation CD into optical disk drive with following the instructions on the screen to finish the installation. INSTALLING THE AGP DRIVER For the best and fast performance of video AGP, please install the driver of the AGP. Follow the procedures indicated below to install the AGP driver. Installing AGP device driver for Windows XP 1. Click the Start, then point to Run. The Run dialog box appears. 2.
N otebook User Guide 4. Click Next to continue and click Yes to accept the License Agreement. 5. There are two choices appeared as "Express: Recommend" and “Custom : For advanced user and system administrators” for your selection. Choose either of these to continue the process, if you choose Custom, moreover, you should press Next twice to continue the advanced program. 6. Press Finish to restart your computer. INSTALLING THE IDE DEVICE DRIVER Your notebook computer uses the advanced IDE controller.
Getting Started 2 2. Click the Browse button and specify the directory as. "E:\Drivers\WinXP\Audio\Setup.exe" where the audio driver is located 3. Implement the setup program to install this driver. The Welcome dialog box appears. 4. Click Next to process the further step continuously when screen displays this command. 5. Press Finish to restart your system.
N otebook User Guide 3. Implement the setup program to install this driver. The Welcome dialog box appears. 4. Click Next to process the further step continuously when screen displays this command. 5. Press Finish to restart your system. INSTALLING THE FIR (FAST IR) DEVICE DRIVER Your notebook computer uses the Fast IR controller. Installing FIR device driver for Windows XP 1. Click the Start button, then point to Run. The Run dialog box appears. 2.
Getting Started 2 3. Implement the setup program to install this driver. The Welcome dialog box appears. 4. Click Next to process the further step continuously when screen displays this command. 5. Press Finish to restart your system. INSTALLING THE KEYBOARD CONTROLLER DRIVER Installing keyboard controller driver for Windows XP 1. Click the Start button, then point to Run to appear the Run dialog box. 2. Click the Browse button to specify the directory as "E:\Drivers\WinXP\KBC\setup.exe" 3.
N otebook User Guide 4. Click Next to process the further step continuously when screen displays this command. 5. Press Finish to restart your system. INSTALLING THE 4 IN 1 CARDREADER DRIVER Installing CardReader driver for Windows XP 1. Click the Start button, then point to Run to appear the Run dialog box. 2. Click the Browse button to specify the directory as "E:\Drivers\WinXP\CardReader\Setup.exe", then click OK to install this setup program. 3.
Getting Started 2 4. Tick Install from a list of specific location (Advanced) and then click Next. 5. Click the "Include this location in the search". Then, click Browse button and point to the Wireless LAN driver location as "E:\Drivers\WinXP\Wireless LAN". Click Next to search and to install the driver. 6. Click Finish button to finish installing Wireless LAN driver.
N otebook User Guide 2. Click the Browse button to specify the directory as "E:\Drivers\WinXP\Wireless Mouse\Battery_Bind.exe" 3. Follows the instruction to finish the installation. INSTALLING EZMAIL LIGHT DRIVER Installing EzMail Light for Outlook 98/2000/2002 driver on Windows XP 2.6 1. Click the Start button, then point to Run. The Run dialog box appears. 2. Click the Browse button to specify the directory as "E:\Drivers\WinXP\EzMail\EzMail.exe". 3.
Fun with Multimedia 3 4 Using Your Notebook This chapter describes how to operate the standard built-in features of the notebook that you normally would use in your day-to-day computer work. If you are new to computers and to your operating system, you also need to read the manual for the operating system on how to work with your computer. It is very important to familiarize yourself well with the operating system.
N otebook User Guide 3.1 Starting Your Operating System The operating system is a must ingredient in using your computer. Without an operating system, it is like playing chess without the chessboard. It is the platform for all your software application programs to run on. The most popular operating system today is Microsoft Windows. You should have installed one operating system by your dealer unless you are an expert computer user and would need a more powerful operating system.
Fun with Multimedia 1. Function Keys 2. Control Keys 3. Windows Start Menu Key 4. Control Keys 5. Windows Shortcut Key 6. Cursor Control Keys 4 Keyboard Key features and operations are described below: • Function Keys Function keys are application-driven, like F1 through F12 can be found on the keyboard. These keys work together with the Fn key to activate special functions. Some keys (printed in blue on keypad) are preprogrammed with dual functions.
N otebook User Guide • 56 Windows keys Use the following two keys to facilitate your work: ➟ Start Menu key Displays the Start menu. ➟ Shortcut/Application key Provides quick access to shortcut menus. This key acts like a right mouse button. • Cursor Control keys Cursor control keys let you position the cursor on the screen where you want. In the screen, the cursor is a blinking underline, block, or vertical bar depending on the application.
Fun with Multimedia 4 BASIC KEYBOARD FUNCTIONS Keypad Function Description key. Execute a command. Within many text editing application programs, the key inserts a hard carriage return, just like what ordinary typewriter does. key. Press this key to cancel or escape from a command or function. Enter Esc key. Known as the Print Screen key. Press this key to map the whole screen to share memory for your specific usage. PrtScr SysRq PrtScr SysRq Fn + key.
N otebook User Guide Keypad Backspace Shift Tab Ctrl Alt Num LocK Caps Lock ScrLocK 58 Function Description key. Press this key to delete the character to the left of the cursor. key. Press this key in combination with alphabet letters to produce uppercase letters in typing. Use this key in combination with those twocharacter keys (found on the second row of the keyboard) to produce the upper marked keys.
Fun with Multimedia 4 CURSOR CONTROL KEYS Keypad Function Description Up arrow key. Moves the cursor up one line at a time. Down arrow key. Moves the cursor down one line at a time. Left arrow key. Moves the cursor to the left one space at a time. Right arrow key. Moves the cursor to the right one space at a time. SCREEN CONTROL KEYS Keypad Function Description Home key. Moves the cursor to the beginning of a screen or line. PgUp key.
N otebook User Guide Keypad Function Description key. Moves the cursor to the end of a screen or line. End WINDOWS HOT KEYS Keypad Function Description key. Pulls up the Windows Start menu. key. Performs a mouse right-click function for Windows system. SPECIAL FUNCTION KEYS The notebook has special system function keys that activate key serving dual functions.
Fun with Multimedia Keypad Fn + F3 F6 Fn 4 Function Description Switches display between LCD, CRT, or LCD and CRT simultaneously. Enable or Disables the built-in system speakers. + Fn + F8 F9 Fn Increases the brightness of LCD display incrementally. Decreases the brightness of LCD display incrementally. + 3.3 Using the Glide Pad and Wireless mouse Your computer comes with a built-in Glide Pad pointing device that is found on the center of the palm-rest surface.
N otebook User Guide Windows-based operating system. You can use the standard Microsoft driver that is compatible with the Glide Pad device and is normally used under Windows-based operating system. However, if you want to utilize the added features of the Glide Pad, you may want to try installing its own device driver that comes with added utilities for enhancing the function of the device. In addition to Glide Pad, the N/B also comes with a wireless mouse.
Fun with Multimedia 4 1. The rectangular surface acts like a miniature duplicate of your display screen. To move the mouse cursor, place the finger lightly on the sensor pad and move in the desired direction. If you reach the end of the pad, lift your finger and place it back down on the other side of the pad. 2. To select an item, click on the item by pressing the left button or by simply tapping on the surface once. A light, quick tap always works best.
N otebook User Guide Please Refer to Section 6 "Installing the Notebook Device Drivers" of Chapter 2 in this manual for the procedures on how to install the VGA device driver under Windows. After installing the VGA driver, you would then configure the display resolution or screen size to match your LCD display panel. You would also probably want to set the amount of color output to display sharper images and photos.
Fun with Multimedia 4 CHANGING THE DISPLAY PROPERTIES UNDER WINDOWS To change the display properties of your screen under Windows system, just right-click on the desktop area and select Properties or go to the Control Panel and click on the Display icon. The Display Properties dialog box will appear on your screen. Click on the Settings tab to set your desired configuration. Make sure to follow the configuration table above.
N otebook User Guide Full-On Mode No device in the system is executed in power management, the system can respond to all applications at maximum performance. Suspend to RAM mode All devices are powered off except the other supporting components and system memory where your working files are stored. You can activate this either pressing the power button, or setting the Suspend timer on the Power Options function of the Control Panel in Windows. To resume full-on state, press the power button.
Fun with Multimedia 4 all application software programs. You need to format the hard disk before using. The internal hard disk is normally assigned as Drive C after formatting. Sometimes divided into two partitions, adding a Drive D. Since your computer supports different hard disk capacities (to 40 GB or above), you also need to setup the disk type first on your computer’s BIOS SETUP program before formatting the disk drive.
N otebook User Guide 1. Make sure the computer is turned on. Press the eject button found on the door cover of the optical disk drive. The CD tray mechanism will pop-out slightly and slowly pull out the whole length of the tray. 2. Place the disc on top of the CD tray with the label side facing up. Gently press the compact disc onto the center spindle to secure the disc. 3. To remove the disc, press on the center spindle and pull up the disc from the side until the disc snaps out of the spindle lock.
Fun with Multimedia 4 • Avoid scratching or soiling either side of the CD. • Do not write with the hard ball-point pen or apply labels on either side of the CD. • Keep the CD away from direct sunlight or high temperatures. • Clean fingerprints or dust from the CD by wiping it with a soft cloth. ☞ The optical disk drive is a Class 1 Laser Product. 3.
N otebook User Guide (I/O) features such as modems and LANs. The features for Type II Cards include following characters: • Type II Extended Cards Many PC cards are Type II extended cards. The extended card has an additional physical component that protrudes beyond the traditional card size. The extension can be as large as 40 mm deep by 9.65 mm high. This extension provides room for additional electronics as well as a location for external connectors. The wireless LAN card and GPRS card are examples.
Fun with Multimedia 4 Sample Drive Designations Drive letter E: F: Location/Device optical disk drive Slot 0, high-speed memory card WHAT IS CARDBUS? CardBus is the high-performance 32-bit PCI bus master interface from PCMCIA. It runs up to 33MHz clock speed and operates at only 3.3V. Your notebook computer incorporates the CardBus inside the PC card slot. Aside from 3.3V CardBus PC cards, you can also insert 5V 16-bit PC cards that can also be detected and used by your computer.
N otebook User Guide Removing PC Cards To remove a PC card from the PCMCIA slot, you should first disable the PCMCIA card setting in the system as described followings: 72 1. Double click the PC card icon on the right bottom side of the task bar. 2. Select the socket from the list that you want to remove, and click Stop button. The system then disables the function of PCMCIA card. 3.
Fun with Multimedia 4 MAKING PC CARDS WORK Since PC cards come in different types and brands, making every card work on your computer may not that be easy. PC cards like network, SCSI or multifunction cards (MFC) need additional driver installation and configuration in making the card work. This additional driver may already be built-in under Windows that Windows will try to detect and prompts you if you want to install the driver.
N otebook User Guide NOTICE FOR HOT SWAPPING PC CARDS Just like CD (compact disk), your PCMCIA slots allow you to replace one PC card with another even while your computer is on. However, you need to remember the rule that if the PC card is in use, you must not remove it. ☞ PC cards draw power even when not in use. To save energy, press the button to disconnect the card when it is not in use. 3.9 Using Flash Memory Cards WHAT IS FLASH MEMORY CARD? Flash Memory is a memory storage media.
Fun with Multimedia 4 For MMC and SD card, you should position the copper connector at the bottom side. For SmartMedia and Memory Stick card, you should position the copper connector at the topside. All of these cards should be located at the center of the slots in inserting. Slot Card type Copper connector 4 in 1 SD (Secure Digital) MMC (MultiMedia Card) SmartMedia Memory Stick Bottom side Bottom Top side Top side Only one correct side can be accepted for the 4 in 1 card slots.
N otebook User Guide Removing Flash Memory Card It is similar to PCMCIA card for removing a flash memory card from the slot. You should first disable the card setting in the system as described in the PCMCIA chapter. To remove the flash memory card, you should only pull out the card by finger, there is no release button for flash memory slot. 3.9 Using U-Disk WHAT IS U-DISK? U-Disk is a storage media that is made from flash memory.
Fun with Multimedia 4 REMOVING U-DISK To remove a U-Disk card, you should first disable the card setting in the system as described in the PCMCIA chapter. There is no release button for flash memory slot, you should pull out the U-Disk by finger.
N otebook User Guide 4 Fun with Multimedia This chapter lets you make full use of all the multimedia features of your computer in having fun and excitement during work or leisure. You will learn how to mix and match the built-in sound system, use optical disk drive in creating an exciting full multimedia presentation.
Fun with Multimedia 4.1 4 Notebook Multimedia Features Your notebook computer is rich in multimedia features that make your computing fun, comfortable, exciting and easy. Your computer is well able to perform all multimedia tasks through the following: 4.2 • AMD Mobile AthlonXP microprocessor. • Up to 2 GB DDR SDRAM • Optical disk drive for DVD/CD watching/playing and CD/DVD making • ATI mobility RADEON 9600 Pro Video Graphics Engine. • Brilliant 15.
N otebook User Guide 4.3 • Earphone or headphone jack for personal listening. • External 1/8-inch microphone jack that connects external microphone for recording purpose. • Stereo Line-In Jack for connecting an external audio device such as CD player, a tape deck, or a synthesizer as an input source. Setting Up the Audio Driver Properties Before you can start using the audio capabilities of your computer, you need first to setup properly the audio driver after installing Windows.