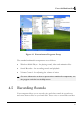
Fun with Multimedia 4 Figure 4-1 Entertainment Programs Group The standard multimedia components are as follows: • Windows Media Player - for playing sound, video and animation files • Sound Recorder - for recording sounds and playback • Volume Control - for adjusting the volume of mixer ☞ For more information on how to operate these multimedia components, run the program and click on the Help menu. 4.
N otebook User Guide be played back through the internal speakers or earphone jack using an external speakers, headphone, or earphone set. You can also use the files as voice annotations on many applications for more real presentation. This section will describe briefly how you can record sounds under Windows operating system. To record sounds, you need to run the Sound Recorder program from the Multimedia program groups.
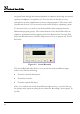
Fun with Multimedia 4 1. Double-click on the Volume Control on the taskbar or click Start button, then point to Programs, Accessories, Entertainment and then click on Volume Control. 2. Click Properties in the Options main menu. 3. Click the round button for Recording and tick off each component that list in the "Shows the following Volume Controls" box. Figure 4-3 Audio Properties 4. Click OK and the Recording Control dialog box will appear.
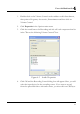
N otebook User Guide Figure 4-4 Recording Volume Control USING AN EXTERNAL MICROPHONE Your computer allows you to connect an external microphone for high quality recording. The external microphone jack is found on the left side of your computer. Use only microphone with 1/8-inch mini-jack connector. Follow the same procedure for recording voice. USING THE BUILT-IN OPTICAL DISK DRIVE You would normally use the optical disk drive for recording audio music from the Audio CD. Follow these steps: 84 1.
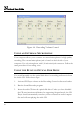
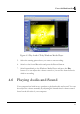
Fun with Multimedia 4 Figure 4-5 Play Audio CD by Windows Media Player 4.6 5. Select the starting point where you want to start recording. 6. Switch to the Sound Recorder and press the Record button. 7. Switch immediately to the Windows Media Player and press the Play button. You can adjust the volume control so you can also hear the music while in recording. Playing Audio and Sound Your computer has built-in two speakers to playback audio and sound.
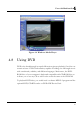
N otebook User Guide For more quality sound output, you can choose to connect an external amplified speakers or earphone from headphone jack. Always minimize the volume first before placing the phone set to your ear. USING THE WINDOWS MEDIA PLAYER The easiest way to playback multimedia media files is to run the Windows Media Player. Follow these steps: 4.7 1. Click on Start, point to Programs, Accessories, and then Entertainment. 2. Click on Windows Media Player to start program. 3.
Fun with Multimedia 4 Figure 4-6 Windows Media Player 4.8 Using DVD DVD is the breakthrough in superb full-motion picture playback. One disc can contain at least 4.7GB of information, capable of holding one full-length movie with soundtracks, subtitles, and different languages. Much more, the DVDROM drive of your computer is backward compatible with CD-ROM drive so it allows you to use any CD as well. It also works the same as the CD-ROM.
N otebook User Guide ☞ For best DVD playback, please enable the DMA function of this notebook, for how to enable the DMA channel on both optical disk drive and Hard Disk, please refer to driver installation on section 6 of chapter 2. Moreover, you can enable Hardware Accelerator if the software MPEG-2 player you are using has supported this function. 4.
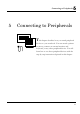
Connecting to Peripherals 5 5 Connecting to Peripherals This chapter describes how you attach peripheral devices to your notebook. You can attach a printer or mouse; connect an external monitor and keyboard, or any other peripheral device. You will learn how to use these peripheral devices with the step-by-step instructions depicted in this chapter.
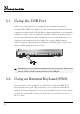
N otebook User Guide 5.1 Using the USB Port USB or Universal Serial Port is a peripheral bus standard developed by Compaq, DEC, IBM, Intel, Microsoft, NEC and Northern Telecom. Personal computers equipped with USB will allow computer peripherals to automatically configure as soon as they are physically attached - without the need to reboot or run setup.
Connecting to Peripherals 5 For advanced system like Windows XP, the system can detect and install suitable driver for the PS/2 mouse automatically when you plug the mouse connector to the computer. If the system you are using does not support this function, please install the driver as follows 1. Turn off your computer. 2. Connect the PS/2 keyboard directly to the PS/2 port. If you are using 5pin DIN-type keyboard, plug the keyboard to the keyboard adapter first and then to the PS/2 port.
N otebook User Guide 1. Turn off your computer and make sure the monitor power switch is turned off. ☞ The notebook computer must be powered off or suspended while the monitor is being connected. Although you can connect the external Monitor without power off the computer and the external monitor, however, it is harmful to both devices and it shortens the life of these devices. 2. Connect the connector cable of the monitor to the VGA port at the back of your computer.
Connecting to Peripherals 5.4 5 Using the IR Port Your computer can equip with an industry standard IR port that allows enhanced wireless connection with infrared built-in devices like PDAs, printers, and portable computers. The IR port is Infrared Data Association (IrDA) compatible that makes use of the second COM port or COM2 of your computer. The transfer rate for SIR is 115.2Kbit/sec. The transfer rate for FIR is 4Mbit/sec. To connect to another IR equipped device: 1.
N otebook User Guide 5.5 Using the TV Port You can setup the detail by operating the computer as follows. Also found at the back of your computer is one S-Video port. To display your computer screen on the TV, please connect the TV port of this notebook to the Video Input of the TV set. You can press + key continually to switch between TFT, external monitor, TFT+external monitor (display simultaneously), and TV only. Keep pressing the hot-key until you get the display to external TV only.
Connecting to Peripherals 5.6 5 Using the IEEE 1394 Port IEEE 1394 is a new I/O standard that is supported by Win98 (second edition) or later Windows version. With supporting high-speed transmission and delivering data at a guaranteed rate, you can record digital video clips and download them directly via a super-speed IEEE 1394 port at the left side of the notebook. IEEE 1394 becomes an ideal for devices that need to transfer high speed data in real-time.
N otebook User Guide 5.7 Using the External Audio System At the left side of your computer, you will find the built-in audio ports. You can connect SPDIF port, audio line-in jack, Microphone jacks, earphone or powered speakers. To connect to a audio jack: 1. Locate the audio port (SPDIF, Line-in, Microphone, Headphone) that you want to use to the target device. 2. Plug the jack into the port on the left side of the system.
Connecting to Peripherals 3. 5.9 5 Connect the other end of the cable into the computer RJ-45 LAN port. Using the Wireless LAN (BTO) Wireless LAN is the major breakthrough in computer communication technology. It lets user connect to the LAN environment without using any wire to traditional RJ-45 jack. User can enjoy the wireless connection within the range of Access Point (AP) of LAN.
N otebook User Guide 5.10 Using the Modem Port This notebook comes equipped with a 56K internal fax/data modem that allows you to communicate with others via fax, email, or to connect to an online service or bulletin board. To connect the analog phone cable to your modem: 1. Locate the analog phone cable in the accessories box in notebook shipping carton. Each end of the cable has a RJ-11 connector. 2. Connect one end of the cable into a standard wall outlet. 3.
Customizing Your Notebook 6 6 Customizing Your Notebook Your computer uses the Phoenix BIOS Setup program that allows you to set several system configuration in changing the way your computer performs. This includes your system time and date, disk drive configuration and password setup. This information is then stored in the CMOS RAM and will remain permanent unless you change it again.
N otebook User Guide 6.1 Running the BIOS Setup Program Your computer is likely to have been properly setup and configured by your dealer prior to delivery. However, you may find it is necessary to use the computer’s BIOS (Basic Input-Output System) Setup program to change system configuration information, such as the current date and time, or your hard disk drive type. The Setup program can be accessed when you power on the system and pressing the function key.
Customizing Your Notebook 6 • Item Specific Help The right side of the screen. This area describes each parameter and its available settings. • Menu Bar The top line of the screen. Each of the five selections displays its own screen. • Parameters The left side of the screen. This area lists the parameters and their current settings. • Key Status Bar The bottom part of the screen. These lines display the keys available to move the cursor, select a particular function and so forth.
N otebook User Guide 6.2 Using the Main Menu Setup Pho enix B IO S Setup Utility Main Advanced Security Boot Exit Item Specific System Time: [12 :00 :00] System Date: [03/03/2003] , selects field. 4 Primary Master Installed CD/DVD System Memory: 640 KB Extended Memory: 523264 KB CPU Type: Mobile AMD Athlon(tm) XP-M CPU Speed: 1900+ BIOS Version: 0.
Customizing Your Notebook 6 • System Date Allows you to set the system date using the month/date/year format. Enter the current time for reach field and use the , +, or key to move from one field or back to another. You can also change the system time from your operating system. • Primary Master This field display various parameters for the hard disk drive. If type [Auto] is selected, the system automatically sets these parameters.
N otebook User Guide 6.2.1 INTERNAL HDD SUB-MENU Pho enix B IO S Setup Utility Main Primary Master Advanced Security Boot [IC25N040ATCS04-0 - (PM)] Type: [Auto] Exit Item Specific Help User = you enter LBA Format parameters of hard-disk Total Sectors: 117210240 drive installed at this Maximum 60012MB connection. Multi-Sector Transfers: [16 Sectors] disk drive installed here.
Customizing Your Notebook 6 Item Specific Help Setup Warning Setting items on this menu to incorrect Enable the integrated values may cause your system to malfunction.
N otebook User Guide • Advanced Chipset Control Allows you to set or view the parameter of Chipset. • I/O Device Configuration Lets you configure input/output device such as Serial Port, Parallel Port. • USB BIOS Legacy Support Enable or disable support for USB floppy drive. • PS/2 Mouse [Disabled] prevents any installed PS/2 mouse from functioning. [Both] activate both the glide pad and external PS/2 mouse.
Customizing Your Notebook F1 Help ÇÈ Select Item Esc Exit Å--> Select Menu -/+ Change Values F9 6 Setup Defaults Enter Select Sub-Menu F10 Save and Exit • Graphic Aperture Select the size of the graphics Aperture for the AGP video device. • CPU Freq. Ratio This field reports the base CPU Frequency Ratio detected by the BIOS during Power-On Self-Test (POST). The real CPU Frequency Ratio is equal to base CPU Frequency Ratio times certain value.
N otebook User Guide BIOS or OS chooses configuration, 6.4 F1 Help ÇÈ Select Item Esc Exit Å--> Select Menu -/+ Change Values F9 Setup Defaults Enter Select Sub-Menu F10 Save and Exit • Infrared port You can select the Enabled, Disabled, or Auto option for enabled or disabled the port, or automatically sensed by BIOS or OS. If you select Enable, you also need to set the IR mode, Base I/O for the IR device.
Customizing Your Notebook Esc Exit Å--> Select Menu Enter 6 Select Sub-Menu F10 Save and Exit • Supervisor Password Is Set/Clear selections show that the notebook is under controlled by Supervisor Password or not. • User Password Is Set/Clear selections show that the notebook is under controlled by User Password or not. • Set Supervisor Password Supervisor password gives you the authority in accessing the setup utility.
N otebook User Guide 6.5 Using the Boot Setup This item allows you to set the search drive sequence where the system will try to boot up first. Pho enix B IO S Setup Utility Main Advanced Security Boot Exit Item Specific Help +Removable Devices Use <Ç> or <È> to +Hard Drive select a device, then CD-ROM Drive press <+> to move it up to the list, or <-> to move it down to the list. Press to exit from this menu.
Customizing Your Notebook 6.6 6 How to Exit the Setup Program There are two choices to escape from the Setup program. Pho enix B IO S Setup Utility Main Advanced Security Boot Exit Item Specific Help Exit Saving Changes Exit System Setup Exit Discarding Changes and save your Load Setup Defaults changes to CMOS.
N otebook User Guide 6.7 • Discard Changes Reverts to previously selected settings. • Save Changes Saves Setup data to CMOS. • Battery Refresh Conditions the battery so that the battery can be fully charged. How to Upgrade the BIOS Your computer uses EPROM Flash BIOS chip that allows you to easily upgrade the BIOS program. When you update the BIOS, any customized settings you made are lost. To upgrade the BIOS: 1.
Customizing Your Notebook 6 It is necessary to prepare a USB Floppy Drive by yourself for BIOS upgrading. If you don't have MS-DOS startup disk, please make one. Insert one diskette into the floppy disk drive. Double click My Computer on the desktop. Click the right button on the icon of 3 1/2 Floppy (A:), and then select Format command. In the format windows, tick Create a MD-DOS startup disk and then click Start bottom to create an MS-DOS startup diskette.
System Upgrade 7 7 System Upgrade This chapter describes how to upgrade your system. You can upgrade your memory size to your system for specific requirements. This section provides an easy step in doing system upgrade for your notebook computer. The upgrade procedures include the following.
N otebook User Guide 7.1 System Upgrade This section provides an easy step in doing system upgrade for your notebook computer. The upgrade procedures include the following: MEMORY UPGRADE PROCEDURES Your notebook computer offers two memory slots using 200-pin SODIMM (Small Outline Dual Inline Memory Module) at least 128MB DDR SDRAM. The memory compartment is located just under your computer.
System Upgrade Based Memory Installing Memory Total 1024 MB 1024 MB 2048 MB 7 INSTALLING MEMORY MODULE Your computer comes with standard 128MB, 256 MB, 512MB or 1024MB of synchronous DDR SDRAM. You can increase system memory to a maximum of 2048 MB in the system, by installing two small outline double inline memory modules (SO-DIMMs) with installed base memory in the system. The 128MB, 256MB, 512MB and 1024MB memory modules are available: To install the memory module: 1.
N otebook User Guide 4. Locate the memory module into the empty memory module sockets. (Your system comes with one memory module already installed in the socket.) ☞ Avoid touching the exposed components inside the system. Doing so may damage the system. 5. Insert the connector of the memory module into the socket. Make sure the notch of the memory module fits the nose of the socket. y Hold the memory module at a 30-degree angle and push its connector into the memory socket of the notebook.
Caring for Your Notebook 8 8 Caring for Your Notebook Notebook computer is very convenience at business, entertainment and many aspects in daily life. Its probability provides you to use it at different environment. Misuses the notebook computer may cause damage, shorten computer's life, or even injure human body. Here is the guideline to take care of your notebook and to operate it safely.
N otebook User Guide 8.1 Important Safety Instructions Portable computers take the most beating from end users. This section gives you detailed information about how to maintain a safe working environment while using the notebook computer. You can maintain its condition and performance by following these guidelines. Please read it carefully to ensure maximum safety. 120 • Before cleaning the notebook computer, make sure it is disconnected from any external power supplies (i.e.
Caring for Your Notebook 8 • While unplugging the power cord, disconnect it by the plug head, not by its wire. • Make sure the socket and any extension cords you may use can support the total current load of all the connected devices. • Though your AC adapter is suitable for universal international voltage, it still requires a stable and continual power supply. Make sure the voltage of the power source when connect the notebook computer to the power outlet.
N otebook User Guide • Never open the body of notebook computer. For safety reason, the notebook computer should only be opened by qualified service personnel. • If one of the following situations arises, have the notebook computer checked by service personnel: ➟ The power cord or plug is damaged. ➟ Liquid has penetrated into the notebook computer. ➟ The notebook computer has been exposed to moisture.
Caring for Your Notebook 8.2 8 Cleaning Your Computer When it is necessary to clean the plastic case and keyboard, use a soft, lint-free cloth, slightly dampened with a mild detergent solution or use the contents of any commercially available computer cleaning kit. Never use alcohol, petroleum-based solvents, or harsh detergents to clean the notebook. Also never spray any liquids directly on the computer case, keyboard, or screen.
N otebook User Guide 8.4 Maintaining Your Hard Disk Losing your data has the same consequences as a system break down. Users must make it a habit of doing hard disk maintenance every week or so. Here is some maintenance you could do: 8.5 • Always backup your data files from your hard disk. • Install the virus detecting program to monitor virus that could tamper your files. • Use SCANDISK once in a while to correct any errors found in the directory and File Allocation Table.
Caring for Your Notebook 8.6 8 • Handle batteries carefully. Do not try to disassemble, crush, puncture, open, drop, mutilate, short external contacts, disposed of in water or fire, or expose it to temperatures higher than 60 C. • Recharge batteries only as described in this manual and only in ventilated areas. Never use an external charger other than the one supplied with your computer. • Do not leave batteries in hot locations for more than a day or two.
N 126 otebook User Guide • Try to bring backup software as well. • Check the voltage rating and the outlet type of your destination. If the power cord of the adapter is different, then you need to purchase a suitable one. Consult your dealer. • Carry your computer in its carrying case or in a briefcase. Never check-in the computer as a luggage. • Remember to apply those power saving features and techniques to save battery power.
Hardware System Information A APPENDIX A Hardware System Information This appendix gives information on the technical and hardware specifications of your computer. Please note that the information mentioned here may not be exactly the same with your computer as specification is subject to change without notice or modifying this manual.
N otebook User Guide System Specification PROCESSOR UNIT • AMD Socket A processor • Up to 2600+ AMD Mobile AthlonXP CPU 266 MHz FSB • 512KB integrated L2 cache SYSTEM MEMORY • Two 200-pin memory slots • User-upgradeable to maximum 2048 MB using 200-pin SODIMM 256MB, 512MB and 1024MB module • DDR 333/400 SDRAM modules LCD DISPLAY • 15.4” WXGA (1280x800) Color TFT LCD • Maximum 16M true colors on all LCD display VGA SYSTEM 128 • AGP Local Bus VGA Accelerator.
Hardware System Information • A Maximum 16 million colors on LCD display at 1280x800 resolution on external monitor. STORAGE • 32-bit PCI Enhanced IDE interface with LBA mode • 9.
N otebook User Guide • Supports 1 x Type II PC card • Supports 32-bit Cardbus Cards, and 16-bit PC Cards POINTING DEVICE • Integrated Glide Pad pointing device with left, right and scroll buttons. • RF wireless mouse with left, right buttons and scroll wheel. KEYBOARD • Full-sized 88 keys keyboard with Windows systems hot-keys, inverted Tcursor keys, 5 hot keys, 12 function keys, embedded numeric keypad and two easy buttons.
Hardware System Information A INFRARED PORT 1 x IR port 820.11b Wireless LAN (BTO) AC/DC POWER SUPPLY ADAPTER Universal auto-switching 90W (100V~240V) adapter LSE0202A1990 power supply adapter BATTERY • Rechargeable 8 Cells Li-ion battery pack with Smart Battery function • 2 hours of usage (when run ZD Battery Mark diagnostic program) • 2 ~ 2.