
Instructions / Assembly

2
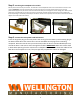
Step 3 – Attaching the snowplow to the vehicle.
Roll the plow to the front of your vehicle. The channel on the snowplow lift frame is to fit around the cross bar on the
mount. Helpful hint…have the channel which is to slide over the front cross bar parallel to the ground. To alter
placement simply push or pull on the control box which will allow you to change the current resting place. When proper
placement is achieved the pins on the front of the cross bar will protrude through the channel on the snowplow lift
frame. Depending on the model purchased you will either need to insert a plow pin on each side or twist the lock tab 90
degrees so it locks itself to the vehicle.
Step 4 – Connect the main power hand held control.
Insert the large blue plug on the main power cord running from the battery into the mating plug on
the bottom back side of the control box. Insert the handheld control plug into the matching
receptacle. Route the control wire up over the hood, under the driver’s side windshield wiper arm,
around the driver’s side mirror and in through the window. IMPORTANT! Make sure to leave slack
in both cables spanning from the vehicle to the snowplow control box. This allows the cables to free
float when the snowplow is in use; if they are tight they may become undone or damaged.
7453 WELLINGTON RD 18 / ELORA / ONTARIO / CANADA / 1-888-616-9085