
Installation Sheet


17
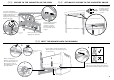
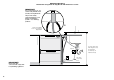
Ensure the supplied
rubber washer is
fitted inside the
coupling.
Tighten coupling
with spanner.
180
o
No leaks!
1
2
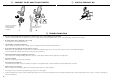
!8 TROUBLESHOOTING
●
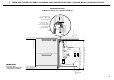
Excessive water remaining above the filter plate, after the rinse cycle. (This is displayed as an A3 fault)
Check for a kinked drain hose, blocked waste connection, highloop not properly installed, drain hose not routed correctly or spray arms not in place.
●
No water supply. (This is displayed as an A1 fault
Check water is connected and turned on.
●
The dishwasher is beeping continuously
There is a fault. See section ‘If there is a fault’ in the User guide for further information and instructions.
●
No program indicator lights up when the drawer is opened
Ensure power is connected and is switched on. If it is and still no indicator ligths up, see the ‘Preference options’ section of the ‘Quick start guide’.
An option called ‘Open drawer auto power-on’ may need to be turned on.
●
Water around water supply and drainage connections
Check connections, existing plumbing and hoses for leaks. Check rubber washer and hose clamp are correctly fitted.
●
If product is tipping
Ensure the product is secured to the cabinetry.
●
If front panels are misaligned
Check and relevel product. Check the cabinetry is square. For Integrated models, check and adjust front panel alignment if necessary.
●
Drawer doesn’t close properly
Ensure nothing is obstructing the drawer from closing properly eg hoses or drawer latches.
●
If a problem occurs, consult the ‘Troubleshooting’ section of the User guide.
●
If after checking these points you still need assistance, please refer to the Service & Warranty book for warranty details and your nearest Authorized Service Center, or contact us through our
website, listed below.
!6 CONNECT INLET HOSE TO HOT WATER !7 SWITCH PRODUCT ON