
Installation Sheet


18
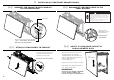
!6 FITTING A CUSTOM TOEKICK PANEL
PROFILE A
PROFILE B
9
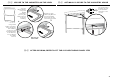
Custom Toekick Panel
Toekick mounting bracket
cutting template
Custom toekick panel
Toekick mounting bracket
cutting template
Toekick mounting
bracket
If you require a cutout in your custom
toekick panel, choose the most
appropriate cutout profile (A or B)
depending on the final depth of your
toekick panel.
After marking the panel, carefully cut or
router out the desired profile. Use the
template as a cutting guide.
Place the Toekick mounting bracket cutting
template onto your toekick panel. Ensure they
are centered and the template rests on the
top surface of the panel.
Secure template to panel either by clamping
or using the supplied mounting screws.
1
4
4
5
6
1
2
2
3
3
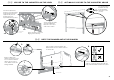
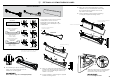
IMPORTANT!
Do not overtighten screw.
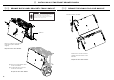
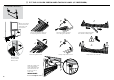
IMPORTANT!
Ensure all bare edges are sealed appropriately.
Slide the toekick onto the mounting rails
either side and screw the toekick onto
the bottom of tub on either side.
Place the Toekick mounting bracket onto your
toekick panel. Ensure they are centered and
the top of the template aligns with the top
surface of the panel.
Secure template to panel using the supplied
toekick mounting screws.
5
6
7
7
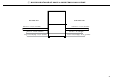
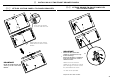
Toekick Depth
For a Toekick Depth
1 9/16” (40mm)
For a Toekick Depth
1 9/16” - 3 7/16”
(40mm - 88mm)
For a Toekick Depth
3 7/16” - 3 15/16”
(88mm - 100mm)
Depth is measured from FRONT of door
panel (assuming thickness ~ 11/16” (18mm)
to front face of custom toekick label
Toekick mounting bracket
cutting template:
PROFILE A
Toekick mounting bracket
cutting template:
PROFILE B
NO CUTOUT
1 9/16” (40mm)
1 9/16” - 3 7/16”
(40mm - 88mm)
3 7/16” - 3 15/16”
(88mm - 100mm)
CUSTOM TOEKICK PANEL
CUSTOM TOEKICK PANEL
CUSTOM TOEKICK PANEL