C O N T E N T S Astro Built -In oven pg 2- 3 First use, The special talents of Astro All about the clock pg 4 Setting the clock, Using the timer, Using automatic cooking with the clock Temperature control pg 5 For single and double built-in ovens Oven cooking options pg 6-7 8 cooking options Which cooking option for what? pg 8 Shelf positions, oven racks & trays pg 9-10 Oven temperature guide pg 10 Grilling pg 11-13 Tips for successful grilling & grilling guides Baking pg 14-17 Tips for successful baking &
U S E R G U I D E B U I L T - I N O V E N 1
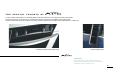
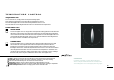
B U I L T - I N O V E N Now that your new Astro oven is installed and ready to use, you will want to know everything about it to ensure excellent results right from the start. This booklet will introduce you to the features and special talents of Astro. It also includes a comprehensive cooking guide and a number of easy food ideas and recipes. We recommend you read the whole book before you start using your oven, for the sake of safety as well as success.
T H E S P E C I A L T A L E N T S O F A choice of eight cooking options for consistently better results. Fully automatic, so you can put your mind to other things. Most interior surfaces are self cleaning. A comprehensive range of accessories are included to make cooking easier. The Astro double oven allows you to achieve more at the same time, while the Astro Compact oven is fully featured in a smaller size.
A L L A B O U T T H E C L O C K Using the timer The timer can be used at any time, even when the oven is not in use. If the oven is in use, the timer will not turn it off. To set the timer, press the button briefly, then the and buttons to get the time you want. The clock will show the time of the day with the symbol in the display. Check the remaining time by pressing the button. When the time is up, the timer will beep. If the oven is on it will not turn off.
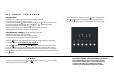
T E M P E R A T U R E C O N T R O L Single built-in oven To turn the oven on, simply select the required cooking option. Then select the temperature you want with the temperature control. The oven flood lights will come on automatically while the oven is in use. The oven indicator neon will glow until the oven has reached the set temperature. Double built-in oven UPPER OVEN To turn the upper oven on, simply select the required cooking option from the left hand side of the control panel.
C O O K I N G O P T I O N S Your Astro oven has 8 cooking options. On the oven control panel each option is represented by a symbol. BAKE Traditional method of cooking, most suitable for food that requires long cooking or cooking at a low temperature e.g. fruit cakes. The oven should be preheated first and is best for single trays. The fan forces hot air from an element around the fan throughout the oven.
ECO GRILL Uses the inner area of the top element. Use for single servings or small pieces of food. Top inner element. GRILL Top inner & outer elements. FAN GRILL Fan plus top elements. DEFROST Fan only. Grill cooks a large area of food using the two top elements. For best results leave the door open at first stop position. Grilled vegetables are quick and have a wonderful flavour. The fan circulates the heat from the top elements. This is excellent for foods that would normally be fried.
W H I C H C O O K I N G O P T I O N F O R W H A T ? This chart will help you to match your cooking requirements to the most appropriate option.
S H E L F P O S I T I O N S , O V E N R A C K S & T R A Y S Your Astro built-in oven is supplied with 2 racks 1 glass tray 1 grill rack 1 deep tray 1 shallow tray 1 fat filter Note: Double Ovens have two sets, one for each oven space for the whole unit. Only 1 Pizza Stone & Paddle is supplied. Shelf positions Shelf positions are numbered from the top down. The top positions are for grilling. We do not recommend cooking on the bottom of the oven.
OVEN TEMPERATURE GUIDE Shallow tray The shallow tray is a baking tray for biscuits and baked dishes. It can also be used to support dishes for multi-level cooking. Glass tray The multipurpose glass tray is made from toughened glass to withstand high temperatures. It is suitable for roasting and grilling, and can also be used as a serving dish. The rim on the tray makes it easy to handle. The glass tray will not distort or corrode, and it won’t shatter into small pieces if knocked.
G R I L L I N G Your Astro oven gives a choice of Grill, Eco Grill or Fan Grill. For many meats grilling is considered to be a healthier alternative to frying. Recently, grilling has also become a popular way to cook vegetables. Where approriate food should be at room temperature before being grilled. Tips for successful grilling Grill Fan Grill Preheat grill for 5 minutes before using. Leave the oven door open at the first stop position so the grill element does not cycle on and off.
G R I L L I N G G U I D E GRILL FOOD Beef Lamb Pork Shelf Steak - Rare - Medium - Well Done Hamburgers - Well Done Meatballs - Well Done Chops - Medium - Well Done Rack - Medium Chops - Well Done Ham Steaks - Well Done Bacon Sausages Chicken Pieces Whole Fish Fillets, Thick Fillets, Thin Toast 1-6 Slices 1-2 Slices - Well Done - Well Done - Medium - Medium Temp °C Time (min) 4 5 5 5 5 5 5 Hi Hi Hi Hi Hi Hi Hi 8-10 10-15 15-20 12-15 12-15 15-20 20-25 4 5 3 4 Hi Hi Hi 250-Hi 15-20 15-20 4-6 10-1
G R I L L I N G FOOD Family Favourites Snacks Fruit Crumbles Macaroni Cheese Lasagne Moussaka Cannelloni Vegetables Cheese Rolls Nacho’s G U I D E - FAN GRILL Shelf Temp °C Time (min) 5 5 5 5 5 5 4 4 150-160 175-180 150-160 150-160 150-160 175-200 175 175 20-25 20-30 25-30 30-35 25-30 20-30 5-8 10-15 This chart refers to full sized oven shelf positions, numbered from the top down.
B A K I N G When it comes to baking, your Astro oven gives you an outstanding choice of options (refer to Cooking Options on pages 6 & 7). Some foods are best cooked on particular functions. For example rich fruit cakes and single cakes are best cooked on Bake without fan. Tips for successful baking A single tray of baking works best using bake, however if 2 or more trays are cooked on Bake they will need to be interchanged during cooking to ensure an evenly cooked product.
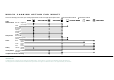
BAKING GUIDE BAKE FOOD Baked Products Biscuits Slices Shortbread Cake Butter/Choc Fruit Rich Sponge Victoria Sandwich Cake Small Cakes Muffins Meringues Scones Bread/Rolls Pizza Quickbread Apple Pie Custard Tart FAN FORCED FAN BAKE Shelf Temp °C Time (min) Shelf Temp °C Time (min) Shelf Temp °C Time (min) 6 7 6 8 8 7 7 6 6 7 6 7 8 8 6 7 170-180 170-180 150-160 150-175 135-150 170-190 170-190 170-190 200-220 110-130 215-230 190-220 225-250 150-180 190-200 210/160 10-20 20-30 25-35 55-75 4-6hrs
BAKING GUIDE BAKE FOOD Pastry Family Favourites Vegetables Filo Flaky/Puff Quiche Bacon & Egg Pie Lemon Meringue Pie Lasagne Meatloaf Chicken Pieces Chicken Casserole Complete Oven Meal* Automatic Cooking of Complete Oven Meals Baked Roasted FAN FORCED FAN BAKE Shelf Temp °C Time (min) Shelf Temp °C Time (min) Shelf Temp °C Time (min) 7 6 7 7 7 7 7 6 7 175-190 225-250 200-220 180-190 170-180 170-180 175-190 175-180 175-190 30-35 10-20 20-30 30-50 15-20 25-35 50-60 45-50 50-65 7 6 7 7 7 7 7
Macadamia Nut Brownies Filling 125g butter 150g dark cooking chocolate 2C brown sugar (lightly packed) 1/2C cocoa 3 eggs (lightly beaten) 1t vanilla essence 1t coffee powder 11/2C flour 1t baking powder 1/2C chopped macadamia nuts Select Fan Bake and 175°C. Melt butter and chocolate (microwave on medium for 3-4 minutes, stirring after 2 minutes). Mix well, add sugar, cocoa, eggs and macadamia nuts. Fold in sifted flour and baking powder. Fan Bake in slice pan 28cm x 19cm for 20-25 minutes, shelf 7.
R O A S T I N G Your Astro oven is equipped to handle a variety of roasts - from a succulent leg of lamb to the trimmed Christmas turkey (refer to Cooking Options on pages 6 & 7). Tips for successful roasting A large piece of meat requires fewer minutes per 500g/1lb than a smaller piece. Roasting times will be affected by the shape and size of the meat being roasted. Meat with a bone will cook more quickly than a rolled roast. Don’t add water to your roast, as this has a steaming effect.
R O A S T I N G FOOD Beef Mutton Hogget/Lamb Pork Chicken Venison* Turkey - Rare - Medium - Well Done - Well Done - Medium - Well Done - Well Done - Well Done - Rare - Well Done G U I D E Temp °C Time (min) Internal Temp °C 160-170 160-170 160-170 160-170 160-170 160-170 180-185 160-180 220 150-170 30-35 35-45 45-60 45-60 30-40 45-60 40-45 60-90 3.5 per cm thickness 3-5 1/2 hours 60-65 65-75 75-80 80-85 79-82 82-85 78 65-70 67-71 * Brown prior to roasting in an oiled frypan on high heat.
CLEANING Cleaning Flood Lights Cleaning Oven Runners With the oven turned off at the wall, clean oven lights using household detergents or an ammonia based cleaner (e.g. Handy Andy). Specialised oven cleaners may also be used (follow manufacturers instructions). The glass covers can be removed for cleaning or to allow bulb replacement. Always replace the cover before using the oven.
Cleaning the Oven Door Clean the inside of the oven door while it’s still warm using household detergents or an ammonia based cleaner (e.g. Handy Andy). Specialised oven cleaners may also be used (follow manufacturers instructions) or a razor blade scraper, handled carefully. To make cleaning easier, you can remove the oven door.
SAFETY & WARNINGS Please keep the following rules in mind when you’re using this appliance Electrical supply cord If the electrical supply cord is damaged, it must only be replaced by an authorised person. This appliance should be connected to a circuit which incorporates an isolating switch, providing full disconnection from the power supply. Warning: During use this appliance becomes hot. Care should be taken to avoid touching heating elements inside the oven.
IS ER PA EL ANU ACTURER S When you purchase any new Fisher & Paykel whiteware Product you automatically receive a 2 year Manufacturer's Warranty covering parts and labour for servicing within New Zealand and Australia. IS ER PA EL UNDERTA ES TO Repair or, at its option, replace without cost to the owner either for material or labour any part of the Product, the serial number of which appears on the Product, which is found to be defective within TWO YEARS of the date of purchase.
C U S T O M E R C A R E Before you call for service or assistance ... In Australia if you need assistance ...* Check the things you can do yourself. Refer to your User Guide and check... 1. Your product is correctly installed 2. You are familiar with its normal operation If after checking these points you still need assistance, please refer to the following... Call the Fisher & Paykel CUSTOMER CARE CENTRE and talk to one of our Customer Care Consultants.
In the United Kingdom (GB) if you need assistance ...* Call the Fisher & Paykel Help Line and talk to one of our Customer Care Consultants. Phone: (01) 926 626700 Fax: (01) 926 626701 Postal Address: Fisher & Paykel Appliances Ltd, Broxell Close, Wedgenock Industrial Estate, Warwick, CV34 6QV. In Ireland (IE) if you need assistance ...* Call the Fisher & Paykel Help Line and talk to one of our Customer Care Consultants.
Copyright Reserved Fisher & Paykel 2000. The product specifications in this booklet apply to the specific products and models described at the date of issue. Under our policy of continuous product improvement, these specifications may change at any time. You should therefore check with your Dealer to ensure this booklet correctly describes the product currently available.