User guide Built-in oven BI453 and BI603 ‘classic range’ models NZ AU
Contents Introduction Safety and warnings Overview of oven models Clocks and timers Operating the oven Cooking functions Automatic cooking Oven shelves Accessories Oven temperature conversion chart Cooking function options Cooking charts Care and cleaning - oven Ceramic cooktop (CTE) Care and cleaning - ceramic cooktop (CTE) Warranty and service Important! SAVE THESE INSTRUCTIONS The models shown in this user guide may not be available in all markets and are subject to change at any time.
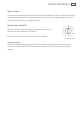
2 Introduction About your new oven Thank you for buying a Fisher & Paykel built-in oven. Now that it is installed and ready to use, you will want to know everything about it to make sure you get excellent results right from the start. This guide introduces you to all its features, as well as giving you a comprehensive set of cooking charts. We recommend you read the whole guide before using your new oven, for both safety and cooking success.
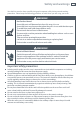
Safety and warnings Your built-in oven has been carefully designed to operate safely during normal cooking procedures. Please keep the following guidelines in mind when you are using your oven. WARNING! Hot Surface Hazard Accessible parts will become hot when this oven is in use. Accessible parts may become hot when the grill is in use with the door open. To avoid burns and scalds keep children away. Do not touch hot surfaces inside the oven.
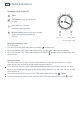
4 Overview of oven models Built-in oven models Depending on which model you have, your built-in oven will have one of the following control panels. Ringer timer (R) Analogue clock (A) Electronic clock with minute timer (C) Electronic clock (E) Double oven with electronic clock (ED) Oven with cooktop and electronic clock (CTE) Fig.
Clocks and timers 5 Types of clock You have to set the clock before you can use the oven. Depending on which model you have (see ‘Overview of oven models’) your oven may have a ringer timer, an analogue clock, an electronic clock with minute timer, or an electronic clock. Ringer timer model (R) The timer can be used at any time even if the oven is not in use. The timer can be set for up to 55 minutes. If the oven is in use, the timer does not turn the oven off. Fig.
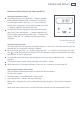
6 Clocks and timers Analogue clock model (A) Timer Timer bell off stops the timer bell ringing. Start time sets a time for automatic cooking to start. Manual symbol returns the oven to manual mode when automatic cooking is finished. COOK TIME START TIME Fig.3 Analogue clock 1 2 3 Setting the analogue clock To set the clock: Turn the COOK TIME knob anticlockwise until the symbol shows. Press and turn the COOK TIME knob anticlockwise until the clock shows the correct time.
Clocks and timers 7 Electronic clock with minute timer model (C) Setting the electronic clock To set the clock, press and hold the – + buttons together briefly (0.00 will stop flashing). You have six seconds to start setting the clock. Press the – or + button until the correct time is displayed. If you make a mistake, press the – + buttons together and correct the time. To adjust the time for daylight savings you can reset the hours only.
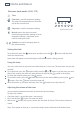
8 Clocks and timers Electronic clock models (E, ED, CTE) Timer Cook time is used for automatic cooking. The oven will automatically turn off at the end of the set cook time. Stop time is used for automatic cooking. Fig.5 Electronic clock Manual returns the oven to manual control during automatic cooking or when automatic cooking is completed, and is used for setting the clock. Symbols are used for changing times in the selected mode. Setting the clock To set the clock, press the shows the correct time.
Operating the oven 9 Your oven has a variety of cooking functions to suit your needs (not all models have the entire range of cooking functions). Depending on which model you have, your oven will have either a ringer timer, or function and temperature control knobs. Note: the oven cooling fan comes on automatically at different stages of the cooking cycle. It blows out warm air above the door. When the oven is turned off, the cooling fan may stay on until the oven cools down.
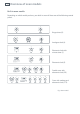
10 Cooking functions Note: not all models have the entire range of cooking functions. ECO GRILL Top inner element ECO GRILL uses the inner area of the top element and is useful when you need to grill single servings or small pieces of food. ECO grill with the door open at the first stop position. GRILL Inner and outer top elements GRILL uses both of the top elements and is ideal for grilling a large area of food. Grill with the door open at the first stop position.
Automatic cooking 11 Use automatic cooking to automatically turn the oven on, cook, and then turn the oven off. Analogue clock model (A) 1 2 3 4 5 To set automatic cooking: Check the clock shows the correct time. Select the function and temperature. The oven indicator light will glow, and the oven will come on. Decide how long the food will take to cook, allowing time for preheating if necessary. Turn the COOK TIME knob anticlockwise to show how long you need the food to cook for, eg 60 minutes (Fig.
12 Automatic cooking Electronic clock models (E, ED, CTE) 1 2 3 4 5 To set automatic cooking: Check the clock shows the correct time. Select the function and temperature. The oven temperature indicator light will glow and the oven will come on. Decide how long the food will take to cook, allowing time for preheating if necessary. Press the button. 0.00 will show. Using the buttons, set the cooking time, eg 1 hour 15 minutes.
Oven shelves 13 Shelf positions Shelf positions are numbered from the top down. The top positions are for grilling functions and middle shelves are suitable for baking and roasting. Do not cook or place anything on the oven floor. Shelf supports The shelf supports hold the wire shelves and the grill/roast pan. Shelf supports 1 23 4 5 6 7 8 Important! Step-down shelf Shelf slides For all shelf positions (unless your oven is supplied with shelf slides on position 7) make sure you fit Fig.
14 Accessories and oven temperature conversion chart Baking tray The baking tray is suitable for biscuits and baked goods. Three-piece grill/roast system The three-piece grill/roast system (made up of the pan, grid and rack) is designed to give superior cooking results and to prevent hot fat and juices in the pan splattering throughout the oven. All pieces can be used together as one complete unit, or in different combinations. Note: not all accessories are supplied with every model.
Baked products Biscuits- single tray Biscuits- 2-3 trays Slices Butter cake Fruit cake Sponge Meringues Scones Muffins Pastry Filo parcels / Apple pie Lemon meringue pie Quiche Meats Beef - roast Beef - steak Lamb - roast Lamb - rack Pork - roast Poultry Chicken - whole Chicken - pieces Savoury dishes Casseroles Lasagne Complete oven meals and reheating precooked food Compact oven The compact oven can be used in the same way as a full sized oven because it is fully featured.
16 Cooking charts Grilling For many meats grilling is considered to be a healthier option than frying. Recently, grilling has also become a popular way to cook vegetables. Tips for successful grilling GRILL and ECO GRILL Preheat the grill for five minutes before using it. Grill with the oven door open at the first stop-position. Place food on the three-piece grill/roast system, and slot it into one of the upper shelf positions (see the ‘Grilling chart’ for the most appropriate shelf ).
Cooking charts 17 Grilling chart Food GRILL/ECO GRILL FAN GRILL Shelf Shelf Temp oC Time (mins) Temp Time (mins) Beef Steak - rare 3 High 8-10 Steak - medium 4 High 10-15 Steak - well done 4 High 15-20 Hamburgers - well done 4 High 12-15 5 180-200 15-20 Meatballs - well done 4 High 12-15 5 180-200 15-25 Chops - medium 4 High 15-20 4 180-200 15-20 Chops - well done 4 High 20-25 4 190-200 20-25 6 190-200 25-35 Lamb Rack - medium Pork Chops - well done 4
18 Cooking charts Grilling chart continued... GRILL/ECO GRILL FAN GRILL Shelf Shelf Temp oC Time (mins) Fruit crumble 7 150-160 30-40 Macaroni cheese 7 175-180 20-25 Food Temp Time (mins) Family favourites Lasagne 7 150-160 25-30 Moussaka 7 150-160 30-35 Cannelloni 5 150-160 25-30 Vegetables 5 175-200 20-30 Cheese on toast 2 High 4-5 Nachos 4 175 10-15 Snacks This chart refers to shelf positions in the full-sized oven.
Cooking charts 19 Baking Your built-in oven gives you an outstanding choice of baking options (see ‘Cooking functions’). Tips for successful baking Preheat the oven while you prepare your food – many baked items should not be left long before baking. Read the recipe and assemble the ingredients on the bench before you start. Use baking paper to line cake pans and biscuit trays, to eliminate the need for greasing. See the ‘Baking chart’ for suggested times, temperature and shelf positions.
20 Cooking charts Baking chart BAKE Food Shelf Temp oC Time (mins) Baked products Biscuits Slices Shortbread Cake - butter/choc Cake - fruit light Cake - fruit rich Sponge Muffins Meringues Scones Bread/Rolls Pizza Apple pie 6 7 6 7 7 7 7 6 7 6 7 7 8 170-180 160-175 135-145 150-170 150-160 135-150 170-190 200-220 110-120 200-220 190-220 225-250 175-190 10-15 20-30 25-35 55-75 70-90 4-6 hrs 25-35 12-18 55-65 10-15 15-30 12-20 25-35 Pastry Filo Flaky/Puff Choux Quiche 7 7 7 7 175-190 210-225 185-
Cooking charts FAN BAKE 21 FAN FORCED Shelf Temp oC Time (mins) Shelf Temp oC Time (mins) 6 7 6 7 7 7 7 6 7 6 7 7 8 160-175 150-170 125-235 150-160 140-150 125-145 160-175 190-200 100-110 190-210 180-210 200-230 175-190 8-12 20-30 20-30 45-65 60-80 4-6 hrs 20-30 12-16 50-60 8-12 15-25 12-18 25-30 5, 7 7 6 7 7 7 7 6 5, 7 6 7 7 7 170-180 160-175 135-145 150-170 145-155 130-150 170-190 200-220 110-120 190-210 190-210 225-250 180-200 10-15 20-30 20-30 55-75 80-100 4-6 hrs 25-35 12-18 55-65 10-12 1
22 Cooking charts Roasting Your built-in oven is equipped to handle a variety of roasts. Tips for successful roasting When cooking large cuts of meat, times and temperatures are based on 30 minutes per 500 g/1 lb. Times and temperatures given below are guidelines and small adjustments may be necessary. Roasting times will be affected by the shape, size and temperature of the meat being roasted. Meat with a bone will cook more quickly than a boneless roast.
Cooking charts 23 Roasting chart Food Shelf Temp oC Mins/500 g Internal temp oC Meat Beef - rare 7 160-170 30-35 50-60 Beef - medium 7 160-170 35-45 65-70 Beef - well done 7 160-170 45-60 75-80 Mutton - well done 7 160-170 45-60 75-80 Hogget - medium 7 160-170 30-40 65-70 Hogget - well done 7 160-170 45-60 75-80 Pork - well done 7 180-185 40-45 75-80 Chicken - well done 7 160-180 25-30 82-85 Venison* - rare 7 220 3.
24 Care and cleaning - oven Cleaning the outside of the oven Important! Do not use abrasive cleaners or a steam cleaner on the outside surfaces of the oven. Before cleaning the outside of your oven, we recommend you turn the oven off at the wall. Wipe the oven’s outside surfaces often, using warm water and a household detergent and/or a stainless steel cleaner and polish.
Care and cleaning - oven 25 Removing and replacing the oven lamp Always turn the oven off at the wall before touching an oven lamp. To clean the oven more easily, pull off the glass cover. If you need to replace the light, simply unscrew it. Removing and replacing the shelf supports 1 2 3 4 Push the shelf slides in position 7 back into the oven.
26 Ceramic cooktop (CTE) The ceramic cooktop is made from glass ceramic, a tough material which is not affected by changes in temperature. Left rear element Left front dual element Right rear element Right front element Surface hot indicators Elements Fig.16 Ceramic cooktop Your cooktop has four individual elements, one of which is a dual circuit element. The diameters of the cooking area are clearly marked. The elements become red when turned on full.
Ceramic cooktop (CTE) 27 Surface hot indicator lights The surface hot indicator lights are marked on the ceramic glass. The indicator lights will glow when the glass above an element is hot. They will continue to glow after the element has been turned off until the glass has cooled to a temperature that is safe to touch. Fig.18 Surface hot indicator lights Dual element control The left front element can be adjusted from inner element, to full element.
28 Care and cleaning - ceramic cooktop (CTE) Cleaning the ceramic glass cooktop 1 2 3 4 5 6 7 To clean your cooktop: Remove baked-on spills while they are still warm, using the razor blade scraper supplied. Wipe clean with a damp, soapy cloth. Allow to cool, then apply ceramic glass cooktop cleaner to soiled areas. Rub vigorously with a clean soft cloth or paper towel. Wipe over with a damp cloth to remove any food or cleaner residue.
Warranty and service 29 Before you call for service or assistance ... Check the things you can do yourself. Refer to the installation instructions and your user guide and check that: 1 2 Your product is correctly installed. You are familiar with its normal operation. If after checking these points you still need assistance, please refer to the Service & Warranty book for warranty details and your nearest Authorised Service Centre, or contact us through our website: www.fisherpaykel.
30
32
Copyright © Fisher & Paykel 2006. All rights reserved. The product specifications in this booklet apply to the specific products and models described at the date of issue. Under our policy of continuous product improvement, these specifications may change at any time. You should therefore check with your Dealer to ensure this booklet correctly describes the product currently available. www.fisherpaykel.com NZ AU Built-in oven user guide Published: 05/2006 Part No.