Installation instructions and User guide Ceramic glass cooktops CE302C, CE604L, CE604C and CE905C models NZ AU GB IE
Contents Safety and warnings Installation instructions Introduction Using your cooktop Cooking guidelines Care and cleaning Troubleshooting Warranty and service Important! SAVE THESE INSTRUCTIONS The models shown in this user guide may not be available in all markets and are subject to change at any time. For current details about model and specification availability in your country, please visit our local website listed on the back cover or contact your local Fisher & Paykel dealer.
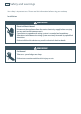
2 Safety and warnings Your safety is important to us. Please read this information before using your cooktop. Installation WARNING! Electrical Shock Hazard Disconnect the appliance from the mains electricity supply before carrying out any work or maintenance on it. Connection to a good earth wiring system is essential and mandatory. Alterations to the domestic wiring system must only be made by a qualified electrician. Failure to follow this advice may result in electrical shock or death.
Safety and warnings 3 Important safety instructions Read these instructions carefully before installing or using this appliance. No combustible material or products should be placed on this appliance at any time. Please make this information available to the person responsible for installing the appliance as it could reduce your installation costs. In order to avoid a hazard, this appliance must be installed according to these instructions for installation.
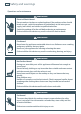
4 Safety and warnings Operation and maintenance WARNING! Electrical Shock Hazard Do not cook on a broken or cracked cooktop. If the cooktop surface should break or crack, switch the appliance off immediately at the mains power supply (wall switch) and contact a qualified technician. Switch the cooktop off at the wall before cleaning or maintenance. Failure to follow this advice may result in electrical shock or death. WARNING! Fire Hazard Never leave the appliance unattended when in use.
Safety and warnings 5 Important safety instructions Never use your appliance as a work or storage surface. Never leave any objects or utensils other than suitable cookware on the appliance. Do not allow children to play with the appliance or sit, stand or climb on it. Do not store items of interest to children in cabinets above the appliance. Children climbing on the cooktop could be seriously injured. Do not leave children alone or unattended in the area where the appliance is in use.
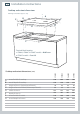
6 Installation instructions Cooktop and cutout dimensions Drawings for illustration purposes only 1 C A B CI 2 D E G F Terminal block location: 1 CE604L, CE604C & CE905C models - Middle rear 2 CE302C models - Front left CE604L CE604C CE905C A B C CI D E F G CE302C Cooktop and cutout dimensions (mm) overall width of cooktop 300 600 600 900 overall depth of cooktop 530 530 530 530 45 45 45 45 height of chassis (below top of bench) height of terminal block (below top of bench)
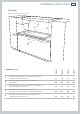
Installation instructions 7 Clearances Drawings for illustration purposes only A B D C E C D E minimum clearance below top of benchtop to: thermal protection barrier CE905C C minimum clearance from side edges of cutout to: nearest combustible surface minimum clearance from benchtop to: overhead cabinet not directly above the cooktop CE604C B minimum clearance from rear edge of cutout to: nearest combustible surface minimum clearance from glass surface to: rangehood CE604L A CE302C Clearanc
8 Installation instructions Before you install the cooktop, make sure that the benchtop is square and level, and no structural members interfere with space requirements the benchtop is made of a heat-resistant material the cooktop will not be installed directly above a dishwasher, as the humidity may damage the cooktop the installation will comply with all clearance requirements and applicable standards and regulations a suitable isolating switch providing full disconnection from the mains power supply is
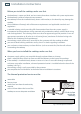
Installation instructions 9 Fastening the cooktop to the bench 4 5 Note: if your bench is thicker than 40 mm, recess the underside to between 30 and 40 mm. CE905C models only: Choose the most suitable clamp position B A A B BA B A Seal Adhesive side Fig. 2 Preparing the cooktop before installation(models may vary) Seal B A 40 mm max. 3 Turn the cooktop upside down and place it on a soft surface.
10 Installation instructions Connecting the cooktop to the mains power supply Important! This cooktop must be connected to the mains power supply only by a suitably qualified person. This cooktop must be earthed. Before connecting the cooktop to the mains power supply, check that: the domestic wiring system is suitable for the power drawn by the cooktop the voltage corresponds to the value given on the rating plate the power supply cable sections can withstand the load specified on the rating plate.
Installation instructions 11 Final checklist TO BE COMPLETED BY THE INSTALLER Is the cooktop earthed? Check that the power supply cable is NOT touching the base of the cooktop. This will ensure that the cable is not damaged by heat from the cooktop. Check that the power supply cable is not accessible via cupboard doors or drawers. Is the cooktop clamped down securely? Check that all the cooking zones function correctly. Turn on all of them to a high setting and leave them on for at least one minute.
Introduction 12 About your new cooktop Thank you for buying a Fisher & Paykel ceramic glass cooktop. This guide introduces you to all its special features. We recommend you read the whole guide before using your new cooktop, for both safety and cooking success. For more information, visit our local website listed on the back cover. Before using your new cooktop Read this user guide, taking special note of the ‘Safety and warnings’ section. Remove any protective film that may still be on your cooktop.
Using your cooktop 13 To start cooking As soon as you turn a cooking zone on, its ‘Hot surface’ indicator will start glowing. It will continue to glow even after you have turned the cooking zone off, until the glass becomes cool enough to be safely touched. Low Fig.8 Single cooking zone control High Low Inner zone ‘Hot surface’ indicators High Full dual zone Turn the control dial of the cooking zone you wish to use to the High setting, then adjust as necessary.
14 Cooking guidelines Cookware Use heavy-gauge, flat, smooth-based cookware that matches the diameter of the cooking zone. This will provide good contact with the glass and help reduce cooking times. Low heat or slow cooking is often due to incorrect cookware size. Cookware with a stainless steel sandwich base or enamelled cast iron will give you the best results. Saucepans or heavy frying pans with jagged edges or a rough base will scratch the glass.
Cooking guidelines 15 Important! Never leave the appliance unattended when in use. Boilover causes smoking and greasy spillovers that may ignite. Take care when deep-frying: oil or fat can overheat very quickly, particularly on a high setting. General cooking tips Using a lid will reduce cooking times through retaining the heat. Minimise the amount of liquid or fat to reduce cooking times. Start cooking on a high setting and reduce it when the food has come to the boil or heated through.
16 Care and cleaning Important! For your safety, switch the power to the cooktop off at the wall before any cleaning. In this case, there will be no ‘Hot surface’ indication, but the cooking zones may still be hot! Take extreme care. Do not use a steam cleaner to clean your cooktop. Do not use scourers or any harsh/abrasive cleaning agents to clean your cooktop, as these can scratch the ceramic glass or stainless steel.
Care and cleaning What? How? 17 Important! soiling examples Hot sugary spills, melted plastic or metal on glass sugar, sugary syrups jams and jellies vegetables or vegetable water with high sugar content (peas, sweetcorn, beetroot) melted aluminium foil or plastic wrap Remove these immediately with a spatula or razor blade scraper suitable for ceramic glass cooktops, but beware of hot spills and surfaces: 1 Hold the blade or utensil at a 30o angle and scrape the soiling or spill to a cool area of the
18 Troubleshooting Troubleshooting chart Problem Possible causes What to do Cooking zones cannot be turned on. No power. Make sure the cooktop is connected to the power supply and that it is switched on at the wall. Check whether there is a power outage in your home or area. If you’ve checked everything and the problem persists, call your Authorised Repairer or Customer Care. Cooking zones seem to turn themselves off and on during use.
Warranty and service 19 Before you call for service or assistance ... Check the things you can do yourself. Refer to the installation instructions and your user guide and check that: 1 2 your product is correctly installed you are familiar with its normal operation.
20 Warranty and service This cooktop has been designed and constructed in accordance with the following codes and specifications: In New Zealand and Australia: AS/NZS 60335-1 General Requirements for Domestic electrical appliances AS/NZS 60335-2-6 Particular Requirements for Domestic electrical cooking appliances AS/NZS 1044 Electromagnetic Compatibility Requirements.
Copyright © Fisher & Paykel 2009. All rights reserved. The product specifications in this booklet apply to the specific products and models described at the date of issue. Under our policy of continuous product improvement, these specifications may change at any time. You should therefore check with your Dealer to ensure this booklet correctly describes the product currently available. www.fisherpaykel.co.nz www.fisherpaykel.com.au www.fisherpaykel.co.uk www.fisherpaykel.