FULL SURFACE INDUCTION COOKTOP CI926DTB4 model USER GUIDE NZ AU BI SG
CONTENTS Safety and warnings 5 First use 10 Cookware 12 Using your cooktop 13 Using the timer 17 Cooking features 21 Cooking functions 22 Safety features 24 Customising your cooktop 27 Cooking guidelines 36 Care and cleaning 38 Alert messages 39 Troubleshooting 41 Energy guidelines 43 Energy guidelines (BI EU only) 44 Warranty and service 45 Registration To register your product visit our website: fisherpaykel.
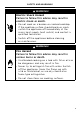
SAFETY AND WARNINGS ! WARNING! Electric Shock Hazard Failure to follow this advice may result in electric shock or death. • Do not cook on a broken or cracked cooktop. If the cooktop surface should break or crack, switch the appliance off immediately at the mains heat supply (wall switch) and contact a qualified technician. • Switch off the appliance before cleaning or maintenance. ! WARNING! Fire Hazard Failure to follow this advice may result in serious burns or death.
SAFETY AND WARNINGS ! WARNING! Hot Surface Hazard Failure to follow this advice may result in electric shock or death. • During use, accessible parts of this appliance will become hot enough to cause burns. • Do not let body, clothing or any item other than suitable cookware contact with the ceramic glass until the surface is cool. • Never leave metal objects (such as kitchen utensils) or empty pans on the cooktop as they can become hot very quickly.
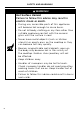
SAFETY AND WARNINGS ! WARNING! Health Hazard Failure to follow this advice may result in death. • This appliance complies with electromagnetic safety standards. However, persons with cardiac pacemakers or other electrical implants (such as insulin pumps) must consult with their doctor or implant manufacturer before using this appliance to make sure that their implants will not be affected by the electromagnetic field.
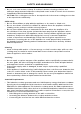
SAFETY AND WARNINGS READ AND SAVE THIS GUIDE WARNING! To reduce the risk of fire, injury to persons or damage when using the appliance, follow the important safety instructions listed below. Read all the guidance before using the appliance. Installation z z z Unpack the packaging materials from the cooktop. Ensure your appliance is properly installed and grounded by a qualified technician.
SAFETY AND WARNINGS z z Do not cook on a broken cooktop. If cooktop is broken, cleaning solutions and spillovers may penetrate inside the cooktop and create a risk of electric shock. Contact a qualified technician immediately. CAUTION: The cooking process has to be supervised. A short term cooking process has to be supervised continuously. Child Safety z z z Do not allow children to play with the appliance or sit, stand, or climb on it.
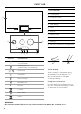
FIRST USE COOKTOP FEATURES 1 2 4 3 5 9 3 !0 1 Cooking area 2 Cooktop On/Off 3 Touchscreen 4 Heat display 5 Clock 6 Keylock 7 Kitchen timer 8 Pause 9 Settings !0 Pan icon / position in cooking area* 5 07 : 11 *Size according to pan dimension 6 7 8 DISPLAY 9 DESCRIPTION Cooking zone off (not activated) Cooking zone on (activated but not operating) Touch display Heat levels – Error message Your cooktop is operated using an intuitive touch display.
FIRST USE Zone display There are three types of possible displays for your pan based on pan dimensions; small, medium and large. The touchscreen will show the pan according to its size and position on the cooking surface. PAN SIZE 1 2 3 1 Small 2 Medium 3 Large Power display The colour of the pan icon changes according to the selected heat setting. COLOR 1 3 2 4 5 HEAT LEVEL 1 Grey Pan is lifted 2 Blue 0 3 Purple 1 - 3.5 4 Red 5 - 6.
COOKWARE The quality of your cookware can affect cooking performance. Only use induction-compatible cookware that has been specifically designed for induction cooking. Look for the induction symbol on the packaging or the bottom of the pan. We recommend to use cookware with maximum diameter of 360mm or less.
USING YOUR COOKTOP To start cooking Touch and hold for two seconds to turn on the cooktop. 1 Place a suitable pan anywhere on the cooking surface 2 z 07 : 20 0 1 2 3 4 5 6 7 8 9 B Ensure the bottom of the pan and cooking surface are clean and dry. Once the pan is placed on the cooking surface, a heat level selector is displayed at the bottom of the touchscreen.
USING YOUR COOKTOP To pause cooking This feature temporarily stops cooking operation for a maximum of 10 minutes. This is useful if you are leaving for a short period of time while cooking. All selected settings such as heat level, timer will remain when cooking resumes. 2 00:06 08 : 19 1 2 Touch on the menu bar to pause cooking operation. 00:06 08 : 19 The pan icon will turn grey and appears. icon 2 2 2 z 08 : 30 All pan settings are retained when in paused mode. again.
USING YOUR COOKTOP After cooking is done Select the pan icon on the display. 0 1 Turn off the pan heating by touching or sliding down to 0. Ensure heat display shows ‘0’. 07 : 20 0 1 2 3 4 5 6 7 8 9 B 2 Touch and hold for two seconds to turn off the cooktop. 3 Beware of hot surfaces: H will be displayed on the display screen to indicate areas on the cooktop surface that are still too hot to touch. It will remain on and steadily lit even when the cooktop is turned off.
USING YOUR COOKTOP Using PowerBoost This feature enables you to increase the heat level of a selected pan to maximum power for a short period of time. When activated, this function can be used for rapid heating of large quantities of water for cooking, such as rice, pasta or noodles for 10 minutes. After 10 minutes, the heat level automatically reduces to setting 9. Select the pan first. B 1 Select POWERBOOST by touching or sliding to B on the heat selector.
USING THE TIMER Setting the cooking time This feature enables the cooktop to automatically switch off the heat supply of each pan after a preset time. You can set the cooking time of each individual pan for up to 9 hours and 59 minutes. The timer can be set for each pan independent from other pans. Once the pan is placed on the cooking surface, touch on the right of the pan indicator icon. 1 2 09 HOURS 00 05 : 06 01 3 MINUTES 07 TIMER 2 09 HOURS 00 Touch to confirm.
USING THE TIMER When the set time is up, 00:00 will flash and you will hear a beeping sound. 3 5 Touch 00:00 to stop the flashing and beeping sound. 00:00 If not pressed, the timer automatically stops after 35 seconds. Resetting the timer 2 1 Touch the set time displayed. 05:00 2 TIMER 2 09 HOURS 00 : 01 3 09 HOURS 00 01 18 to reset the timer to 06 Touch to confirm. MINUTES 07 TIMER 2 Touch 05 05 : 06 07 MINUTES 00:00.
USING THE TIMER Using the kitchen timer This feature is used as a standalone timer which has no effect on the cooking process. The heat level setting of any pan can be operated normally while the kitchen timer is running. The kitchen timer can be adjusted ranging from 1 minute to 9 hours and 59 minutes. 06 : 40 1 2 on the menu bar to select Kitchen timer. TIMER will be displayed on the screen. Scroll up/down to set the cooking time (hours/minutes).
USING THE TIMER The timer will start and the display will show the current time. z 4 04:06 z 5 6 20 00:00 00:00 If the set time is less than 1 hour, the time is displayed in minutes and seconds. If set time is more than 1 hour, the time is displayed in hour/s and minutes. When the set time expires, 00:00 will flash and you wil hear a beeping sound. Touch 00:00 to stop the flashing and beeping sound. The timer menu will automatically close after 15 seconds.
COOKING FEATURES Melting function This function is suitable for melting chocolate. The temperature of the selected pan is set automatically to 44°C. The maximum duration of this function can be set up for two hours. Once the pan is placed on the cooking surface, touch on the left of the pan indicator icon. 2.5 1 07 : 41 0 2 2 1 2 PROGRAMS 3 4 5 6 2 PROGRAMS Touch Keep warm 8 9 to select MELTING function. Melting Melting 7 The PROGRAMS menu will open.
COOKING FUNCTIONS Keep warm function This function is suitable for keeping your food warm to a preset temperature of 70°C. 1 Once the pan is placed on the cooking surface, touch on the left of the pan indicator icon. 2.5 07 : 41 0 2 2 1 2 PROGRAMS 3 4 5 2 PROGRAMS Touch Melting Melting Keep warm 7 8 to select KEEP WARM. Keep warm Simmering Simmering The KEEP WARM symbol is shown in the pan icon, and the temperature of the pan is automatically set to 70°C.
COOKING FUNCTIONS Simmering function This functions sets the temperature of the selected pan to 94°C. The maximum duration of this function can be set up for two hours. Once the pan is placed on the cooking surface, touch on the left of the pan indicator icon. 2.5 1 07 : 41 2 2 0 1 PROGRAMS 2 3 4 5 2 PROGRAMS Touch Melting Melting Keep warm 7 8 Keep warm 9 to select SIMMERING function.
SAFETY FEATURES Key Lock This feature locks all keys on the touchscreen (except On/Off ) to avoid any accidental activation or changing of the pan heat settings when cleaning. When the cooktop is locked, the keys and cooktop display will remain unresponsive. 1 06 : 40 0 0 0 07 : 11 Touch on the menu bar to select KEY LOCK. The display will show the KEY LOCK icon to indicate the touchscreen is now locked.
SAFETY FEATURES Residual heat indicator After cooking, this feature indicates if the part of the cooking surface is still too hot to touch. The touchscreen displays ‘H’ on the indicated cooking surface, and will disappear if temperature is 55°C or less. H H 10 : 20 02:49 If there is a power interruption while the residual heat indicator is active, the cooktop will restart at residual heat temperature with ‘H’ displayed on the touchscreen.
SAFETY FEATURES Auto-off function This is a safety feature that automatically turns off the cooktop after a period of time based on the selected cooking function or heat level setting. Below are the following time limits corresponding to the cooking level. COOKING LEVEL MAXIMUM OPERATING TIME (HOURS) MELTING 2 KEEP WARM 2 SIMMERING 2 1 - 1.5 10 2 - 3.5 5 4 - 4.5 4 5 - 5.5 3 6-9 2 9.5 1 B 10* *Power level switches to 9 after 10 minutes.
CUSTOMISING YOUR COOKTOP Settings menu This feature includes various functions to configure your cooktops: PERSONALISE, CHILD LOCK, SOUND, BRIGHTNESS, CLOCK, LANGUAGE, FACTORY RESET. 2 06 : 31 1 2 Touch on the bottom right corner of the touchscreen. 06 : 31 SETTINGS 2 Personalise Child lock Sound Brightness Clock The SETTINGS menu is displayed. Swipe the icons left or right to navigate all functions in this menu.
CUSTOMISING YOUR COOKTOP Personalise This function allows you to customise the menu bar at the bottom of the touchscreen. It allows you to select which settings can be displayed on the touchscreen. SETTINGS SETTINGS 1 On the SETTINGS menu, touch to open PERSONALISE setting on the touchscreen. Personalise Personalise Child lock Sound Brightness Clock Child lock Sound The touchscreen shows an editing box containing the functions in the menu bar.
CUSTOMISING YOUR COOKTOP Child Lock This function restricts the access of children to prevent unintended operation of the cooktop. If child lock is activated, the cooktop can still be turned ON but the main screen is not displayed. If power is interrupted, the child lock remains active when the cooktop is turned ON. SETTINGS SETTINGS To activate Key lock 1 On the SETTINGS menu, touch to open the CHILD LOCK setting on the touchscreen.
CUSTOMISING YOUR COOKTOP The child lock icon is displayed each time the cooktop is switched ON. 4 To access the main screen, touch the icon for 3 seconds. 3 sec SETTINGS SETTINGS To deactivate Key lock 2 Personalise Personalise 3 Child lock Sound Brightness Clock Personalise Child lock Sound Brightness ON OFF 30 On the SETTINGS menu, touch to open CHILD LOCK setting on the touchscreen. Scroll to select OFF. Touch confirm. Child lock is now deactivated.
CUSTOMISING YOUR COOKTOP Sound This function enables you to change the volume of sound emitted by the touchscreen. There are two volume sliders to adjust the NOTIFICATION and TIMER sounds. SETTINGS SETTINGS 1 On the SETTINGS menu, touch to open SOUND setting on the touchscreen.
CUSTOMISING YOUR COOKTOP Brightness This function allows you to change the brightness of the touchscreen. SETTINGS SETTINGS 1 Personalise Personalise 2 On the SETTINGS menu, touch to open BRIGHTNESS setting on the touchscreen. Child lock Child lock Sound Sound Brightness Brightness Clock Clock Language Sound Brightness Clock Slide your finger along the slider to adjust the brightness level. Touch 32 Child lock to confirm.
CUSTOMISING YOUR COOKTOP Display clock This function enables you to set the time of clock displayed on the main screen. SETTINGS SETTINGS 1 Personalise Personalise 2 Sound Child lock Sound Brightness Clock Brightness Clock Language Factory reset 12h 13 24h 14 15 3 On the Settings menu, touch to open the CLOCK setting on the touchscreen. 13 : 14 15 14:11 Child lock Sound Brightness Clock Select the display format in 12 hours or 24 hours.
CUSTOMISING YOUR COOKTOP Language This function allows you to set your preferred language. The languages supported are: English, German, French, Spanish, Italian, Simplified Chinese, Korean and Vietnamese. English is set as the default language. SETTINGS SETTINGS 1 Child lock Child lock Brightness 2 Sound Clock Brightness Language Clock Factory reset ENGLISH DEUTSCH FRANÇAIS 34 On the SETTINGS menu, touch to open LANGUAGE setting on the touchscreen.
CUSTOMISING YOUR COOKTOP Factory reset This function enables you to reset the cooktop to its default settings. SETTINGS 1 On the SETTINGS menu, touch to open FACTORY RESET menu on the touchscreen. Clock Sound Clock Brightness Language Clock Language Factory reset 2 Factory reset Language Factory reset Reset all settings? Touch to confirm. To cancel, touch X to exit FACTORY RESET menu and return to the main screen.
COOKING GUIDELINES Take care when frying: oil and fat heat up very quickly, particularly if you’re using PowerBoost. At extremely high temperatures, oil and fat will ignite spontaneously and this presents a serious fire risk. Cooking tips z z z z When food comes to boil, reduce the temperature setting. Using a lid will reduce cooking times and save energy by retaining the heat. Minimize the amount of liquid or fat to reduce cooking times.
COOKING GUIDELINES HEAT SETTING SUITABILITY FOOD ITEMS 1 - 2 melting, reheating Sauces, butter, chocolate, gelatine, prepared dishes 2 - 3 simmering, defrosting Rice, pudding, sugar syrup, dried vegetables, fish frozen products 3 - 4 steam Vegetables, fish, meat 4 - 5 water Steamed potatoes, soups, pasta, fresh vegetables 6 - 7 medium cooking, simmering Meat, eggs, sausages, pancakes 7 - 8 cooking Potatoes, fritters, waffles 9 frying, roasting, boiling water Steaks, omelettes, fried d
CARE AND CLEANING WHAT? HOW? Everyday soiling on the glass (fingerprints, marks, stains left by food or non-sugary spillovers on the glass) 1 Switch off the cooktop before cleaning. 2 Apply cooktop cleaner while the glass is still warm (but not hot). 3 Rinse and wipe dry with a clean cloth or paper towel.
ALERT MESSAGES Induction cooking is activated when cookware is detected on the cooking surface. If there is a problem with the cookware, the pan icon will show . 3 Touch to show the corresponding alert message on the touchscreen. The following are examples of alert messages: Oops! Your cookware is not suitable for your induction cooktop. The pan you’re using is not suitable for induction cooking. Please use other cookware. Oops! Your cookware is too small for heating in this area.
ALERT MESSAGES Oops! Your display is overheated. The pan is placed too close to the touchscreen which can result in overheating of the panel surface. Please move your cookware. Sorry An error occured... Alert code indicates elecronic system is defective. E04 Please contact service department.
TROUBLESHOOTING PROBLEM POSSIBLE CAUSES WHAT TO DO The cooktop cannot be turned on. No power. Ensure the cooktop is connected to the power supply and that it is switched on at the wall. Check whether there is a power outage in your home or area. Check the circuit breaker. If you’ve checked everything and the problem persists, call your Authorized Service Centre or Customer Care. The touchscreen are unresponsive. The controls are locked. Unlock the controls. See section ‘Key Lock’ for instructions.
TROUBLESHOOTING PROBLEM POSSIBLE CAUSES WHAT TO DO Touchscreen shows on pan display. There is no pan on the cooking surface. Reposition the pan. The pan is placed too close to the touchscreen. The pan is too small. Use a suitable pan. The pan is not compatible with induction. 42 Touchscreen shows on cooking surface Electronics error. Disconnect and reconnect the cooktop at the circuit breaker to reset. Continuous ventilation after turning off the cooktop This is normal.
ENERGY GUIDELINES This cooktop has been designed and constructed in accordance with the following codes and specifications: In New Zealand and Australia: z z z AS/NZS 60335-1:2011 General Requirements for Domestic electrical appliances AS/NZS 60335-2-6:2014 Particular Requirements for Domestic electrical cooking appliances AS/NZS CISPR 14.1.2013 Electromagnetic Compatibility Requirements.
ENERGY GUIDELINES (BI EU ONLY) MODEL DIMENSION OF COOKING AREA MINIMUM DETECTION NOMINAL POWER (kW)* ENERGY CONSUMPTION* CI926DTB 920 x 445mm Ø 150mm 11100 192.5 Wh/kg *Energy consumption for whole cooktop calculated in accordance with the regulation (EU) No. 66/2014 and standard BS EN 60350-2:2018. Reducing the environmental impact of cooking Reducing energy consumption will reduce the impact of cooking on the environment.
WARRANTY AND SERVICE Before you call for service or assistance Check the things you can do yourself. Refer to the installation instructions and your user guide and check that: 1 Your product is correctly installed. 2 You are familiar with its normal operation. If after checking these points you still need assistance or parts, please refer to the Service & Warranty book for warranty details and your nearest Authorized Service Centre, Customer Care, or contact us through our website www.fisherpaykel.com.
FISHERPAYKEL.COM © Fisher & Paykel Appliances 2021. All rights reserved. The models shown in this guide may not be available in all markets and are subject to change at any time. The product specifications in this guide apply to the specific products and models described at the date of issue. Under our policy of continuous product improvement, these specifications may change at any time.