
Installation Guide


26
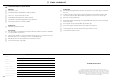
TO BE COMPLETED BY THE INSTALLER
GENERAL
Placement of unit.
Specified clearance maintained to cabinet surfaces.
Unit Level – front to back, side to side.
All packaging material and tie straps removed.
Island trim or optional backguard correctly attached.
The anti-tip bracket is correctly installed.
ELECTRICAL
Adequate ground connection.
GAS SUPPLY
Site gas supply is compatible with range model, and sufficient pressure is available
(see section ‘Gas connection’).
The pressure regulator is connected and correctly set for 4.0” (101.6mm) W.C.P. for
NATURAL gas or 11.0” (279.4mm) W.C.P. for LP/PROPANE gas.
Manual gas shut-off valve installed in an accessible location.
Unit tested and free of gas leaks.
@1 FINAL CHECKLIST
Complete and keep for safe reference:
Model
Serial No.
Purchase Date
Purchaser
Dealer Address
Installer’s Name
Installer’s Signature
Installation Company
Installation Date
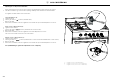
OPERATION
All internal packing materials removed. Check below the cooktop grates and inside
the oven.
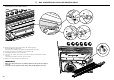
If used on LP gas, verify that the pressure regulator, cooktop burner injectors and
oven burner injectors (Gas Gas models only) have been set for use with LP gas.
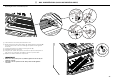
Dials turn correctly and freely.
Each burner lights satisfactorily, both individually and with other burners operating
at the same time.
Oven ignition can be achieved (Gas gas models only)
Oven door hinges seated and door opens and closes properly.
Cooktop grates are correctly positioned, level, and do not rock.
Cooktop burner flame correct.
Copyright © Fisher & Paykel Appliances 2018. All rights reserved.
The product specifications in this booklet apply to the specific products
and models described at the date of issue. Under our policy of continuous
product improvement, these specifications may change at any time. You
should therefore check with your Dealer to ensure this booklet correctly
describes the product currently available.
FISHERPAYKEL.COM