
Installation Guide


3
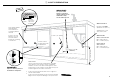
3 OPTIONALLY HARD WIRING PRIOR TO INSTALLATION
3-A REMOVE THE DRAWER 3-B REMOVE THE ACCESS COVER & REMOVE POWER
Access cover
Clip
Clip
Electronics
module
Terminal
Block cover
Remove existing
power cord
1 With a flat-bladed screwdriver, push
in the clips and slide out the access
cover.
2 Unscrew the electronics module
cover.
3 Carefully pull out the electronics
module and rest on the chassis base
out of the way.
4 With a screwdriver, unclip the plastic
harness cover and hinge open.
5 Slide the terminal block cover
sideways to unlock and hinge open
to access the terminal block.
6 Unscrew the Live, Neutral and Earth
wires as shown.
7 Unscrew the three screws on the
base as shown and remove the cord
from the product.
1
1
2
3
4
5
6
7
7
2
1
3
4
4
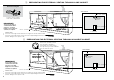
4” (100mm)
To prevent kinked hoses
Either sit the drawer down on the left
hand side (recommended) or rotate the
drawer clockwise, resting it on its side after
removal.
Press the release tabs in
on either side and push
back to release drawer
from runners.
Lift drawer off runners.
Push drawer
runners back in
on either side.
Push drawer
runners back
in on either
side.
Sit the drawer down
Rotate the drawer
clockwise (max. 90
o
)
and rest on side.