Installation instructions and User guide Dishwasher DW60 models AU SG
Contents Safety and warnings Installation instructions Introducing your dishwasher Using your dishwasher Selecting a wash programme Caring for your dinnerware Dishwasher standards test Loading Detergent Rinse aid Care and cleaning Fault codes Troubleshooting Warranty and service Important! SAVE THESE INSTRUCTIONS The models shown in this user guide may not be available in all markets and are subject to change at any time.
2 Safety and warnings Important safety precautions For your safety, follow basic precautions when using your dishwasher, including the following: Please read all instructions before operating your dishwasher. The information in this user guide must be followed to minimise the risk of fire or explosion, or to prevent property damage, personal injury or loss of life. Operational Use the dishwasher only for its intended function as described in this user guide. Dishwasher detergents are alkaline.
Safety and warnings 3 Installation This dishwasher must be installed and positioned in accordance with the ‘Installation instructions’ before it is used. Installation and service should be performed by a qualified technician. If the power supply cord is damaged, it must be replaced by the manufacturer or Authorised Service Centre or a similarly qualified person in order to avoid a hazard. Ensure the dishwasher is placed between cabinetry.
4 Installation instructions Before you start These instructions are intended as a guide only. It is the responsibility of the plumber and electrician to ensure that each installation complies with the Government and local government by-laws. Check packaging and dishwasher immediately for signs of transport damage. If the appliance is damaged, do not put into use but contact your Fisher & Paykel Authorised Service Centre or dealer.
Installation instructions 5 Plumbing Drainage The recommended method of installation is shown in diagrams 1,2 and 3. The diagrams are designed to eliminate problems that occur with combined sink – dishwasher waste systems. The standpipe must have a minimum diameter of 38 mm and stand 750mm above the floor. A drain hose support is provided to hold the drain hose in place in the standpipe (See diagrams 1 and 2).
6 Installation instructions Water inlet connections The dishwasher has a single valve water connection. We recommend a cold water connection to give the best wash performance and energy efficiency. Important! The appliance should be connected to the water main using a new hose set. Old hose sets should not be used. If the water inlet hose is not long enough to make a proper connection, it must be replaced. This hose can be purchased from a Fisher & Paykel dealer or authorised service centre.
Installation instructions 7 If the electrical socket to which the appliance must be connected is not appropriate for the plug, replace the whole cable, rather than using adaptors as they could cause overheating and burns. Important! The dishwasher plug must be accessible even when the appliance is installed as a built-in unit so that maintenance can be done safely. If a fault occurs If the dishwasher malfunctions, turn off the water supply to the appliance and disconnect the plug from the wall socket.
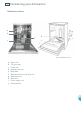
8 Introducing your dishwasher Dishwasher interior a g b h d j i c e f Fig.
Using your dishwasher a b a Power button (ON/OFF) b Programme button c Programme indicator a b c 9 c Fig. 2 Control panel for DW60CS models d e f g h Fig. 3 Control panel for DW60CD models a b c d e Power button (ON/OFF) Reset button Delay start button Time remaining indicator Heater indicator f Rinse aid indicator g Programme button h Programme indicator Quick start 1 2 3 4 5 6 7 Remove all food scraps and load the dishes. Add detergent. Check rinse aid.
10 Using your dishwasher If you have forgotten to load some dishes 1 2 To pause a wash programme (DW60CD models only) Press the Power button. Open the door slowly. Important! There is a risk of being sprayed with hot water. Do not open the door fully until the spray arm has stopped rotating. If the door is left open during the wash programme, the dishwasher will beep ten times every thirty seconds.
Using your dishwasher 11 If you want a programme to start later 1 2 3 4 5 6 Delay start (DW60CD models only) This feature can delay the start of a wash programme from 1 to 12 hours. To activate the delay start: Ensure you have loaded all the dishes, added detergent, and closed the door. Turn your dishwasher ON. Press the Delay start button. The Delay indicator will flash and the Time remaining indicator will change to ‘1h’.
12 Selecting a wash programme PROGRAMME What load should I use it for? What stages does the programme consist of? HEAVY DUTY NORMAL ECO DELICATE* FAST RINSE Dishes with Heavily normal soils soiled pots, for optimum pans, and wash and dry dishes. performance. Normally soiled dishes for optimum energy usage. Rinses dishes that have been stacked for several days in the dishwasher prior to washing. Hot prewash Cold prewash.
Caring for your dinnerware 13 The combination of high temperatures and dishwasher detergent may cause damage to some items if they are washed in your dishwasher. Remember, if in doubt about any items to be washed in the dishwasher, follow the instructions from the manufacturer of the items, or wash them by hand. Cutlery and silverware All cutlery and silverware should be rinsed immediately after use to prevent tarnishing caused by some foods. The Rinse wash programme is useful for this.
14 Dishwasher standards test This dishwasher is tested to AS/NZS 2007 standards for both wash and dry performance. The following are loading pattern diagrams, detergent quantities and rinse aid quantities used for the dishwasher. Wash programme Normal Eco Detergent quantities 5 g prewash, +25 g main wash Rinse aid setting 5 Maximum place setting 12 Recommended loading pattern - The height-adjustable top basket must be in the uppermost position.
Loading 15 Take care when loading dishes to ensure that there is enough space and room for the water to reach all areas, particularly the cup racks. If there are any items blocking the spray arms’ paths or the wash water, then the performance will be ineffective. Before placing the dishes in the dishwasher, remove larger food particles to prevent the filter from becoming clogged.
16 Loading How to load the upper rack The upper rack is designed to hold items like glasses, cups, saucers, plates, small bowls and shallow pans. Position these items so that they cannot be moved during the wash. Upper rack adjustment for DW60CS models The upper rack can be adjusted for height by using the rollers located on both sides of the rack (see below). Adjusting the upper rack to a higher level will give you more space to accommodate taller items in the lower rack. Fig.
Detergent 17 Important! Never sprinkle or pour detergent directly onto any item in the dishwasher. Hand washing liquids, soap, laundry detergents or disinfectants will damage your dishwasher. Press button to open Filling the detergent dispenser 1 2 3 4 5 Press the button on the top of the dispenser to open the cover. Pour the detergent for the wash cycle into the larger main detergent compartment.
18 Rinse aid We highly recommend the regular use of liquid rinse aid to give the best drying results. Rinse aid gives a streak-free, sparkling clean look to glass and chinaware. In addition it prevents metal from tarnishing. The rinse aid dispenser is located on the inside panel of the door. Filling the rinse aid dispenser 1 2 3 Open the dispenser by turning the cap in an anticlockwise direction. Pour the rinse aid into the dispenser, making sure not to overfill.
Care and cleaning 19 After each wash, turn off the water supply to the dishwasher and leave the door ajar 30°, so that moisture and odours are not trapped inside. Important! The door should not be left in the fully open position as this could present a tripping hazard. Before cleaning or performing maintenance, always remove the power plug from the wall socket.
20 Care and cleaning Cleaning the drain filters and spray arms Regular inspection and maintenance of your dishwasher helps to prevent problems from occurring. You should carefully inspect your dishwasher regularly. Check that no grease or scale has accumulated on the inside of your dishwasher. If you discover any deposits, clean them thoroughly with warm water on a soft, lint-free cloth. Fig.
Fault codes 21 Please read the following pages before you call for service. You can correct many of your dishwasher’s problems yourself, using the checklists on the following pages. Fault signal Fault code Possible causes What to do First 2 programme indicators flashing E1 The door is not properly closed. Close the door firmly. 1 and 3 programme indicator lights flashing E2 Temperature sensor faulty Turn the water and power off to the dishwasher.
22 Troubleshooting Problem Probable cause What to do Dishwasher will not start. Power supply is not connected. Connect the power supply. The door is not properly closed. Close the door. Programme button has not been pressed. Select a programme. Water tap not turned on. Ensure the water is connected and turned on. Blocked strainer in water intake hose.Check strainer – located in the inlet supply hose where it screws into the tap.
Troubleshooting Problem Probable cause Knocking or rattling sound Spray arm knocking against dishes. during wash. 23 What to do Stop cycle and reposition dishes. Dishes have been stacked incorrectly. Stop cycle and reposition dishes. Wash programme unsuitable for load or soils were too heavily baked on and dishes may need soaking. See the ‘Wash programme chart’ for a suitable wash programme. Spray arm unable to rotate. Ensure no items are obstructing the spray arm path.
24 Troubleshooting Problem Probable cause What to do Glasses have dull appearance. Rinse aid set too low. Increase rinse aid setting. See the ‘Rinse aid’ section. Tea stains or traces of lipstick have not been completely removed. Not enough detergent. See the ‘Detergent’ section or the detergent manufacturer’s instructions. Wash temperature too low. Select wash programme with higher temperature. Traces of rust on cutlery. Cutlery is not sufficiently rust proof. Wash by hand.
Warranty and service 25 Manufacturer’s warranty When you purchase any new Fisher & Paykel whiteware Product you automatically receive a two year Manufacturer’s Warranty covering parts and labour for servicing. Fisher & Paykel undertakes to Repair or, at its option, replace without cost to the owner either for material or labour any part of the Product, the serial number of which appears on the Product, which is found to be defective within TWO YEARS of the date of purchase.
26 Warranty and service Customer care 1 2 Check the things you can do yourself. Refer to your User Guide and check: your appliance is correctly installed you are familiar with its normal operation If after checking these points you still need assistance please refer to the following: In Australia If you need assistance call...* Call the Fisher & Paykel Customer Care Centre and talk to one of our Customer Care Consultants. Toll Free - 1300 650 590 Fax: (07) 3826 9298 Email: customer.care@fp.com.
Copyright © Fisher & Paykel 2008. All rights reserved. The product specifications in this booklet apply to the specific products and models described at the date of issue. Under our policy of continuous product improvement, these specifications may change at any time. You should therefore check with your Dealer to ensure this booklet correctly describes the product currently available. www.fisherpaykel.com.au www.fisherpaykel.com.sg AU SG Dishwasher user guide Published: 08/2008 Part No.