DISHWASHER DW60FC and DW60UC models USER GUIDE NZ AU
This user guide is an accompaniment to your ‘Quick start guide’ which is included with your dishwasher. For operating instructions, see your ‘Quick start guide’. If you no longer have your ‘Quick start guide’, you can download it from our local website, listed on the back cover.
CONTENTS Safety and warnings 2 Controls and starting a wash 4 Setting Delay Start 5 Setting wash modifiers (DW60FC6 and DW60UC6 models) 6 Setting a 1/2 load (DW60FC6 and DW60UC6 models) 8 User preference settings 9 Caring for your dinnerware 10 Loading advice 11 Water hardness and dishwashing 13 Wash programmes and detergent quantities 14 Adding detergent 15 Using rinse aid 16 After the wash 17 Care and cleaning 18 Fault codes 21 Troubleshooting 23 Warranty and service 27 W
SAFETY AND WARNINGS Your dishwasher has been carefully designed to operate safely during normal dishwashing procedures. Please keep the following instructions in mind when you are using your dishwasher. IMPORTANT SAFETY INSTRUCTIONS WARNING! When using your dishwasher, follow basic precautions, including the following: ● ● ● ● ● ● ● ● ● ● ● ● ● ● ● ● 2 Read all instructions before using the dishwasher.
SAFETY AND WARNINGS IMPORTANT SAFETY INSTRUCTIONS ● ● ● ● ● ● ● ● ● ● ● ● ● ● ● ● ● ● Maintenance Disconnect the appliance from the power supply before any cleaning or maintenance. When disconnecting the appliance pull the plug rather than the power supply cord or junction of cord to avoid damage. Do not repair or replace any part of the appliance or attempt any servicing unless specifically recommended in this user guide. We recommend that you contact Customer Care to arrange service.
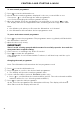
CONTROLS AND STARTING A WASH To start a wash programme to turn the dishwasher on. 1 Press 2 Check that the wash programme displayed is the one you would like to use. If not, press to scroll through the wash programmes (see section ‘Changing the wash programme’ below). 3 Once the display shows the programme you would like to use, press to start. The display will show the approximate time remaining and the stage of the wash.
her SETTING DELAY START This feature can delay the start of a wash programme by 1 to 12 hours. 1 Load the dishes, add detergent and close the door. 2 Press to turn the dishwasher on. 3 Check that the display shows the wash programme you require. If not, see instructions for ‘Changing the wash programme’. 4 C1/C2/C4 models: Press . C6 models: Press and hold for a second. ● The delay start indicator will light up and the display will show the delay time (hours).
SETTING WASH MODIFIERS (DW60FC6 AND DW60UC6 MODELS) C2, C4 Dishwasher er C6 Dishwasher Along with setting the wash programme, you may select one of the following the additional options: ● ● ● Extra dry: Increases the wash temperature and the length of the drying phase for improved drying performance. This is especially useful for plastic items. Quick: Uses additional water and energy for a faster wash time, while maintaining wash performance.
C2, C4 Dishwasher C6 D SETTING WASH MODIFIERS (DW60FC6 AND DW60UC6 MODELS) Using sanitize The sanitize wash modifier adjusts the wash programme to meet the conditions required C6 Dishwasher by Section 6, NSF 184 for sanitization to occur. While sanitize is running, the wash programme is monitored to ensure that these conditions are met. C2, C4 Dishwasher IMPORTANT! ● ● ● For sanitization to occur, the temperature of the water needs to reach 700C.
SETTING A 1/2 LOAD (DW60FC6 AND DW60UC6 MODELS ) C6 Dishwasher C2, C4 Dishwasher 8 DISHWASHER TOPCAP GRAPHICS C2, C4 Dishwasher C6 Dishwasher C6 Dishwasher KEL P8Half DISHWASHER TOPCAP GRAPHICS load Option ● ● If you don’t have a full load of dishes to wash, you can choose to use the 1/2 load option. This may be useful if, for example, you only wish to wash the breakfast dishes. The dishes should fill only half the dishwasher, but may be placed in both upper and lower baskets.
C2, C4 Dishwasher C6 Dishwasher USER PREFERENCE SETTINGS ● ● These allow you to: Change the rinse aid setting or turn rinse aid on or off. Turn the beeps on or off. FISHER AND PAYKEL P8 DISHWASHER TOPCAP GRAPHICS To change the rinse aid setting 1 Press to turn the dishwasher on. 2 Press and hold and together for five seconds to enter the user preference menu. The display will show the current Rinse Aid setting.
CARING FOR YOUR DINNERWARE The combination of high temperatures and dishwasher detergent may cause damage to some items if they are washed in the dishwasher. Remember, if in any doubt about any aspect concerning items washed in the dishwasher, follow the instructions from the manufacturer of the items, or wash the item by hand. IMPORTANT! Never put highly absorbent materials, such as sponges and towels in your dishwasher.
LOADING ADVICE ● ● ● ● When loading your dishwasher Place items so that water coming from the rotating spray arms below can reach all areas. Especially items on the foldaway cup racks. Wash performance will be reduced if it can’t. Ensure glass and other fragile items are stable, so that they do not accidentally topple and break during the wash. Any flimsy or light plastic items should be either weighted down or placed on the cup racks or in the cutlery tray.
LOADING ADVICE ● ● ● ● ● ● ● 12 The large mug below is blocking wash water reaching the mug on the cup rack. Locate sharp items safely to prevent injuring the user and damaging the lid assembly. Sharp or pointed items must be placed horizontally or with sharp edges/points facing down to avoid risk of injury. Ensure cutlery has not fallen through the base rack and stopped the spray arms from rotating.
WATER HARDNESS AND DISHWASHING What is water hardness? Hard water is water with a high concentration of minerals such as calcium and magnesium. In soft water, this concentration is low. Water hardness varies by geographical location. How does water hardness affect dishwashing? ● ● Hard water can be detrimental to the performance of your dishwasher. Over time, glassware washed in hard water will become opaque and dishes will become spotted or covered in a white film.
WASH PROGRAMMES AND DETERGENT QUANTITIES ● ● ● The quantities in the table below are for powdered detergent and typical levels of soiling. If your home has softer or harder water, or to suit the particular load, you may need to adjust these quantities. If you are using tablets, follow the tablet manufacturer’s recommendations. The indicator light will show which option has been selected.
ADDING DETERGENT IMPORTANT! ● ● ● ● Only use detergents recommended for automatic dishwashers. Dishwasher detergents are strongly alkaline. They can be extremely dangerous if swallowed. Avoid contact with the skin and eyes and keep children and infirm persons away from the dishwasher when it is open. Check that the detergent dispenser is empty after completion of each wash programme. Never sprinkle or pour detergent directly onto any item in the dishwasher.
C2, C4 Dishwasher USING RINSE AID We highly recommend using liquid rinse aid regularly to get the best drying results. Rinse aid gives a streak-free, sparkling clean look to glass and chinaware. In addition, it prevents metal from tarnishing. When to refill the rinse aid dispenser Rinse aid level indicators (rinse aid dispenser) When rinse aid level becomes low, the rinse aid indicator on the control panel will light up to remind you to refill the dispenser.
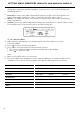
AFTER THE WASH When the wash programme is over, the dishwasher will beep six times, then automatically turn off in a few seconds. 1 Open the door slightly and leave it ajar (about 100mm) to help the drying process. 2 Once the dishes are cool to touch, they can be removed. IMPORTANT! Never leave the dishwasher door in the fully open position, as this could present a tripping hazard. 3 Check that the detergent dispenser is completely empty. If it isn’t, wipe out with a damp cloth.
CARE AND CLEANING Over time, food residue or limescale deposits may accumulate inside your dishwasher. These may reduce efficiency, and food residue may produce a bad odour. Inspect and clean your dishwasher regularly. IMPORTANT ! ● ● ● ● 18 Before any cleaning or maintenance, always disconnect the dishwasher from the power supply, turn off the water supply, and wait until all parts of the dishwasher have cooled.
CARE AND CLEANING Cleaning the dishwasher exterior ● ● ● To clean exterior surfaces of the dishwasher, wipe with a clean, soft damp cloth and dry with a clean, lint-free cloth. For non-flush surfaces wipe along or around the surface. For example, to wipe down the exterior control buttons, use a circular wiping motion around the button. Take care not to cause excessive wetting of the control panel area. Note: before cleaning the control panel, it is useful to disable the buttons by activating Keylock.
CARE AND CLEANING Cleaning the spray arms Limescale and food particles in the wash water can block the holes in the spray arms and the arm mountings. Clean these parts about once a month, or more often should the need arise. Cleaning the upper spray arm/head Do not remove the upper spray arm for cleaning. Clean with a small plastic-bristled brush, or if heavily soiled or blocked use a dishwasher cleaner/descaler following the manufacturer’s instructions.
FAULT CODES If the dishwasher malfunctions, it will display a fault code and beep. Check the following table below to see if you can correct the fault yourself. If the dishwasher still will not work, or shows any other fault code 1 Press 2 Press to turn the dishwasher off and wait a few minutes. again to turn the dishwasher back on.
FAULT CODES FAULT CODES AND DESCRIPTIONS POSSIBLE CAUSES WHAT TO DO F30 Flood switch activated. Turn the dishwasher OFF and ON again. If fault persists, turn water off and disconnect the dishwasher from the power supply. Call Customer Care. F40 Water flow error. Switch dishwasher OFF and ON again. If fault persists call Customer Care. F50 Electronics error. Switch dishwasher OFF and ON again. If the fault persists call Customer Care. A60 Water temperature error.
C2, C4 Dishwasher C2, C4 Dishwasher C6 Dishwasher C6 Dishwas C6 Dishwas TROUBLESHOOTING PROBLEM POSSIBLE CAUSE WHAT TO DO Dishwasher will not start. No power. Ensure the dishwasher is plugged in and the power supply is turned on at the wall. The door is not properly closed. Close the door. Start/Pause button not been pressed. has Press the Start/Pause button . Water tap not turned on. Ensure water is connected and turned on. Blocked strainer in water inlet hose.
TROUBLESHOOTING 24 PROBLEM POSSIBLE CAUSE WHAT TO DO Foaming. Incorrect amount or type of detergent used. See section ‘Adding detergent’ or consult the detergent manufacturer’s instructions. Too much egg in the wash load. Increase the amount of detergent. Rinse aid dosage level too high. Decrease the rinse aid dosage. Rinse aid spills not wiped up. Ensure that all rinse aid spills are wiped up when they occur. The dishwasher stops suddenly during the wash.
TROUBLESHOOTING PROBLEM POSSIBLE CAUSE WHAT TO DO Plastic items are discoloured (e.g. stain left by tomato sauce). Not enough detergent, not pre-rinsed. Pre-rinse plastic dishes before placing in the dishwasher and/or add more detergent. Alternatively, using the Rinse programme after adding dishes may minimise staining. Display flashing while Keylock is on. This is normal. The display remains on although the buttons are disabled. No action required.
TROUBLESHOOTING PROBLEM POSSIBLE CAUSE WHAT TO DO Water marks left on glasses and cutlery. Rinse aid level or dosage setting is too low. Ensure there is rinse aid in dispenser. If necessary, increase the rinse aid setting or try using a wash programme with a higher temperature. See sections ‘Using rinse aid’ and ‘Wash programme data’. Hard water 26 Increase the rinse aid setting and the amount of detergent. See section ‘Water hardness and dishwashing’.
WARRANTY AND SERVICE Before you call for service or assistance Check the things you can do yourself. Refer to the installation instructions and your user guide and check that: 1 Your product is correctly installed. 2 You are familiar with its normal operation. If after checking these points you still need assistance or parts, please refer to the Service & Warranty book for warranty details and your nearest Authorised Service Centre, Customer Care, or contact us through our website www.fisherpaykel.com.
WASH PROGRAMME DATA DW60FC1, DW60FC2, DW60UC2 AUTO NORMAL NORMAL ECO* pre-wash pre-wash pre-wash main wash 45–68°C main wash 60°C FAST main wash 45°C DW60FC1: main wash 45°C HEAVY RINSE pre-wash rinse 45°C main wash 68°C Stages DW60FC2, DW60UC2: main wash 44°C post-rinse post-rinse post-rinse final rinse 70°C final rinse 70°C DW60FC1: post-rinse main wash 44°C final rinse 55°C final rinse 70°C drying drying DW60FC2: main wash 46°C drying drying drying AUTO NORMAL NORMAL
STANDARDS TEST (DW60FC1 MODELS ONLY) The dishwasher is tested to AS/NZS 2007 standards for both wash and dry performance using the parameters detailed below. Wash programme Normal Eco When the programme is finished, open the door 100mm to help with drying Powdered detergent quantities 5 g pre-wash + 27.
STANDARDS TEST (DW60FC2 AND DW60UC2 MODELS ONLY) The dishwasher is tested to AS/NZS 2007 standards for both wash and dry performance using the parameters detailed below. Wash programme Normal Eco When the programme is finished, open the door 100mm to help with drying Powdered detergent quantities 5 g pre-wash + 28.
STANDARDS TEST (DW60FC4/C6 AND DW60UC6 MODELS ONLY) The dishwasher is tested to AS/NZS 2007 standards for both wash and dry performance using the parameters detailed below. Wash programme Normal Eco When the programme is finished, open the door 100mm to help with drying Powdered detergent quantities 5 g pre-wash + 28.
FISHERPAYKEL.COM © Fisher & Paykel Appliances 2020. All rights reserved. The product specifications in this document apply to the specific products and models described at the date of issue. Under our policy of continuous product improvement, these specifications may change at any time. You should therefore check with your Dealer to ensure this document correctly describes the product currently available. NZ AU 591216E / 0120500575E 02.