Designer canopy HC36DTXB1 & HC48DTXB1 model Campana extractora decorativa HC36DTXB1 & HC48DTXB1 modelo Hotte aspirante décorative HC36DTXB1 & HC48DTXB1 modèle Installation instructions and User guide (EN) Instrucciones para la instalación y su uso (ES) Conseils d’installation et guide d’utilisation (FR) US CA
EN English Page 3 – 13 ES Español Page 15 – 25 FR Français Pág 27 – 37
Contents Safety and warnings Installation instructions Four-speed control panel with digital indicator Cleaning and maintenance Limited warranty 3 EN 4 6 9 10 11 Important! SAVE THESE INSTRUCTIONS The models shown in this User Guide may not be available in all markets and are subject to change at any time. For current details about model and specification availability in your country, please visit our local website listed on the back cover or contact your local Fisher & Paykel dealer.
EN 4 Safety and warnings Installation instructions READ AND SAVE THESE INSTRUCTIONS. WARNING – to reduce the risk of fire, electric shock or injury to persons, observe the following: WARNING! Electrical Shock Hazard Installation work and electrical wiring must be done by qualified person(s) in accordance with all applicable codes and standards, including fire‑rated construction. Read and follow the SAFETY AND WARNINGS outlined in this User Guide before operating this appliance.
Safety and warnings ■■ ■■ CAUTION: For general ventilating use only. Do not use to exhaust hazardous or explosive materials and vapors. CAUTION: To reduce the risk of fire, use only metal duct work. WARNING – to reduce the risk of a range top grease fire: ■■ ■■ ■■ ■■ Never leave surface units unattended at high settings. Boilovers cause smoking and greasy spillovers that may ignite. Heat oils slowly on low or medium settings. Always turn hood on when cooking at high heat or when flambeing food (i.e.
EN 6 Installation instructions Decorative extractor hoods Dear client: We are sure that the purchase of our rangehood will fully satisfy all of your needs. Please read this instruction manual carefully in order to obtain the best results from the use of the hood. Important ■■ Proof of purchase is required before a warranty claim will be accepted.
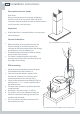
Installation instructions 7 EN Electrical connection Important! Be certain all wiring complies with local codes and the unit is properly grounded. 1 Run three wires, two for the power supply and the ground wire, from the connection box on the canopy to a power connection point near the installation. 2 Using approved wiring connectors, connect the power conductors to the conductors for the fan: black to black and white to white.
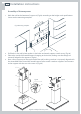
EN 8 Installation instructions Assembly of chimney cover 1 Mark the wall at the location of support C (Fig.4a) according to the heights and specifications shown on the mounting template. 4” 9.8 .4” Fig.3 Mounting template 10 ” .26 10 4” 9.8 2” 0.9 7” ” 25 2 3 4 8” 5.9 N2 MI Drill holes in the wall, place anchors in the holes and attach support C with screws (Fig.4a).
Four-speed control panel with digital indicator This panel is situated on the front of the rangehood and includes: ■■ Button for the light (ref. A). ■■ On/off button of the motor (ref. B). ■■ Button for reducing the motor speed (ref. C). ■■ Motor speed indicator (ref. D). ■■ Button for increasing the motor speed (ref. E). ■■ Button for directly activating the TURBO speed of the motor (ref. F). ■■ Button for setting the timer of the motor (ref. G).
EN 10 Cleaning and maintenance IMPORTANT! Disconnect the power before cleaning or servicing. Cleaning ■■ Clean the external part with a mild, liquid detergent and avoid the use of abrasive cleaning products. Changing the light 1 2 3 4 Before changing the light make sure that the hood is not operating. Remove the grease filter. Replace the light with a light bulb no more powerful than that specified in the Technical Characteristics. Place the grease filter back into position.
Limited warranty 11 EN When you purchase any new Fisher & Paykel whiteware product for personal or consumer use you automatically receive a one year limited warranty covering parts and labor for servicing within the 48 mainland United States, Hawaii, Washington DC and Canada. In Alaska the limited warranty is the same except that you must pay to ship the product to the service shop or the service technician’s travel to your home.
EN 12 Limited warranty This warranty does not cover: A Service calls that are not related to any defect in the product. The cost of a service call will be charged if the problem is not found to be a defect of the product. For example: 1. Correcting faulty installation of the product. 2. Instructing you how to use the product. 3. Replacing house fuses, resetting circuit breakers, correcting house wiring or plumbing, or replacing light bulbs. 4. Correcting fault(s) caused by the user. 5.
Limited warranty 13 EN How to get service Please read your User Guide. If you then have any questions about operating the product, need the name of your local Fisher & Paykel Authorized Service Agent, or believe the product is defective and wish service under this limited warranty, please contact your dealer or call us at: USA and Canada TOLL FREE 1.888.9.FNP.USA (1.888.936.7872) or use the link at: www.fisherpaykel.
Índice Seguridad y advertencias Instrucciones de instalación Panel de mando cuatro velocidades con indicador digital Limpieza y mantenimiento Garantia limitada 15 16 18 21 22 23 ¡Importante! GUARDE ESTE INSTRUCTIVO Los modelos que se ilustran en esta Guía del Usuario pudieran no estar disponibles en todos los mercados y están sujetos a cambio en cualquier momento.
16 ES Seguridad y advertencias Instrucciones de instalación LEER Y CONSERVAR ESTAS INSTRUCCIONES. ADVERTENCIA – para reducir el riesgo de incendio, descarga eléctrica o daño para las personas, observe lo siguiente: ¡ADVERTENCIA! Peligro de Descarga Eléctrica El trabajo de instalación y el cableado eléctrico deben ser realizados por personas cualificadas, de acuerdo con todos los códigos y normas aplicables, incluyendo una construcción ignífuga.
Seguridad y advertencias ■■ ■■ ■■ 17 ES Antes de efectuar servicio o de limpiar el aparato, desconecte la alimentación en el panel de servicio y bloquee el panel de servicio para evitar que la alimentación se conecte accidentalmente. Cuando el medio de desconexión del servicio no pueda bloquearse, ajuste de forma segura un dispositivo de advertencia destacado, como por ejemplo, una señal en el panel de servicio. PRECAUCIÓN: Utilizar exclusivamente para ventilación general.
18 ES Instrucciones de instalación Campana extractora decorativa Estimado cliente: Tenemos la certeza que la adquisición de nuestra campana extractora va a satisfacer plenamente sus necesidades; para ello le rogamos lea atentamente las instrucciones del manual con lo cual obtendrá un resultado óptimo en la utilización de la misma. Importante ■■ Antes de aceptar una reclamación de garantía se requiere una prueba de compra.
Instrucciones de instalación 19 ES Cableado Importante! Asegurase que todo el cableado cumple con las leyes locales y que el aparato esté correctamente puesto a tierra. Marrón Motor Amarillo/Verde Ground Blanco Amarillo/Verde Blanco Púrpura Azul Rojo Interruptor Gris Negro Extienda tres cables, dos de alimentación y uno de tierra, desde la caja de empalmes de la campana hasta una caja de empalmes próxima al lugar de instalación.
20 ES Instrucciones de instalación Montaje del tubo telescópico embellecedor 1 Marcar en la pared la posición del soporte C (Fig.4a), según cotas y especificaciones de la plantilla adjunta. 4” 9.8 .4” Fig.3 Plantilla 10 ” .26 10 4” 9.8 2” 0.9 7” ” 25 2 3 4 8” 5.9 N2 MI Efectuar los agujeros en la pared, aplicar los tacos en los orificios y fijar el soporte C con los tornillos (Fig.4a).
Panel de mando cuatro velocidades con indicador digital Este panel está situado en la parte frontal de la campana y comprende: ■■ Pulsador para la lámpara de iluminación (ref. A). ■■ Pulsador para el apagado / encendido del motor (ref. B). ■■ Pulsador para la reducción de la velocidad del motor (ref. C). ■■ Indicador de la velocidad del motor (ref. D). ■■ Pulsador para el aumento de la velocidad del motor (ref. E). ■■ Pulsador para la activación directa de la velocidad TURBO del motor (ref. F).
22 ES Limpieza y mantenimiento IMPORTANTE! Siempre antes de efectuar cualquier operación asegurarse de que el interruptor esté en posición de paro. Limpieza ■■ Limpiar la parte externa con un detergente líquido no corrosivo y evitar el uso de productos de limpieza abrasivos. Cambio de lámpara 1 2 3 4 Antes de sustituir la lámpara asegurarse de que la campana no esté conectada. Quitar el filtro de grasa.
Garantia limitada 23 ES Cuando usted adquiere cualquier producto electrodoméstico nuevo Fisher & Paykel para uso personal o doméstico, usted recibe automáticamente una garantía limitada válida por un año que cubre partes y mano de obra para reparaciones dentro de los 48 Estados Unidos continentales, Hawai, Washington D.C. y Canadá. En Alaska, la garantía limitada es la misma excepto que usted debe pagar para enviar el producto al servicio técnico, o pagar el viaje del técnico de reparaciones a su casa.
24 ES Garantia limitada Esta garantia no cubre: A Visitas del servicio técnico que no están relacionadas con defectos en el producto. Se le cobrará el costo del servicio técnico si no se encuentra que el problema sea un defecto del producto. Por ejemplo: 1. Corregir una instalación defectuosa del producto. 2. Enseñarle a utilizar el producto. 3. Cambiar fusibles de la casa, resetear disyuntores de circuitos, corregir el cableado o plomería de la casa, o cambiar focos. 4.
Garantia limitada 25 Cómo obtener servicio técnico Por favor lea su Guía del Usuario. Si tuviera alguna pregunta acerca de cómo operar el producto, si necesita el nombre de su Técnico local de Servicio Técnico Autorizado por Fisher & Paykel, o siente que el producto está defectuoso y necesita algún servicio en los términos de esta garantía limitada, favor de ponerse en contacto con su concesionario, o llámenos sin costo al: EE.UU. LLAMADA SIN COSTO 1.888.9.FNP.USA (1.888.936.
Table des matières Sécurité et mises en garde Instructions d’installation Panneau de commande quatre vitesses avec indicateur digital Nettoyage et entretien Garantie limitée Important! CONSERVEZ CES INSTRUCTIONS Les modèles illustrés dans ce guide de l’utilisateur peuvent ne pas être offerts par tous les détaillants et sont sujets à modifications sans préavis.
28 Sécurité et mises en garde Instructions d’installation INSTRUCTIONS À LIRE ET À CONSERVER. FR ATTENTION – pour réduire le risque d’incendie, de décharge électrique ou de dommage pour les personnes, observez les points suivants: DANGER! Risque D’électrocution Le travail d’installation et le câblage électrique doivent être réalisés par des personnes qualifiées, en accord avec tous les codes et les normes applicables, y compris une construction ignifuge.
Sécurité et mises en garde ■■ ■■ ■■ 29 Avant d’effectuer un service ou de nettoyer l’appareil, le débrancher de l’alimentation sur le panneau de service et bloquer ce dernier afin d’éviter que l’alimentation se connecte accidentellement. Si le moyen de déconnexion du service ne peut être bloqué, ajuster le plus sûrement possible un dispositif de mise en garde bien en évidence, comme par exemple un signal FR sur le panneau de service. PRÉCAUTION: Utiliser exclusivement pour la ventilation générale.
30 Instructions d’installation Hotte aspirante décorative Cher client: Nous sommes persuadés que la hotte aspirante que vous venez d’acheter va satisfaire vos besoins. Nous vous prions cependant de lire attentivement les instructions du manuel; cela vous permettra d’obtenir un résultat optimal quand vous l’utiliserez. FR Important ■■ Il faudra présenter une preuve d’achat pour pouvoir bénéficier des services de la garantie.
Instructions d’installation 31 Branchement électrique Important! Vérifier que le câblage soit conforme à la réglementation locale et que l’appareil soit correctement branché à une prise de terre. Brun Moteur Jaune/Vert Ground Blanc Jaune/Vert Blanc Pourpre Bleu Rouge Interrupteur Gris Noir Étendre trois câbles – deux câbles d’alimentation et un câble de terre – du boîtier de branchements de la hotte jusqu’au boîtier de branchements la plus proche du lieu de l’installation.
32 Instructions d’installation Montage du tube télescopique enjoliveur FR 1 Marquer sur le mur la position du support C (fig.4a), d’après les cotes et les spécifications du patron cijoint. 4” 9.8 .4” Fig.3 Spécifications 10 ” .26 10 4” 9.8 2” 0.9 7” ” 25 2 3 4 8” 5.9 N2 MI Percer les trous dans le mur, placer les chevilles et fixer le support C avec les vis (Fig.4a).
Panneau de commande quatre vitesses avec indicateur digital 33 Ce panneau est situé sur le devant de la hotte et comprend : ■■ Bouton pour la lampe d’illumination (réf. A). FR ■■ Bouton pour l’arrêt/la marche du moteur (réf. B). ■■ Bouton pour la réduction de la vitesse du moteur (réf. C). ■■ Indicateur de la vitesse du moteur (réf. D). ■■ Bouton pour l’augmentation de la vitesse du moteur (réf. E). ■■ Bouton pour l’activation directe de la vitesse TURBO du moteur (réf. F).
34 Nettoyage et entretien Important! Avant d’effectuer n’importe quelle opération, vérifier que le câble d’alimentation ne soit pas branché et que l’interrupteur soit sur la position arrêt. FR Nettoyage ■■ Nettoyer la partie externe avec un détergent liquide non corrosif et éviter d’utiliser les produits de nettoyage avec des abrasifs. Remplacement de la lampe 1 2 3 4 Avant de remplacer la lampe, assurez-vous que la hotte soit débranchée. Enlevez le filtre à graisse.
Garantie limitée 35 Lorsque vous achetez un nouvel appareil électroménager Fisher & Paykel pour une utilisation ménagère, vous recevez automatiquement une garantie limitée d’un an couvrant les pièces de rechange et la main d’oeuvre pour le service dans les 48 états du continent américain, Hawaï, Washington D.C. et au Canada.
36 Garantie limitée Cette garantie ne couvre pas les points suivants : A Les déplacements d’un technicien de maintenance jusqu’à votre domicile pour tout problème non lié à un défaut dans le produit. Les frais du déplacement vous seront facturés si le problème s’avère ne pas être un défaut du produit. Par exemple : 1. Rectifier une mauvaise installation du produit. 2. Vous expliquer comment utiliser le produit. 3.
Garantie limitée 37 Comment solliciter le service clientèle Veuillez lire le manuel d’utilisation.
www.fisherpaykel.com www.fisherpaykel.ca Copyright © Fisher & Paykel 2010. All rights reserved. The product specifications in this booklet apply to the specific products and models described at the date of issue. Under our policy of continuous product improvement, these specifications may change at any time. You should therefore check with your Dealer to ensure this booklet correctly describes the product currently available. Derechos de autor © Fisher & Paykel 2010. Todos los derechos reservados.