
User Guide


6
EN
Installation instructions
Decorative extractor hoods
Dear client:
We are sure that the purchase of our rangehood
will fully satisfy all of your needs. Please read this
instruction manual carefully in order to obtain the best
results from the use of the hood.
Important
Proof of purchase is required before a warranty claim
will be accepted.
General indications
Before installing and using the hood, be sure
that the voltage (V) and the frequency (Hz)
indicated on the feature plate match the voltage
and frequency at the installation site.
The feature plate and technical data are shown
on the inside of the product.
This hood is equipped with an adjustable
chimney cover which allows it to be adjusted to
the height of the ceiling.
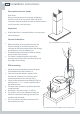
Wall mounting
1
Please remove the polyfoam protection piece
(from behind the motor) before use.
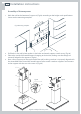
2
Connect the outlet adapter supplied with
the hood (6“ diameter) to an exhaust duct
connected directly to the outside (Fig.2).
3
Screw on the connection box following (Fig.2a)
with the two /” x /” screws supplied in the
box of accessories.
4
The accessories needed to install the hood are
inside the hood.
5
Drill holes in the wall using a ¼” drill bit.
6
The anchors and screws needed to hang the
hood are contained in the bag of accessories
supplied with the hood.
7
This fan shall be mounted a minimum of 22“
above the heat source.
Fig.1 HC36DTXB1 Designer canopy
Fig.2 Connect the outlet adapter to the exhaust duct
Fig.2a