
Companion Product Installation Guide


CONTENTS
IMPORTANT!
SAVE THESE INSTRUCTIONS
The models shown in this user guide may not be available in all markets and are subject to change at any time. For current details about model and specification availability in your country,
please go to our website fisherpaykel.com or contact your local Fisher & Paykel dealer.
Warming drawer 1
1 Safety and warnings 2
2 Parts supplied 3
3 Prior to installation 3
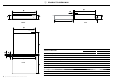
4 Product dimensions 4
5A Cabinetry dimensions – underbench
(ie installed with F&P single oven) 5
5B Cabinetry dimensions – wall mounted
(ie installed with a F&P compact oven) 6
5C Cabinetry dimensions – wall mounted
(ie installed with a F&P coffee maker) 7
5 Cabinetry dimensions – wall mounted
(standalone) 8
6 Discard packaging responsibly 9
7 Mark and pre-drill the holes for securing
the warming drawer 9
8 Connect the warming drawer to the mains supply 9
9 Secure the warming drawer to the cabinetry 10
10 Secure the anti-tip bracket
(optional depending on cabinetry configuration) 10
11 Final checklist 11
Coffee maker 13
1 Safety and warnings 14
2 Parts supplied 15
3 Prior to installation 15
4 After installation 15
5 Product dimensions 16
6A Cabinetry dimensions
(18 1/8” (460mm) high cavity) 17
6B Cabinetry dimensions
(18 7/8” (480mm) cavity trim kit) 18
7 Installation instructions 19
8 Final checklist 20
Steam oven 21
1 Safety and warnings 22
2 Prior to installation 23
3 After installation 23
4 Product dimensions 24
5A Cabinetry dimensions
(18 1/8” (460mm) high cavity) 25
5B Cabinetry dimensions
(18 7/8” (480mm) cavity trim kit) 26
6 Electrical hook-up 27
7 Secure the oven to the cabinetry 27
8 Final checklist 28