
Installation Guide


25
25
2
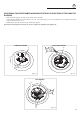
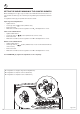
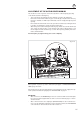
ADJUSTMENT OF THE OVEN BURNER MINIMUM
This needs to be done only for the oven burner (the broil is a fi xed capacity) by acting
on the thermostat in the following way:
• Turn on the burner by setting the thermostat knob on position “8” (maximum).
• Remove the knob and unscrew the by-pass screw “G” (fi g. 2.19) about three times by
passing a small fl at screwdriver (Ø 3 mm blade, 100 mm length) through the panel
opening.
• Re-mount the knob and let the oven heat up for about 10 minutes, then bring the knob
to position “1” (minimum) to operate the thermostat by-pass.
• After having removed the knob again and being very careful not to turn the thermostat
stem, slowly screw the by-pass screws “G” (fi g. 2.19) until you obtain a fl ame of 3-4
mm in height. The fl ame should not go out even when passing suddenly from maxi-
mum to minimum fl ame.
For LP/Propane gas, tighten the by-pass screw completely.
After regulation repeat the operations indicated in paragraph “2. PRESSURE REGULA-
TOR” at page 12 and 17.
If the range has been disconnected and then connected again to the gas supply line repe-
at the operations indicated in paragraph “5. LEAK TESTING” at page 17.
IMPORTANT:
• After conversion to LP/PROPANE gas has been carried out affi x near the data plate
the conversion label supplied and also affi x a conversion label at page 3 of this in-
struction manual.
• After conversion back to the original gas (NATURAL GAS) has been carried out re-
move, near the data plate and at page 3 of this instruction manual, the LP/PROPANE
conversion labels. Save the labels removed for future use.
Fig. 2.19
G