
Installation Guide


WARMING DRAWER INSTALLATION GUIDE|7
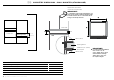
5CCABINETRY DIMENSIONS – WALL MOUNTED (ie INSTALLED WITH A F&P COFFEE MAKER)
23 5/8”
(600mm)
1 3/4”
(45mm)
*PO
PLAN
SIDE
CABINETRY DIMENSIONS inches (mm)
M
Minimum inside height of cavity
with optional Lower trim kit fitted
without optional Lower trim kit fitted
23 1/4” (590)
22 1/2” (570)
N
Inside width of cavity 22” (560)
O
Minimum inside depth of cavity 22 1/4” (565)
Note: When installed in combination with a companion product the companion product may be placed directly onto the warming drawer. It is not
necessary to place a shelf between the products. A built-in shelf at the base of the cabinetry able to support the weight of both products is required.
* PO – POWER OUTLET. Ensure there is an accessible earthed power outlet within 35 7/16” (900mm) of the centre rear of the product.
Additional 11/16” (18mm)
Wood spacer
IMPORTANT!
In a wall mounted installation,
there needs to be an
11/16” (18mm) Spacer fixed
underneath the warming
drawer first to raise it to the
required height.
Warming drawer
Warming drawer
Coffee maker
Coffee maker
Warming drawer
Lower trim kit
(optional, supplied separately)
Coffee maker
Side rail
IMPORTANT!
When installing under an F&P Coffee maker
you must ensure the supplied anti-tip
bracket is installed, unless there is a
fixed shelf above the drawer acting as
an anti-tip obstacle.
Anti-tip bracket
Supplied anti-tip bracket
(screwed to the back wall)
IMPORTANT!
If installing under the F&P Coffee Maker, ensure there
is the 2” (50mm) gap at the back of the cabinet and the
7 7/8”
2
(200mm
2
) toekick cutout required for airflow.
Refer to the Coffee Maker Install instructions.
N
O
M
M